DOOR LOCK
Exploded View
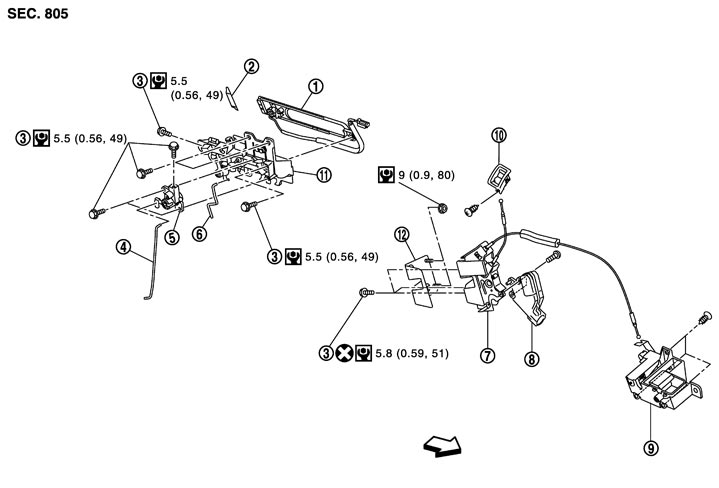
|
1. |
Outside handle escutcheon |
2. |
Outside handle cap |
3. |
TORX bolt |
|
4. |
Key cylinder rod (driver side) |
5. |
Key cylinder (driver side) |
6. |
Outside handle rod |
|
7. |
Door lock assembly (standard model) |
8. |
Door actuator assembly (standard model) |
9. |
Inside handle |
|
10. |
Door lock knob |
11. |
Outside handle assembly |
12. |
Door lock stiffener |
 : Vehicle front : Vehicle front |
|||||
|
Refer to Components for the symbols shown in the figure. |
|||||
Removal and Installation
 REMOVAL
- 1.Remove the door finisher. Refer to Removal and Installation.
- 2.Remove the inside handle cable from the inside handle. Remove the door lock knob cable from the door lock knob.
■ CAUTION ■
Never bend the cable end. - 3.Remove the door window. Refer to Removal and Installation (GT-R certified NISSAN dealer).
- 4.Disengage the joint of key cylinder rod and outside handle rod at the outside handle side.
- 5.Remove the door lock assembly TORX bolt by the arrows in the figure.
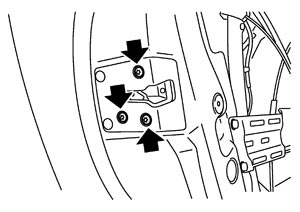
- 6.Disengage the door lock assembly connector, and then remove the door lock assembly.
INSTALLATIONNote the following, and install in the reverse order of removal.
■ CAUTION ■
- Apply anticorrosive agent onto the mounting surface.
- Check door lock cables are properly engaged with inside handle and outside handle.
- When installing key rod, rotate key rod holder until a click is felt.
- After installation, check door open/close, lock/unlock operation.