SIDE WINDOW GLASS
Exploded View
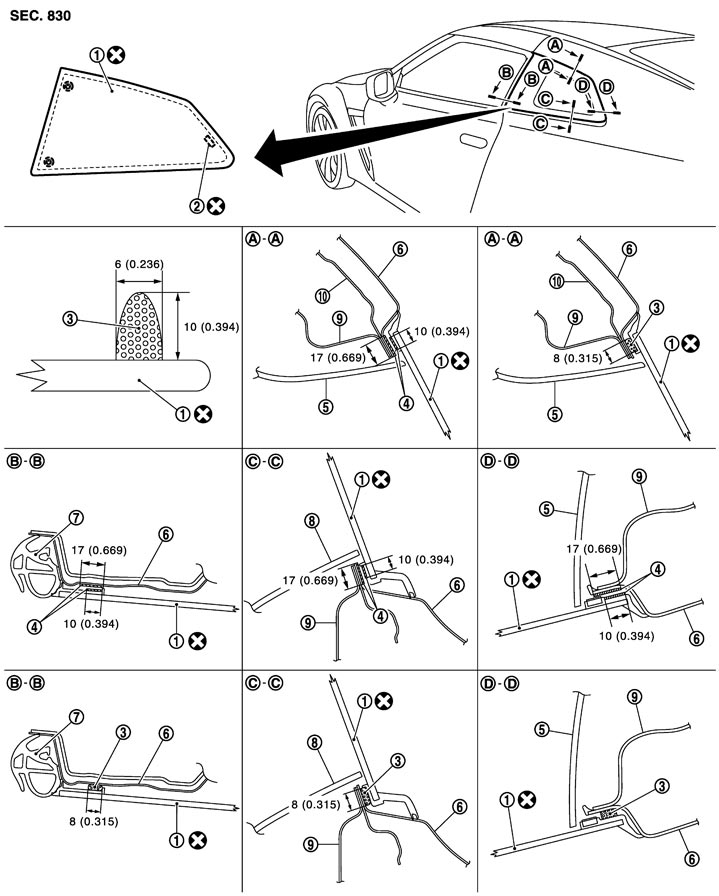
|
1. |
Side window glass |
2. |
Spacer |
3. |
Adhesive |
|
4. |
Primer |
5. |
Rear pillar finisher |
6. |
Rear fender |
|
7. |
Body side weather-strip |
8. |
Rear side finisher |
9. |
Rear pillar inner |
|
10. |
Rear pillar outer |
|
|
|
|

|
: Clip |
|
|
|
|
|
Unit: mm (in) |
|||||
Refer to Components for the symbols shown in the figure.
Removal and Installation
 REMOVAL
- 1.Remove the rear pillar finisher. Refer to Removal and Installation.
- 2.Apply protective tape on body panel around side window glass to protect painted surfaces from damage.
- 3.Cut the adhesive from passenger room side. Use a windshield cutter for straight section. For the area that the windshield cutter cannot be used, use piano wire or a cutter knife.
-
(1)With a windshield cutter
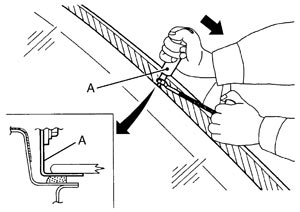
- 1)Apply soapy water around the bonded area on the body for smooth movement of the windshield cutter (A).
- 2)Insert windshield cutter into the bonded area. Cut adhesive by pulling the knife, keeping the tip parallel to body flange edge.
-
(2)With piano wire
- 1)Pass both sides of piano wire through each passenger room side from the area cut by the windshield cutter.
- 2)Tie both ends of the piano wire (B) to the wire grip (A), etc.
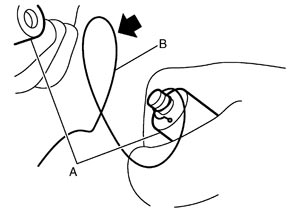
- 3)Lift up the molding using a plastic spatula, pass the piano wire through the inside of molding, and then cut the adhesive by pulling the wire grips alternately.
■ CAUTION ■
Never contact the piano wire with the coated panel surface. -
(3)With a cutter knife
- 1)Working from inside vehicle, insert cutter knife between side window glass and body panel. Guide cutter edge along molding to cut off adhesive.
■ CAUTION ■
Never contact painted surfaces with the cutter knife tip. - 4.Use piano wire to cut the side window glass mounting clip. Use rubber suction cups or suction lifter to remove the glass from the vehicle.
INSTALLATION- 1.Using a scraper, remove remaining adhesive on the body side down to approximately a depth that is 2 mm thick (a) so that entire contour becomes smooth.
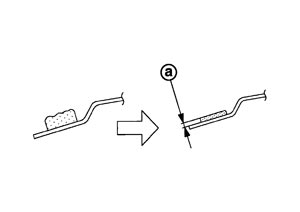
■ CAUTION ■
If the bonded area on the body is scratched, repair it with a two-liquid type urethane paint. Never use lacquer type paint. - 2.Clean bonded and surrounding area on glass with white gasoline or degreasing agent.
- 3.Apply primer for the glass along the entire circumference of the glass.
- Use the sealing kit for glass application and the special holder for cartridge or similar tools.
- Primer for painted surfaces
- Primer for glass
■ CAUTION ■
There are 2 types of primer. Never confuse the application methods. NOTE:
The essential function of primers is to strengthen adhesion between glass and painted surface. - 4.Apply primer for the painted surface to the body side bonding surface.
- If the body side bonding surface is repaired with a two-liquid type urethane paint, always apply the primer after drying the paint.
- If primer for painted surfaces adheres to a painted surface other than the bonding area, or if it overflows, quickly remove it with white gasoline or degreasing agent.
■ CAUTION ■
- 5.Apply adhesive along glass edge within the time period indicated in the service manual after applying primer with the procedure shown in the Exploded View.
NOTE:
Open adhesive by cutting off the nozzle tip and set it in a sealant gun.- 6.After setting rubber suction cups or suction lifter to glass, align matching marks on body and glass. Install glass to the body.
- 7.Press the entire surface of the glass lightly to fit it completely.
- 8.Correct any adhesive overflow or shortage using a spatula to make the surface smooth.
■ CAUTION ■
After installing glass, keep the front door glass open until the adhesive has completely cured. Avoid driving the vehicle. - 9.Remove the protective tape.
- 10.Install the removed parts.