REAR BUMPER
Exploded View
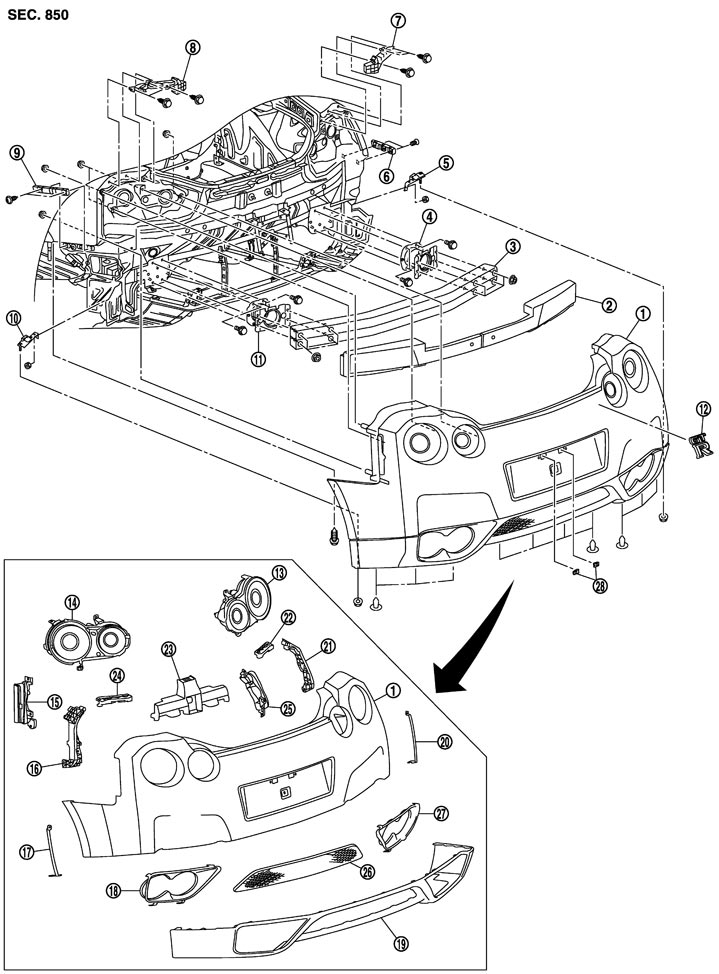
|
1. |
Bumper fascia |
2. |
Energy absorber |
3. |
Bumper reinforcement |
|
4. |
Bumper stay RH |
5. |
Bumper side bracket B RH |
6. |
Bumper side bracket A RH |
|
7. |
Rear bumper upper frame RH |
8. |
Rear bumper upper frame LH |
9. |
Bumper side bracket A LH |
|
10. |
Bumper side bracket B LH |
11. |
Bumper stay LH |
12. |
Rear emblem |
|
13. |
Rear combination lamp RH |
14. |
Rear combination lamp LH |
15. |
Side marker lens LH |
|
16. |
Rear bumper side frame B LH |
17. |
Bumper side bracket C LH |
18. |
Rear bumper guard LH |
|
19. |
Bumper fascia (lower) |
20. |
Bumper side bracket C RH |
21. |
Rear bumper side frame B RH |
|
22. |
Rear bumper side frame A RH |
23. |
License lamp bracket |
24. |
Rear bumper side frame A LH |
|
25. |
Side marker lens RH |
26. |
Bumper finisher |
27. |
Rear bumper guard RH |
|
28. |
J-nut |
|
|
|
|
|
Refer to Components for symbols in the figure. |
|||||
Removal and Installation
■ CAUTION ■
- Be careful of being burned because the rear bumper guard is very hot after driving.
- The bumper fascia is made of resin. Never apply strong force to it, and be careful to prevent contact with oil.
 REMOVAL
- 1.Open trunk lid.
- 2.Remove the trunk floor carpet, trunk rear finisher and rear wheel house finishers (LH/RH). Refer to Removal and Installation.
- 3.Remove the mounting nuts (A) of rear combination lamps (1) (LH/RH).
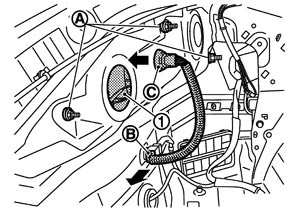
- 4.Disconnect the harness connector (B) and remove the harness grommet (C) from the rear combination lamps (LH/RH).
- 5.Remove the mounting nuts (A) of the side marker lens (1) (LH/RH).
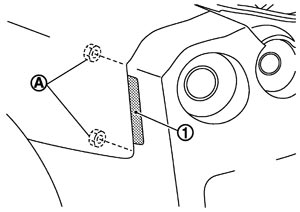
- 6.Remove the clips (A) from the lower surface of bumper fascia.
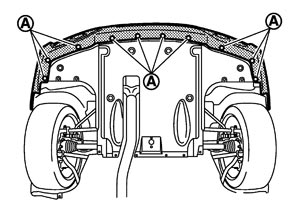
- 7.Remove the clips (A) of the rear wheel house protector (1) (LH/RH).
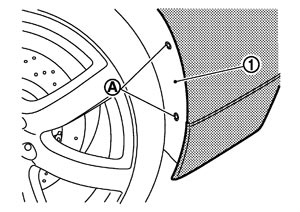
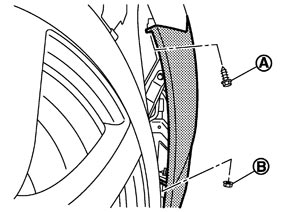
- 8.Pull off the rear wheel house protector to secure work space, and then remove the screws (A) and the nuts (B) connecting the bumper fascia and the rear fender (LH/RH).
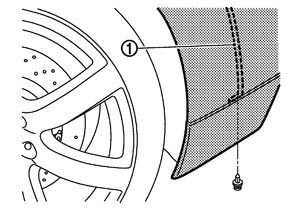
- 9.Remove the clips connecting the bumper side bracket C (1) and the bumper fascia (LH/RH).
- 10.Pull the bumper fascia in the direction and in the order 1 - 3 as shown in the figure while lifting up both ends, and then disengage it from the bumper side bracket.
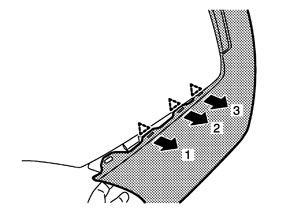
■ CAUTION ■
Never damage the tabs integrated with the bumper fascia and bumper side bracket during removal.  | : Pawl |
- 11.Pull the bumper fascia toward the rear of the vehicle, and then disengage it from the rear bumper upper frame (LH/RH).
- 12.Pull the bumper fascia toward the rear of the vehicle, and then disconnect the license lamp connector (A).
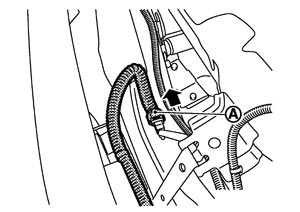
- 13.Remove the bumper fascia.
■ CAUTION ■
When removing bumper fascia, 2 workers are required so as to prevent it from dropping. - 14.Remove the following parts after removing the bumper fascia.
- Rear combination lamp (LH/RH)
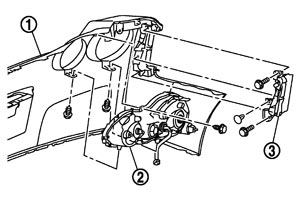
Remove the mounting screws, and then remove the rear combination lamp (2) from the bumper fascia (1). - Side marker lens (LH/RH)Remove the mounting bolts and clip, and then remove the side marker lens (3) from the bumper fascia.
- Bumper fascia (lower)
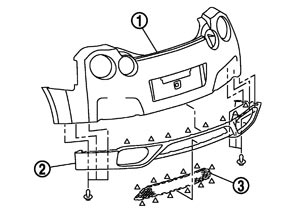
Disengage the clips and pawls, and then remove the bumper fascia (lower) (2) from the bumper fascia (1). - Bumper finisherDisengage the pawls, and then remove the bumper finisher (3) from the bumper fascia (lower).
: Pawl - License lamp bracket
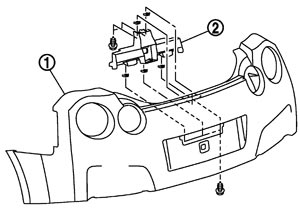
Remove the mounting screws, and then remove the license lamp bracket (2) from the bumper fascia (1). - Rear bumper side frame (LH/RH)
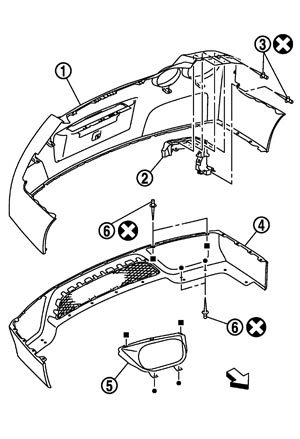
Remove the rivets (3), and then remove the rear bumper side frame (2) from the bumper fascia (1). - Rear bumper guard (LH/RH)Remove the rivets (6), and then remove the rear bumper guard (5) from the bumper fascia (lower) (4). NOTE:Removal and installation of rivet
- Grind the head of rivet (1) with a drill (A) [bit of φ4.0 – 4.5 mm (φ0.157 – 0.177 in)], and then remove the bumper side bracket.
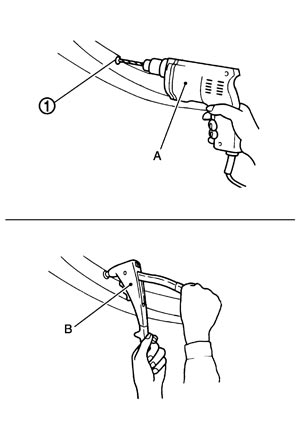
- Securely crimp the bumper side bracket with the bumper fascia using a hand riveter (B).
Rear bumper side frame LH/RH Crimping thickness : 4.0 – 8.0 mm (0.157 – 0.315 in) Prepared hole diameter : φ 3.2 mm (0.126 in) Used rivet head diameter : φ 8.0 mm (0.315 in) Rear bumper guard LH/RH Crimping thickness : 1.2 – 6.4 mm (0.047 – 0.252 in) Prepared hole diameter : φ 4.1 –φ4.4 mm (0.161 – 0.173 in) Used rivet head diameter : φ 8.0 mm (0.315 in) - Grind the head of rivet (1) with a drill (A) [bit of φ4.0 – 4.5 mm (φ0.157 – 0.177 in)], and then remove the bumper side bracket.
- 15.Remove the energy absorber.
- 16.Remove the mount rubber that is hanged from the bracket attached to the bumper reinforcement.
- 17.Remove the harness clamp of the license lamp harness from the bumper reinforcement.
- 18.Remove the mounting nuts, and then remove the bumper reinforcement.
INSTALLATIONInstall in the reverse order of removal.
NOTE:
Clearance between rear bumper and each unit. 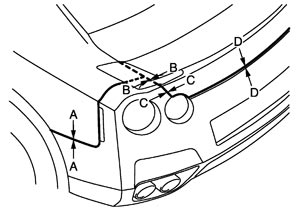
| Portion | Clearance | Surface height difference | |
| Rear bumper and rear fender | A – A | 0.0 – 0.8 mm (0.000 – 0.031 in) | −1.8 – 0.2 mm (−0.071 – 0.008 in) |
| Rear bumper and trunk lid | B – B | 2.0 – 6.0 mm (0.079 – 0.236 in) | −2.0 – 1.0 mm (−0.079 – 0.039 in) |
| Rear bumper and trunk lid | C – C | 2.0 – 6.0 mm (0.079 – 0.236 in) | −1.9 – 1.9 mm (−0.075 – 0.075 in) |
| Rear bumper and trunk lid | D – D | 4.0 – 8.0 mm (0.157 – 0.315 in) | — |