COWL TOP
Exploded View
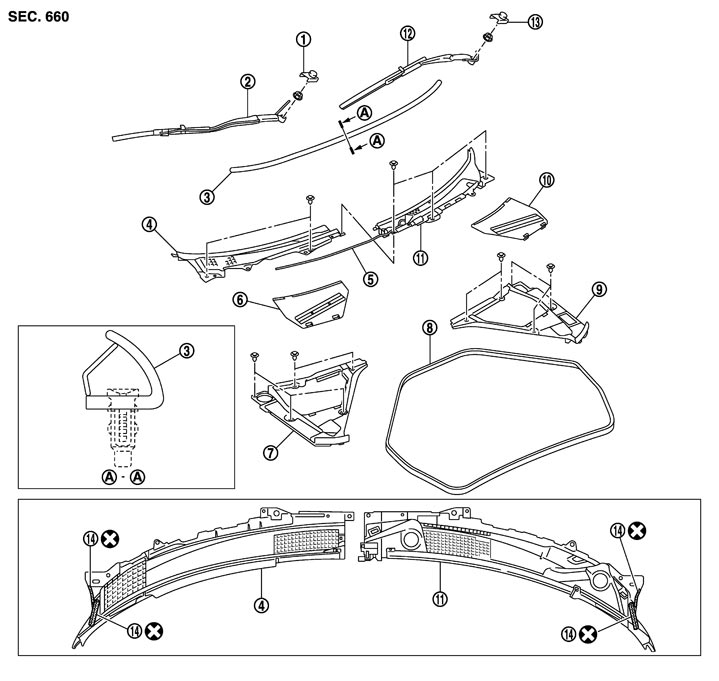
|
1. |
Wiper arm & blade RH |
2. |
Wiper arm & blade RH |
3. |
Cowl top cover seal |
|
4. |
Cowl top cover RH |
5. |
Washer tube |
6. |
Battery cover |
|
7. |
Hood ledge cover RH |
8. |
Cowl top cover seal |
9. |
Hood ledge cover LH |
|
10. |
Brake master cylinder cover |
11. |
Cowl top cover LH |
12. |
Wiper arm & blade LH |
|
13. |
Wiper arm cover LH |
14. |
EPT sealer |
|
|
|
Refer to Components for symbols in the figure. |
|||||
Removal and Installation
 REMOVAL
- 1.Open hood.
- 2.Remove the front wiper arms & blades (LH/RH). Refer to Removal and Installation.
- 3.Disengage the clips with the remover tool (A), and then remove the cowl top seal (1).
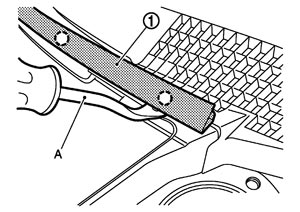
 | : Clip |
- 4.Remove the battery cover and the brake master cylinder cover.
- 5.Remove the cowl top cover seal.
- 6.Remove the clips, and then remove the hood ledge cover (LH/RH).
- 7.Remove the clips from the cowl top cover (LH/RH).
- 8.Lift up the cowl top cover RH (1), and then pull it toward the front of the vehicle.
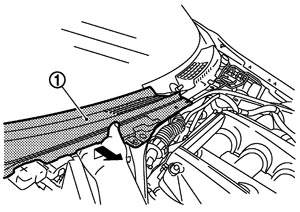
- 9.Disengage the joint of washer tube on rear side of cowl top cover RH, and then remove the cowl top cover RH.
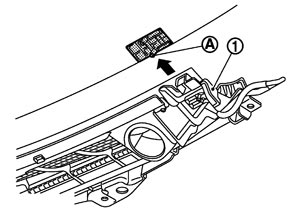
- 10.Push down the lever (A) (to disengage from the pin of windshield), and then pull out the cowl top cover LH (1) toward the front of the vehicle.
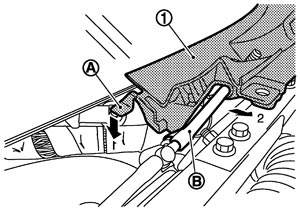
- 11.Disengage the joint of the washer tube on the rear side of cowl top cover LH and the joint of (B), and then remove the cowl top cover LH.
- 12.Remove the following parts after removing the cowl top cover.
- Washer tube: Refer to Removal and Installation.
- EPT sealer
INSTALLATIONNote the following, and install in the reverse order of removal.
■ CAUTION ■
- Clean the joint between the cowl top cover and the windshield, and then install them.
- Replace the EPT sealer on the back surface with new EPT sealer when reusing the cowl top cover.
- Remove the EPT sealer remaining on the cowl top cover using a double-faced adhesive tape remover.
- To maintain adhesion, never wash the vehicle within 24 hours after installation.
- Align concave of cowl top cover LH (1) to windshield glass pin (A) as shown in the figure when installing.
- Perform the stop position adjustment at the installation of the front wiper arms. Refer to Adjustment.