EXHAUST SYSTEM
Exploded View
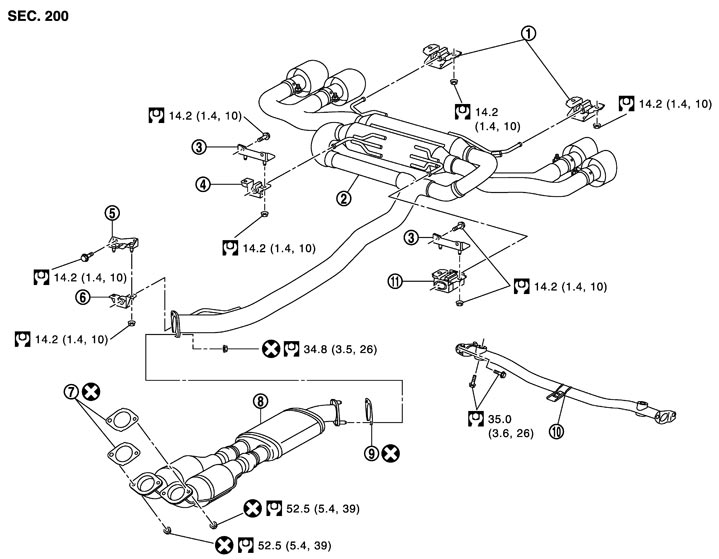
|
1. |
Mounting bracket (No. 4) |
2. |
Main muffler assembly |
3. |
Bracket |
|
4. |
Mounting bracket (No. 3) (RH) |
5. |
Bracket |
6. |
Mounting bracket (No. 2) |
|
7. |
Gasket |
8. |
Sub muffler |
9. |
Gasket |
|
10. |
Front cross bar assembly |
11. |
Mounting bracket (No. 3) (LH) |
|
|
|
Refer to Components for symbols in the figure. |
|||||
Removal and Installation
■ CAUTION ■
- Be sure to use genuine exhaust system parts or equivalents which are specially designed for heat resistance, corrosion resistance, and shape.
- Perform the operation with the exhaust system fully cooled down because the system is hot just after engine stops.
- Be careful not to cut hand on the heat insulator edge.
- Never disassemble main muffler assembly.
 REMOVAL
- 1.Remove rear bumper. Refer to Exploded View.
- 2.Remove front cross bar assembly.
- 3.Remove the nuts fixing main muffler assembly and sub muffler.
- 4.Remove the nuts fixing sub muffler and catalyst.
- 5.Remove sub muffler.
- 6.Remove the nuts from each mounting bracket.
- 7.Remove main muffler assembly.
■ CAUTION ■
Be careful not to bump main muffler assembly against its surrounding parts. INSTALLATION■ CAUTION ■
- Always replace exhaust tube gaskets with new ones when reassembling.
- If heat insulator is badly deformed, repair or replace it. If deposits such as mud pile up on the heat insulator, remove them.
- Remove deposits from the sealing surface of each connection. Connect them securely to avoid gases leakage.
- Temporarily tighten mounting bolts and nuts. Check each part for unusual interference, and then tighten them to the specified torque.
- When installing each mounting bracket, avoid twisting or unusual extension in up/down and right/left directions.
- 1.Install mounting brackets to main muffler assembly, checking the front mark of mounting brackets.
- 2.Install main muffler assembly.
■ CAUTION ■
Be careful not to bump main muffler assembly against its surrounding parts (rear suspension member etc.).- 3.Temporarily tighten the nuts of each mounting brackets.
- 4.Install sub muffler, and then temporarily tighten the nuts fixing main muffler assembly and sub muffler.
- 5.Temporarily tighten the nuts fixing sub muffler and catalyst.
- 6.Tighten the nuts mounting bracket (No. 4) to the specified torque.
- 7.Tighten the nuts mounting bracket (No. 3) to the specified torque.
- 8.Tighten the nuts mounting bracket (No. 2) to the specified torque.
- 9.Tighten the nuts fixing main muffler assembly and sub muffler to the specified torque.
- 10.Tighten the nuts fixing sub muffler and catalyst to the specified torque.
- 11.Install all the remaining parts in the reverse order of removal.
Inspection
INSPECTION AFTER REMOVAL- Check that the muffler finisher installation position, referring to the figure.
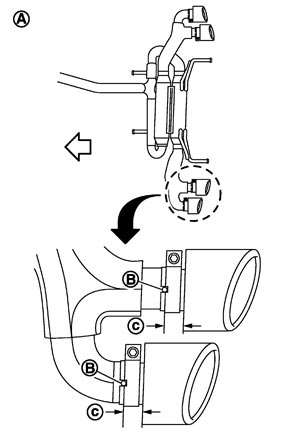
A : Under view B : Protrusion (main muffler assembly side) c : 28 mm (1.10 in) 
: Vehicle front ■ CAUTION ■Be sure to correct the installation position if it is different from the position shown in the figure.
INSPECTION AFTER INSTALLATION- Check that clearance between muffler finisher and rear bumper is even.
- If the clearance is not even, reinstall main muffler assembly.■ CAUTION ■When reinstalling main muffler assembly, check the muffler finisher installation position. Refer to “INSPECTION AFTER REMOVAL”.
- With engine running, check exhaust tube joints for gas leakage and unusual noise.
- Check to ensure that mounting brackets are installed properly and free from undue stress. Improper installation may result in excessive noise and vibration.