RADIATOR
Exploded View
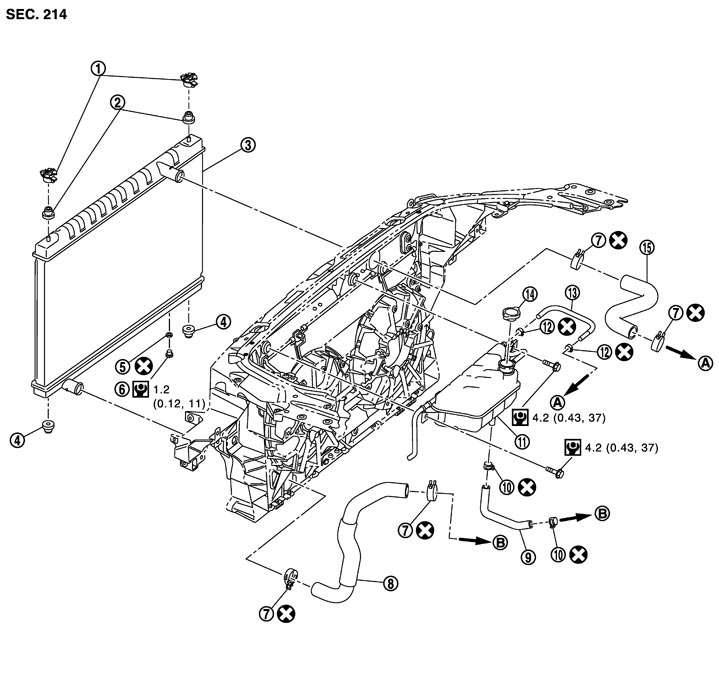
|
1. |
Radiator upper mount bracket |
2. |
Mounting rubber (upper) |
3. |
Radiator |
|
4. |
Mounting rubber (lower) |
5. |
O-ring |
6. |
Drain plug |
|
7. |
Clamp |
8. |
Radiator hose (lower) |
9. |
Water hose |
|
10. |
Clamp |
11. |
Reservoir tank |
12. |
Clamp |
|
13. |
Water hose |
14. |
Reservoir tank cap |
15. |
Radiator hose (upper) |
|
A. |
To water outlet (front) |
B. |
To water inlet and thermostat assembly |
|
|
|
Refer to Components for symbols in the figure. |
|||||
Removal and Installation
 REMOVAL
■ WARNING ■
Never remove radiator cap and reservoir tank cap when engine is hot. Serious burns could occur from high-pressure engine coolant escaping from radiator. Wrap a thick cloth around the cap. Slowly turn it a quarter of a turn to release built-up pressure. Carefully remove cap by turning it all the way.
- 1.Drain engine coolant from radiator. Refer to Draining.
- Perform this step when the engine is cold.
- Never spill engine coolant on drive belt.
■ CAUTION ■
- 2.Remove air cleaner case (RH and LH). Refer to Exploded View.
- 3.Remove air intake duct assembly 1 with charge air cooler. Refer to Exploded View (GT-R certified NISSAN dealer).
- 4.Remove condenser. Refer to Exploded View (GT-R certified NISSAN dealer).
- 5.Remove reservoir tank if necessary.
- 6.Remove radiator hoses (upper and lower) and reservoir tank hose.
- 7.Support the hood with a proper tool to prevent the hood from falling.
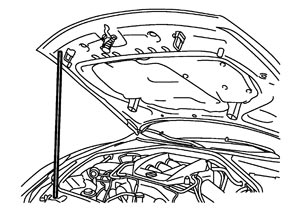
■ CAUTION ■
Check that the tool surely supports the hood so as not to accidentally fall down during the work.- 8.Remove hood support rod and hood lock bracket assembly. Refer to Exploded View and Exploded View (GT-R certified NISSAN dealer).
- 9.Rotate two radiator upper mount brackets 90 degrees in direction as shown in the figure, and remove them.
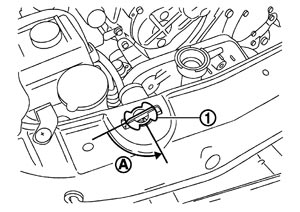
| 1 | : Radiator upper mount bracket |
| A | : Turn 90° counterclockwise |
- 10.Remove radiator as follows:
■ CAUTION ■
Be careful not to damage radiator core.-
(1)Lift up and pull the radiator (1) forward, and then remove the mounting rubber (lower) (3) from the radiator core support (2).
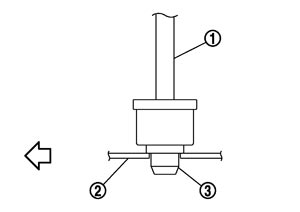
 | : Vehicle front |
-
(2)Remove radiator (1) from front of radiator core support (2).
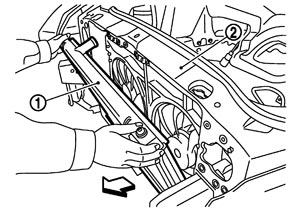
| : Vehicle front |
INSTALLATIONInstall in the reverse order of removal.
■ CAUTION ■
Replace water hose clamp if it is removed.Inspection
INSPECTION AFTER INSTALLATION- Check for leakage of engine coolant using the radiator cap tester adapter (commercial service tool) and the radiator cap tester (commercial service tool). Refer to Inspection.
- Start and warm up the engine. Visually check that there is no leakage of engine coolant.