OIL FILTER BRACKET
Exploded View
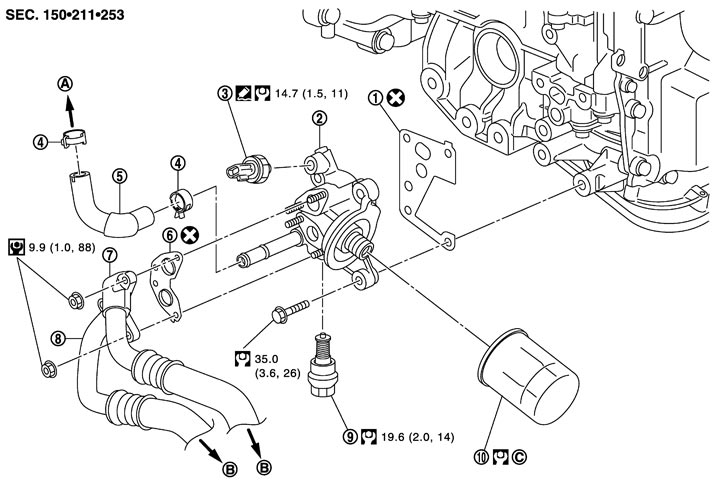
|
1. |
Gasket |
2. |
Oil filter bracket |
3. |
Oil pressure switch |
|
4. |
Clamp |
5. |
Oil return hose |
6. |
Gasket |
|
7. |
Oil cooler feed hose |
8. |
Oil cooler return hose |
9. |
Oil thermostat |
|
10. |
Oil filter |
|
|
|
|
|
A. |
To exhaust manifold turbocharger assembly (bank 1) |
B. |
To oil cooler |
C. |
Refer to Removal and Installation |
|
Refer to Components for symbols in the figure. |
|||||
Removal and Installation
 REMOVAL
■ WARNING ■
Be careful not to get burned, as engine oil may be hot.
- 1.Disconnect battery cable from the negative terminal. Refer to Exploded View.
- 2.Remove drive belt. Refer to Exploded View.
- 3.Remove engine undercover with power tool.
- 4.Remove alternator and alternator bracket. Refer to Exploded View (GT-R certified NISSAN dealer).
- 5.Disconnect oil pressure switch harness connector.
- 6.Disconnect oil cooler feed hose, oil cooler return hose, and oil return hose at oil filter bracket side.
■ CAUTION ■
Never spill engine oil to rubber parts such as engine mounting insulator.- 7.Using the oil filter wrench [SST: KV10115801 (J38956)], remove oil filter. Refer to Removal and Installation.
- 8.Remove oil filter bracket from oil pan (upper).
■ CAUTION ■
Never spill engine oil to rubber parts such as engine mounting insulator.- 9.Remove oil pressure switch and oil thermostat from oil filter bracket if necessary.
INSTALLATIONNote the following, and install in the reverse order of removal.
- Install oil pressure switch as follows:
- Remove old liquid gasket adhering to oil filter bracket.
- Apply liquid gasket and install oil pressure switch.Use Genuine RTV Silicone Sealant or equivalent. Refer to Recommended Chemical Products and Sealants.
Inspection
INSPECTION AFTER INSTALLATION- 1.Check the engine oil level and add engine oil. Refer to Inspection.
- 2.Start the engine, and check there is no leakage of engine oil.
- 3.Stop the engine and wait for 10 minutes.
- 4.Check the engine oil level again. Refer to Inspection.