HIGH-PRESSURE PIPE 1
COOLER PIPE AND HOSE
 REMOVAL
- 1.Use a refrigerant collecting equipment (for HFC‐134a) to discharge the refrigerant.
- 2.Remove air cleaner case (bank 2) and air duct (bank 2). Refer to Exploded View.
- 3.Remove radiator cover. Refer to Exploded View.
- 4.Remove clip (A) and mounting bolt (B), and then remove air guide (1).
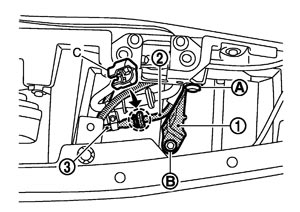
- 5.Disconnect one-touch joint between high‐pressure pipe 1 (2) and condenser (3) with disconnector (C) (SST: 9253089908).
■ CAUTION ■
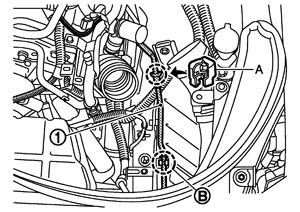
Cap or wrap the joint of the cooler piping with suitable material such as vinyl tape to avoid the entry of air.- 6.Disconnect one-touch joint between high‐pressure pipe 1 (1) and high‐pressure pipe 2 with disconnector (A) (SST: 9253089908).
■ CAUTION ■
Cap or wrap the joint of the cooler piping with suitable material such as vinyl tape to avoid the entry of air.- 7.Remove high‐pressure pipe 1 from vehicle clip (B), and then remove high‐pressure pipe 1.
INSTALLATIONInstallation is basically the reverse order of removal.
■ CAUTION ■
- Replace O‐rings with new ones. Then apply compressor oil to them when installing.
- Female‐side piping connection is thin and easy to deform. Slowly insert the male‐side piping straight in axial direction.
- Insert piping securely until a click is heard.
- After piping connection is completed, pull male‐side piping by hand to make sure that connection does not come loose.
- Check for leakages when recharging refrigerant.