HEAT EXCHANGER PIPING
HEAT EXCHANGER SYSTEM · TRANSMISSION: GR6Z30A
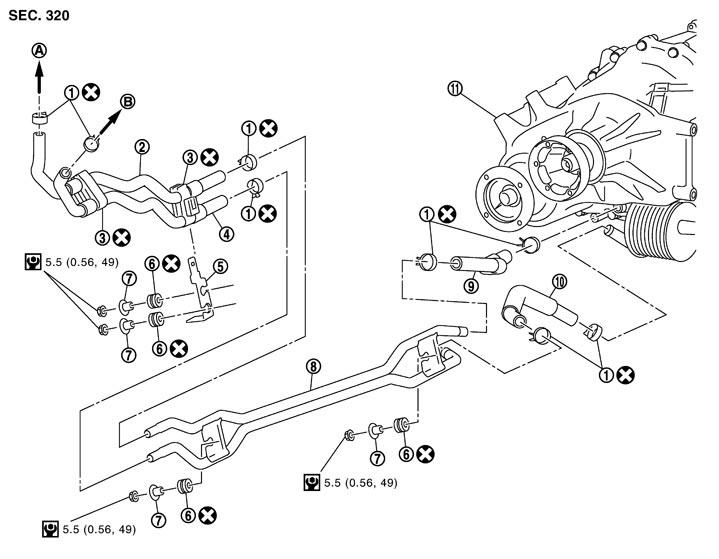
Exploded View
|
1. |
Clamp |
2. |
Water hose A |
3. |
Clips |
|
4. |
Water hose B |
5. |
Bracket |
6. |
Insulator |
|
7. |
Collar |
8. |
Water tube |
9. |
Water hose C |
|
10. |
Water hose D |
11. |
Transmission assembly |
|
|
|
A. |
To water outlet (rear) |
B. |
To heater pipe |
|
|
|
Refer to Components in GI section for the symbols shown in the figure. |
|||||
Removal and Installation
 REMOVAL
■ CAUTION ■
Perform the operation when the engine is cold.
- 1.Remove the front diffuser. Refer to Exploded View.
- 2.Remove the sub-muffler. Refer to Exploded View.
- 3.Remove the heat insulator.
- 4.Remove the water tube, water hose C and water hose D from the vehicle.
- 5.Remove the water outlet (rear) and heater pipe. Refer to Exploded View (GT-R certified NISSAN dealer).
- 6.Remove water hose A and water hose B from the water outlet (rear) and heater pipe.
- 7.Remove the clips from water hose A and water hose B.
INSTALLATIONNote the following, and install in the reverse order of removal.
■ CAUTION ■
- Never reuse clamps.
- The clip is not reusable. Never reuse it.
- Never reuse insulators.
- Install the clips to water hose A (1) and water hose B (2) with the paint mark (A) of hose in the direction shown in the figure.
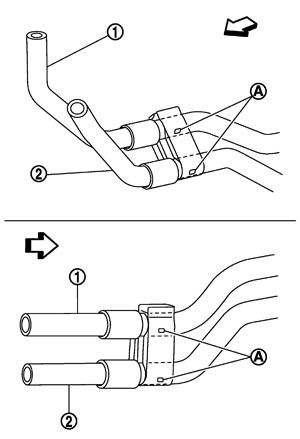

: Front of vehicle - Refer to the following table when installing the water hose.
Water hose Hose end
(Paint shape / Color)Direction of hose paint mark
(Paint shape / Color)Hose insertion amount Direction of clamp tab Water hose A Water outlet (rear)
(— / —)Rear of vehicle
( / Green)
Until it contacts a tube end Rear of vehicle Water tube
(□ / Green)Right of vehicle
(□ / Green)Until it reaches the point where the winding radius stops Right of vehicle Water hose B Heater pipe
(— / —)Upside of vehicle
( / Yellow)Until it contacts a tube end Upside of vehicle Water tube
(□ / Yellow)Right of vehicle
(□ / Yellow)Until it reaches the point where the winding radius stops Downside of vehicle Water hose C Water tube
(□ / Green)Right of vehicle
( / Pink)Until the tube insertion indication stops Right of vehicle Heat exchanger
(— / Green)Right of vehicle
(□ / Pink)Water hose D Water tube
(□ / Yellow)Right of vehicle
( / Yellow)Right of vehicle Heat exchanger
(— / Blue)Right of vehicle
(□ / Yellow) - Fill with the coolant after installation. Refer to Refilling.
Inspection
INSPECTION AFTER INSTALLATIONCheck the following items.
- Coolant leakage from the part removed and installed.
- Coolant amount. Refer to Inspection.