DOOR HINGE
DOOR
Exploded View
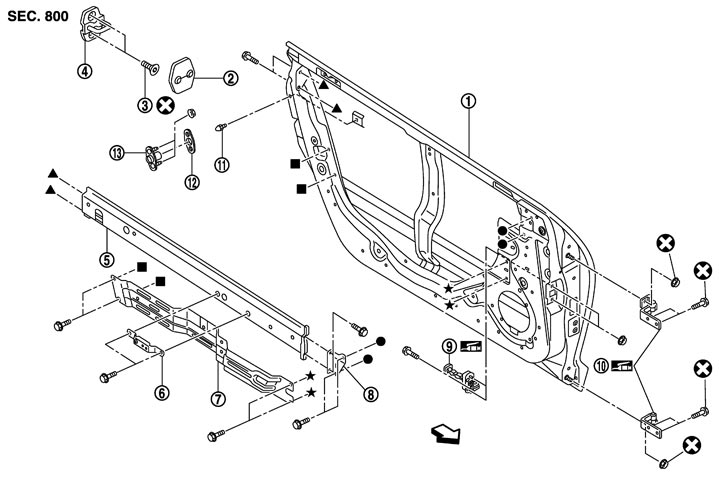
|
1. |
Door panel |
2. |
Door striker cover |
3. |
TORX bolt |
|
4. |
Door striker |
5. |
Door inner west reinforcement |
6. |
Door grip bracket |
|
7. |
Door module assembly |
8. |
Bracket |
9. |
Check link |
|
10. |
Door hinge |
11. |
Dovetail male |
12. |
Dovetail female cover |
|
13. |
Dovetail female |
|
|
|
|
 : Vehicle front : Vehicle front |
|||||
|
Refer to Components for the symbols shown in the figure. |
|||||
Removal and Installation
■ CAUTION ■
- Operate with two workers, because of its heavy weight.
- Support door with a jack and use protective tape or shop cloth to protect from damage during removal and installation.
 REMOVAL
- 1.Remove the door assembly. Refer to Removal and Installation.
- 2.Remove the front fender. Refer to Removal and Installation.
- 3.Remove the door hinge mounting bolts (body side), and then remove the door hinge.
INSTALLATIONInstall in the reverse order of removal.
■ CAUTION ■
- Never reuse bolts and nuts connecting the door hinge with the door striker. Use the specified bolts and nuts when installing.
- Apply anticorrosive agent onto the mounting surface.
- After installation, perform the fitting adjustment. Refer to Adjustment.
- After installation, apply touch-up paint (the body color) onto the head of door hinge mounting bolts and nuts.