TRUNK LID HINGE
TRUNK LID
Exploded View
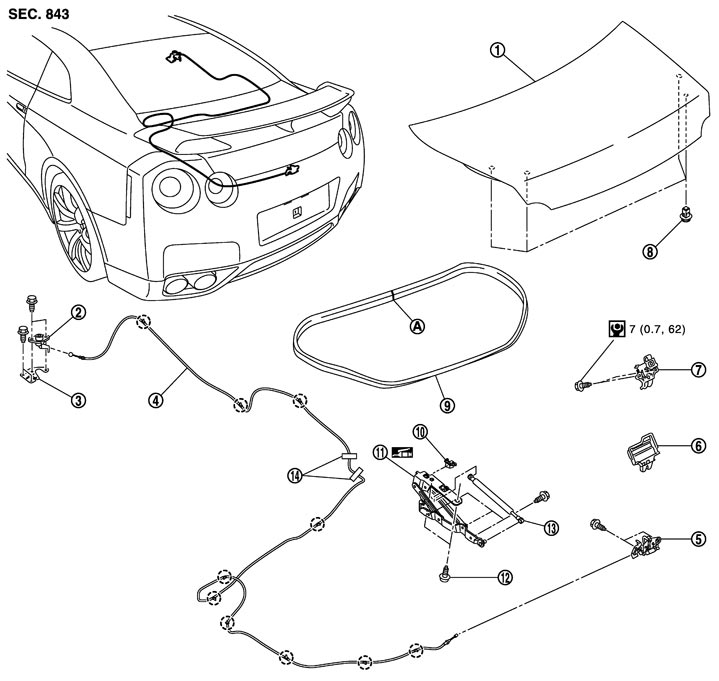
|
1. |
Trunk lid assembly |
2. |
Trunk lid key cylinder |
3. |
Trunk lid cylinder bracket |
|
4. |
Trunk lid lock control cable |
5. |
Trunk lid striker |
6. |
Trunk lid lock cover |
|
7. |
Trunk lid lock assembly |
8. |
Bumper rubber |
9. |
Trunk lid weather-strip |
|
10. |
Trunk lid hinge stopper |
11. |
Trunk lid hinge |
12. |
TORX bolt |
|
13. |
Trunk lid stay |
14. |
Protector harness |
|
|
|
A. |
Vehicle center mark |
|
|||

|
: Clip |
|
|
|
|
|
Refer to Components for the symbols shown in the figure. |
|||||
Removal and Installation
 REMOVAL
- 1.Remove the trunk lid assembly. Refer to Removal and Installation.
- 2.Remove the trunk lid stay. Refer to Removal and Installation.
- 3.Remove the trunk lid hinge mounting bolts (body side), and then remove the trunk lid hinge.
INSTALLATIONInstall in the reverse order of removal.
■ CAUTION ■
- Apply anticorrosive agent onto the mounting surface.
- Check trunk lid hinge rotating part for poor lubrication. If necessary, apply body grease.
- After installation, check trunk lid open/close, lock/unlock operation.
- After installation, perform the fitting adjustment. Refer to Adjustment.
- After installation, apply touch-up paint (the body color) onto the head of trunk lid hinge mounting bolts and nuts.