TRUNK LID LOCK CONTROL CABLE
TRUNK LID LOCK
Exploded View
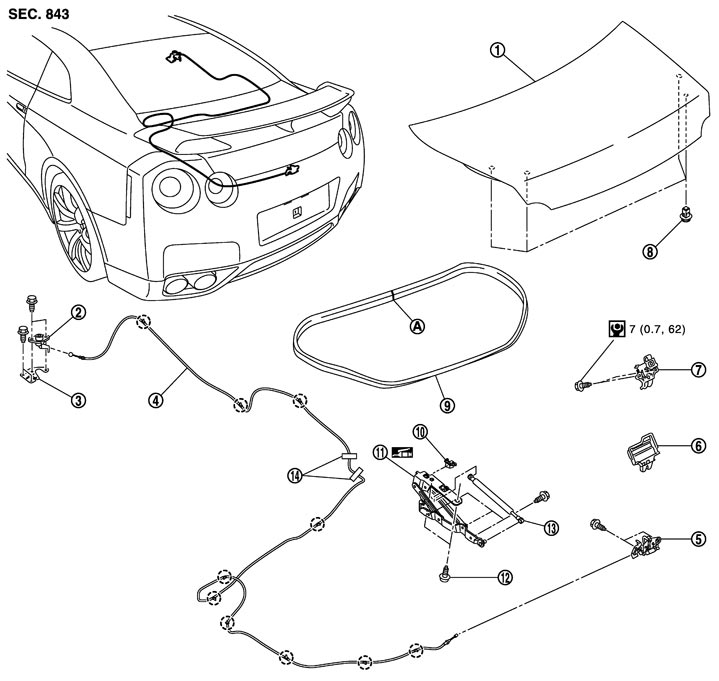
|
1. |
Trunk lid assembly |
2. |
Trunk lid key cylinder |
3. |
Trunk lid cylinder bracket |
|
4. |
Trunk lid lock control cable |
5. |
Trunk lid striker |
6. |
Trunk lid lock cover |
|
7. |
Trunk lid lock assembly |
8. |
Bumper rubber |
9. |
Trunk lid weather-strip |
|
10. |
Trunk lid hinge stopper |
11. |
Trunk lid hinge |
12. |
TORX bolt |
|
13. |
Trunk lid stay |
14. |
Protector harness |
|
|
|
A. |
Vehicle center mark |
|
|||

|
: Clip |
|
|
|
|
|
Refer to Components for the symbols shown in the figure. |
|||||
Removal and Installation
 REMOVAL
- 1.Remove dash side lower finisher (RH) and kicking plate inner (RH). Refer to Exploded View.
- 2.Remove front seat (passenger side). Refer to Removal and Installation.
- 3.Remove front seat belt (passenger side) outer anchor mounting anchor belt. Refer to Exploded View.
- 4.Turn over the floor trim of passenger seat side. Refer to Removal and Installation.
- 5.Remove the tool-box.
- 6.Remove the mounting bolts, and then remove the trunk lid key cylinder.
- 7.Disengage the joint of trunk lid lock control cable from the trunk lid key cylinder.
- 8.Remove the rear seat cushion (LH/RH) and the rear seatback (LH/RH). Refer to Removal and Installation.
- 9.Remove rear seat center finisher. Refer to Exploded View.
- 10.Remove the rear side finisher (RH). Refer to Exploded View.
- 11.Disengage the clip connecting the trunk lid lock control cable of passenger room side with the vehicle body.
- 12.Remove the trunk front finisher, trunk rear finisher, trunk side finisher back (LH), trunk side finisher upper (LH), and trunk side finisher lower (LH). Refer to Removal and Installation.
- 13.Disengage the clip connecting the trunk lid lock control cable of trunk room side with the vehicle body.
- 14.Remove the trunk lid striker. Refer to Removal and Installation.
- 15.Disengage the joint of trunk lid lock control cable from the trunk lid striker.
- 16.Pull out the trunk lid control cable toward passenger room side or trunk room side to remove.
INSTALLATIONInstall in the reverse order of removal.
■ CAUTION ■
- After installation, check trunk lid open/close, lock/unlock operation.
- After installation, perform the fitting adjustment. Refer to Adjustment.