DIAGNOSIS SYSTEM (AIRBAG)
Diagnosis Description
■ CAUTION ■
- Never use electrical test equipment on any circuit related to the SRS unless instructed in this Service Manual. SRS wiring harnesses can be identified by yellow and/or orange harnesses or harness connectors.
- Never repair, splice or modify the SRS wiring harness. If the harness is damaged, replace it with a new one.
- Keep ground portion clean.
 DIAGNOSIS FUNCTION
- The SRS self-diagnosis results can be read by using air bag warning lamp and/or CONSULT-III.
- The user mode is exclusively prepared for the customer (driver). This mode warns the driver of a system malfunction through the operation of the air bag warning lamp.
- The diagnosis mode allows the technician to locate and inspect the malfunctioning part.
- The mode applications for the air bag warning lamp and CONSULT-III are as per the following.
User mode Diagnosis mode Display type Air bag warning lamp X X ON-OFF operation CONSULT-III – X Monitoring ×: Application, —: Not application
HOW TO PERFORM TROUBLE DIAGNOSIS FOR QUICK AND ACCURATE REPAIRA good understanding of the malfunction conditions can make troubleshooting faster and more accurate.
In general, each customer feels differently about a malfunction. It is important to fully understand the symptoms or conditions for a customer complaint.
 Information from Customer.
- WHAT..... Vehicle model.
- WHEN..... Date, Frequencies.
- WHERE..... Road conditions.
- HOW..... Operating conditions, Symptoms.
Preliminary Check.Check that the following parts are in good order.
- Battery (Refer to How to Handle Battery).
- Fuse (Refer to Fuse).
- System component-to-harness connections.
Air Bag Warning Lamp Diagnosis
SELF-DIAGNOSIS FUNCTION- The reading of these results is accomplished by “User mode” and “Diagnosis mode”.
- After a malfunction is repaired, turn ignition switch ON. Diagnosis mode returns to the user mode. At that time, the self-diagnosis result is cleared.
HOW TO CHANGE SELF-DIAGNOSIS MODE WITHOUT CONSULT-III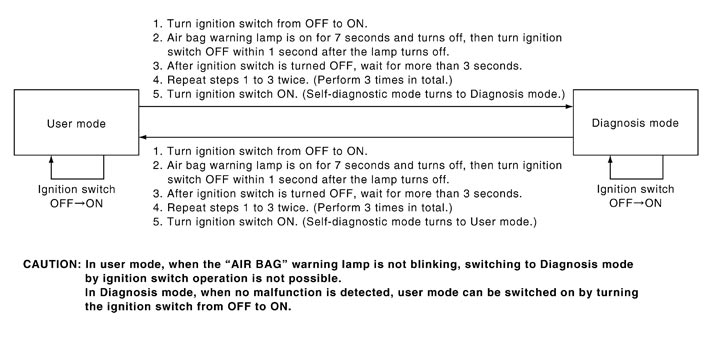 DIAGNOSTIC PROCEDURE (USER MODE) Checking air bag operation according to air bag warning lamp-User mode
- 1.Turn the ignition switch from OFF to ON, and check that the air bag warning lamp blinks.
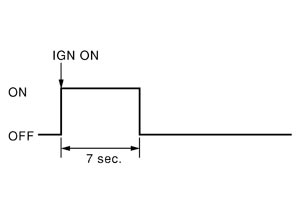
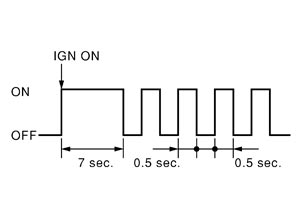
- 2.Compare the air bag warning lamp blinking pattern with the examples.
Air bag warning lamp examples (User mode)
|
Air bag warning lamp operation -User mode |
SRS condition |
Reference item |
|
|
— |
|
|
Go to Diagnosis Description |
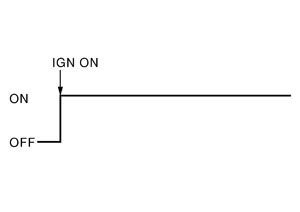
|
|
Go to Diagnosis Procedure or Diagnosis Procedure |
|
Go to Diagnosis Procedure |
|
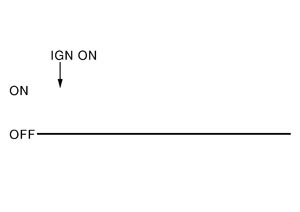
|
|
Go to Diagnosis Procedure |
DIAGNOSTIC PROCEDURE (DIAGNOSIS MODE)- 1.Turn the ignition switch ON, and check that the air bag warning lamp blinks.
- 2.There are 2 blinking patterns for the air bag warning lamp. One is a 3-second blink followed by a 0.5- second blink repeat. The other is two 1.5-second blinks followed by a 0.5-second blink repeat.
An Example of a 3-second Blink Followed by a 0.5-second Blink Repeat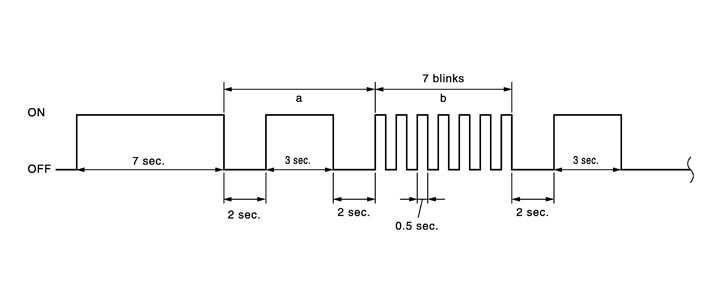
a through b are repeated.
b: Seven 0.5-second blinks indicate that the air bag diagnosis sensor unit circuit is malfunctioning.
Number of 0.5-second Blinks After a 3-second Blink Indicates Malfunctioning Items|
Number of 0.5-second blinks |
Malfunctioning items |
Blinking pattern |
|
0 |
Self-diagnosis result is not deleted |
— |
|
1 |
Front LH seat belt pre-tensioner |
Refer to the following |
|
2 |
Driver air bag module |
Refer to the following |
|
3 |
Front RH seat belt pre-tensioner |
Refer to the following |
|
5 |
Occupant Classification System control unit |
Refer to the following |
|
6 |
Crash zone sensor |
Refer to the following |
|
7 |
Air bag diagnosis sensor unit |
Refer to the following |
|
8 |
Front passenger air bag module |
Refer to the following |
|
11 |
Front passenger air bag OFF indicator |
Refer to DTC Logic. |
An Example of Two 1.5-second Blinks Followed by a 0.5-second Blink Repeat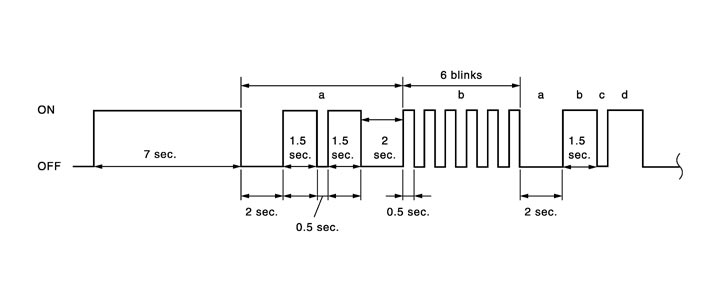
a through b are repeated.
b: Six 0.5-second blinks indicate that the LH side curtain air bag module circuit is malfunctioning.
Number of 0.5-second Blinks After Two 1.5-second Blinks Indicates Malfunctioning Items|
Number of 0.5-second blinks |
Malfunctioning items |
B linking pattern |
|
1 |
Front RH side air bag module |
Refer to the following |
|
2 |
Front LH side air bag module |
Refer to the following |
|
3 |
RH satellite sensor |
Refer to the following |
|
4 |
LH satellite sensor |
Refer to the following |
|
5 |
RH side curtain air bag module |
Refer to the following |
|
6 |
LH side curtain air bag module |
Refer to the following |
HOW TO ERASE SELF-DIAGNOSTIC RESULTSAfter a malfunction is repaired, turn the ignition switch OFF for at least one second, then turn ignition switch ON. Diagnosis mode returns to the user mode. At that time the self-diagnosis result is cleared.
CONSULT-III Function
HOW TO CHANGE SELF-DIAGNOSIS MODE WITH CONSULT-III From User Mode to Diagnosis ModeAfter selecting “AIR BAG” on the “SELECT SYSTEM” screen, User mode automatically changes to Diagnosis mode.
From Diagnosis Mode to User ModeTo return to User mode from Diagnosis mode, touch the “BACK” key of CONSULT-III until “SELECT SYSTEM” appears, then diagnosis mode automatically changes to User mode.
DIAGNOSIS MODE FOR CONSULT-III- “SELF-DIAG [CURRENT]”The current self-diagnosis results (also indicated with the number of air bag warning lamp blinks in diagnosis mode) are displayed on CONSULT-III screen in real time. This refers to a malfunctioning part requiring repairs.
- “SELF-DIAG [PAST]”Diagnosis results previously stored in the memory are displayed on CONSULT-III screen. The stored results are not erased until memory erasing is executed.
- “TROUBLE DIAG RECORD”With TROUBLE DIAG RECORD, diagnosis results previously erased by a reset operation can be displayed on CONSULT-III screen.
- “DISCRIMINATED NO.”The air bag diagnosis sensor unit for each vehicle model has its own individual classification number. This number is displayed on CONSULT-III screen, as shown. When replacing the air bag diagnosis sensor unit, refer to the part number for the compatibility. After installation, replacement with a correct unit can be checked by confirming this classification number on CONSULT-III screen.After repair, check that the discriminated number of air bag diagnosis sensor unit installed to vehicle are the same. Refer to Removal and Installation.
HOW TO ERASE SELF-DIAGNOSTIC RESULTS- “SELF-DIAG [CURRENT]”A current self-diagnosis result is displayed on CONSULT-III screen in real time.After the malfunction is repaired completely, no malfunction is detected on “SELF-DIAG [CURRENT]”.
- “SELF-DIAG [PAST]”Return to “SELF-DIAG [CURRENT]” CONSULT-III screen by touching the “BACK” key of CONSULT-III and select “SELF-DIAG [CURRENT]” in SELECT DIAG MODE. Touch “ERASE” in “SELF-DIAG [CURRENT]” mode.NOTE:If the memory of the malfunction in “SELF-DIAG [PAST]” is not erased, the user mode shows the system malfunction by the operation of the warning lamp even if the malfunction is repaired completely.
- “TROUBLE DIAG RECORD”The memory of “TROUBLE DIAG RECORD” cannot be erased.