DRIVE BELT
Exploded View
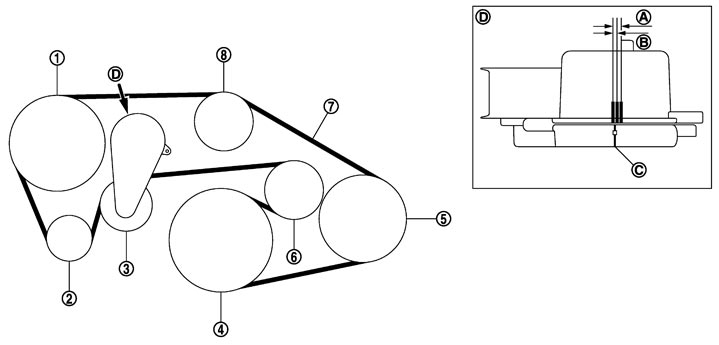
|
1. |
Power steering oil pump |
2. |
Alternator |
3. |
Drive belt auto-tensioner |
|
4. |
Crankshaft pulley |
5. |
A/C compressor |
6. |
Idler pulley |
|
7. |
Drive belt |
8. |
Idler pulley |
|
|
|
A. |
Possible use range |
B. |
Range when new drive belt is installed |
C. |
Indicator |
|
D. |
View D |
|
|
|
|
Checking
■ WARNING ■
Be sure to perform the this step when engine is stopped.
- Check that the indicator (C) (notch on fixed side) of drive belt auto-tensioner is within the possible use range (A).NOTE:
- Check the drive belt auto-tensioner indication when the engine is cold.
- When new drive belt is installed, the indicator (notch on fixed side) should be within the range (B) in the figure.
- Check the drive belt auto-tensioner indication when the engine is cold.
- Visually check entire drive belt for wear, damage or cracks.
- If the indicator (notch on fixed side) is out of the possible use range or belt is damaged, replace drive belt.
Tension Adjustment
Removal and Installation
 REMOVAL
- 1.While securely holding the square hole (A) in pulley center of auto tensioner (1) with a spinner handle, move spinner handle in the direction of arrow (loosening direction of drive belt).
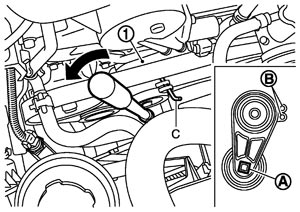
■ CAUTION ■
Avoid placing hand in a location where pinching may occur if the holding tool accidentally comes off. | : Loosening direction of drive belt |
- 2.Under the above condition, insert a metallic bar of approximately 6 mm (0.24 in) in diameter [hexagonal wrench (C) shown as example in the figure] through the holding boss (B) to lock auto-tensioner pulley arm.
- 3.Remove drive belt.
- Keep auto-tensioner pulley arm locked after drive belt is removed.
INSTALLATIONNote the following, and install in the reverse order of removal.
■ CAUTION ■
- Check drive belt is securely installed around all pulleys.
- Check drive belt is correctly engaged with the pulley groove.
- Check for engine oil and engine coolant are not adhered drive belt and pulley groove.
Inspection
INSPECTION AFTER INSTALLATION- Turn crankshaft pulley clockwise several times to equalize tension between each pulley, and then confirm tension of drive belt at indicator (notch on fixed side) is within the possible use range. Refer to Exploded View.