DRIVE PINION
FRONT FINAL DRIVE: F160A
Exploded View
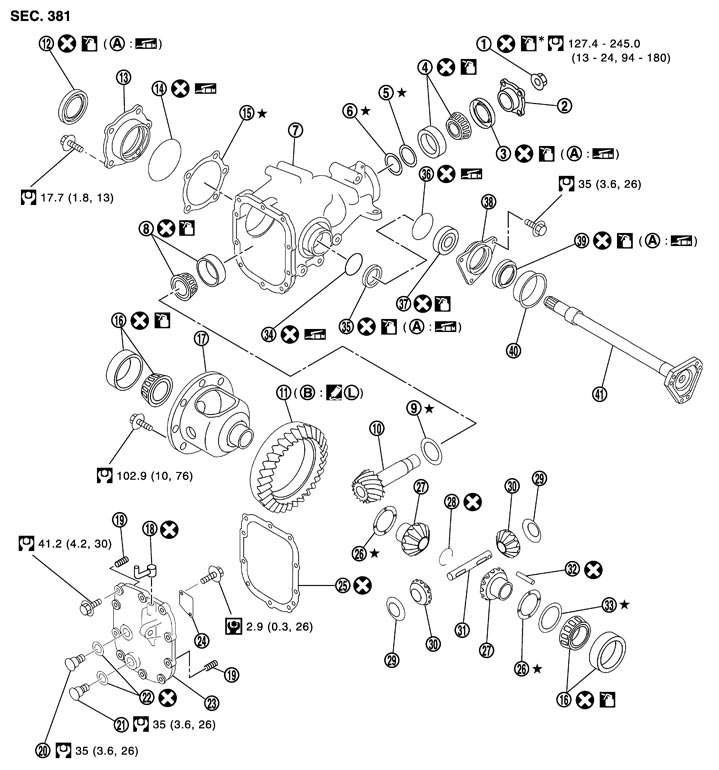
|
1. |
Drive pinion lock nut |
2. |
Companion flange |
3. |
Front oil seal |
|
4. |
Pinion front bearing |
5. |
Drive pinion bearing adjusting washer |
6. |
Drive pinion adjusting washer |
|
7. |
Gear carrier |
8. |
Pinion rear bearing |
9. |
Pinion height adjusting washer |
|
10. |
Drive pinion |
11. |
Drive gear |
12. |
Side oil seal (right side) |
|
13. |
Side retainer |
14. |
O-ring |
15. |
Side bearing adjusting shim |
|
16. |
Side bearing |
17. |
Differential case |
18. |
Breather connector |
|
19. |
Dowel pin |
20. |
Filler plug |
21. |
Drain plug |
|
22. |
Gasket |
23. |
Carrier cover |
24. |
Gear oil defense |
|
25. |
Gasket |
26. |
Side gear thrust washer |
27. |
Side gear |
|
28. |
Circular clip |
29. |
Pinion mate thrust washer |
30. |
Pinion mate gear |
|
31. |
Pinion mate shaft |
32. |
Lock pin |
33. |
Side bearing adjusting washer |
|
34. |
O-ring |
35. |
Side oil seal (left side) |
36. |
O-ring |
|
37. |
Side shaft bearing |
38. |
Extension tube retainer |
39. |
Side shaft oil seal |
|
40. |
Dust seal |
41. |
Side shaft |
|
|
|
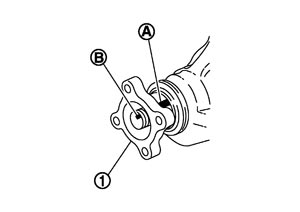
A: |
Oil seal lip |
B: |
Screw hole |
|
|
 : Apply gear oil. Refer to Fluids and Lubricants. : Apply gear oil. Refer to Fluids and Lubricants. |
|||||
 : Apply anti-corrosion oil. : Apply anti-corrosion oil. |
|||||

 : Apply Genuine Medium Strength Thread Locking Sealant or equivalent. Refer to Recommended Chemical Products and Sealants. : Apply Genuine Medium Strength Thread Locking Sealant or equivalent. Refer to Recommended Chemical Products and Sealants. |
|||||
|
Refer to Components for symbols not described above. |
|||||
Disassembly
- 1.Remove differential case assembly. Refer to Disassembly (GT-R certified NISSAN dealer).
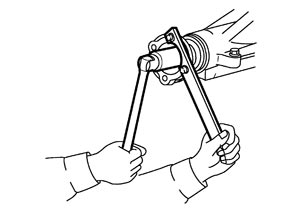
- 2.Remove drive pinion lock nut with a flange wrench (commercial service tool).
- 3.Put matching mark (B) on the end of drive pinion. The matching mark should be in line with the matching mark (A) on companion flange (1).
■ CAUTION ■
For matching mark, use paint. Never damage companion flange and drive pinion.NOTE:
The matching mark (A) on the final drive companion flange (1) indicates the maximum vertical runout position.When replacing companion flange, matching mark is not necessary.
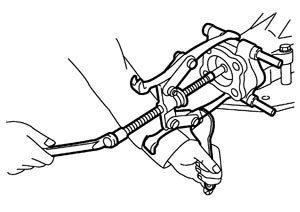
- 4.Remove companion flange using a suitable puller.
- 5.Press drive pinion assembly out of gear carrier.
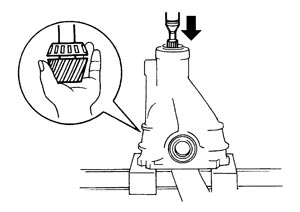
■ CAUTION ■
Never drop drive pinion assembly.- 6.Remove front oil seal.
- 7.Remove pinion front bearing inner race.
- 8.Remove drive pinion bearing adjusting washer and drive pinion adjusting washer.
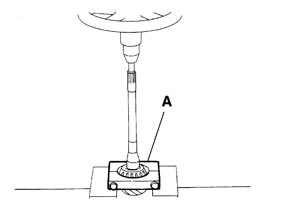
- 9.Remove pinion rear bearing inner race and pinion height adjusting washer with replacer (A) (commercial service tool).
- 10.Tap pinion front/rear bearing outer races uniformly a brass rod or equivalent to removed.
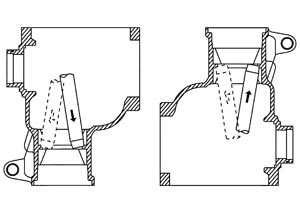
■ CAUTION ■
Never damage gear carrier.Assembly
- 1.Install pinion front and rear bearing outer races using drift (A) [SST: ST37820000 ( — )].
- At first, using a hammer, tap bearing outer race until it becomes flat to gear carrier.
- Never reuse pinion front and rear bearing outer race.
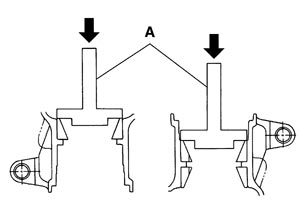
■ CAUTION ■
- 2.Install pinion height adjusting washer (1) to drive pinion.
- Select pinion height adjusting washer. Refer to Adjustment (GT-R certified NISSAN dealer).
- Install the removed pinion height adjusting washer or same thickness washer to drive pinion.
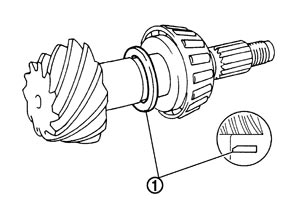
When hypoid gear set has been replaced
When hypoid gear set has been reused
■ CAUTION ■
Pay attention to the direction of pinion height adjusting washer.- 3.Press pinion rear bearing inner race (1) to drive pinion, using drift (A) [SST: ST30032000 (J-26010-01)].
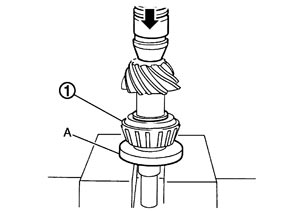
■ CAUTION ■
Never reuse pinion rear bearing inner race.- 4.Assemble a new drive pinion adjusting washer and the pinion bearing adjusting washer with the same thicknesses as the ones removed for disassembly or the removed washers. If the adjusting washers with appropriate thicknesses have been selected, use the ones selected.
- 5.Apply gear oil to pinion rear bearing, and assemble drive pinion into gear carrier.
- 6.Apply gear oil to pinion front bearing, and assemble pinion front bearing inner race to drive pinion assembly.
■ CAUTION ■
Never reuse pinion front bearing inner race.- 7.Using suitable spacer (A), press the pinion front bearing inner race to drive pinion as far as drive pinion nut can be tightened.
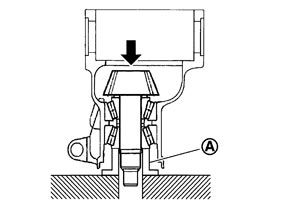
- 8.Adjust pinion bearing preload. If necessary, select the appropriate drive pinion adjusting washer and drive pinion bearing adjusting washer. Refer to Adjustment (GT-R certified NISSAN dealer).
- 9.Using the drifts, install front oil seal as shown in figure.
- Never reuse oil seal.
- When installing, never incline oil seal.
- Apply multi-purpose grease onto oil seal lips, and gear oil onto the circumference of oil seal.
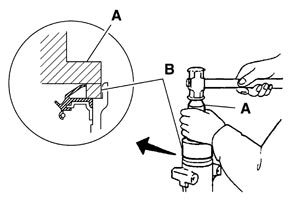
| A: Drift [SST: ST33400001 (J-26082)] | |
| B: Drift [SST: KV38102510 ( — )] |
■ CAUTION ■
- 10.Install companion flange (1).
NOTE:
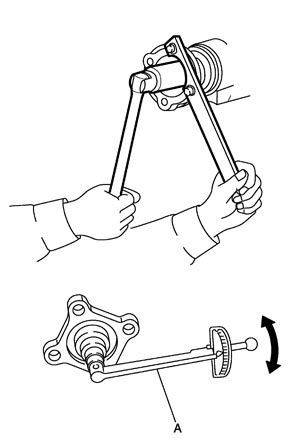
When reusing drive pinion, align the matching mark (B) of drive pinion with the matching mark (A) of companion flange, and then install companion flange (1).- 11.Apply anti-corrosion oil to the thread and seat of new drive pinion lock nut, and temporarily tighten drive pinion lock nut to drive pinion.
■ CAUTION ■
Never reuse drive pinion lock nut.- 12.Tighten to drive pinion lock nut, while adjusting pinion bearing preload torque.
- Adjust to the lower limit of the drive pinion lock nut tightening torque first.
- After adjustment, rotate drive pinion back and forth 2 to 3 times to check for unusual noise, rotation malfunction, and other malfunctions.
| A: Preload gauge [SST: ST3127S000 (J-25765-A)] |
| Standard | |
| Pinion bearing preload | : Refer to Preload Torque (GT-R certified NISSAN dealer). |
■ CAUTION ■
- 13.Install differential case assembly. Refer to Assembly (GT-R certified NISSAN dealer).
■ CAUTION ■
Never install carrier cover yet.- 14.Check and adjust drive gear runout, tooth contact, drive gear to drive pinion backlash, and companion flange runout. Refer to Adjustment (GT-R certified NISSAN dealer) and Adjustment (GT-R certified NISSAN dealer).Recheck above items. Readjust the above description, if necessary.
- 15.Check total preload torque. Refer to Adjustment (GT-R certified NISSAN dealer).
- 16.Install carrier cover. Refer to Assembly (GT-R certified NISSAN dealer).
Adjustment
 PINION GEAR HEIGHT
If the hypoid gear set has been replaced, select the pinion height adjusting washer.
- 1.Use the formula below to calculate pinion height adjusting washer thickness.
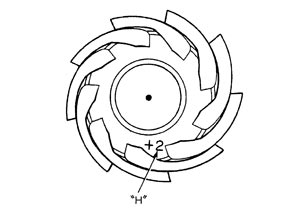
| Washer selection equation: | |||
| T = T0 + (t1− t2) | |||
| T: | Correct washer thickness | ||
| T0: | Removed washer thickness | ||
| t1: | Old drive pinion head letter “H × 0.01” (“H”: machined tolerance 1/100 mm × 100) | ||
| t2: | New drive pinion head letter “H × 0.01” (“H”: machined tolerance 1/100 mm × 100) | ||
| Example: | |||
| T = 3.21 + [(2 × 0.01) − (−1 × 0.01)] = 3.24 | |||
| T0: | 3.21 | ||
| t1: | +2 | ||
| t2: | −1 | ||
- 2.Select the proper pinion height adjusting washer.If unable to find a washer of desired thickness, use a washer with thickness closest to the calculated value.
| Example: | ||
| Calculated value... T = 3.22 mm | ||
| Used washer... T = 3.21 mm | ||
PINION BEARING PRELOADAssemble the drive pinion parts if they are disassembled. Refer to Assembly (GT-R certified NISSAN dealer).
- 1.Make sure all parts are clean. Also, make sure the bearings are well lubricated with gear oil.
- 2.Install companion flange (1).
NOTE:
When reusing drive pinion, align the matching mark (B) of drive pinion with the matching mark (A) of companion flange, and then install companion flange (1).- 3.Temporarily tighten removed drive pinion lock nut to drive pinion.
NOTE:
Use removed drive pinion lock nut only for the preload measurement.- 4.Rotate drive pinion at least 20 times to check for smooth operation of the bearing.
- 5.Tighten to drive pinion lock nut, while adjust pinion bearing preload torque.
- Adjust to the lower limit of the drive pinion lock nut tightening torque first.
- After adjustment, rotate drive pinion back and forth 2 to 3 times to check for unusual noise, rotation malfunction, and other malfunctions.
| A: Preload gauge [SST: ST3127S000 (J-25765-A)] |
| Standard | |
| Pinion bearing preload | : Refer to Preload Torque (GT-R certified NISSAN dealer). |
■ CAUTION ■
- 6.If the pinion bearing preload torque is outside the specification, use a thicker/thinner drive pinion bearing adjusting washer and drive pinion adjusting washer to adjust.
| When the preload torque is large: | |
| Decrease the drive pinion bearing adjusting washer and drive pinion adjusting washer thickness. For select parts refer to parts information. | |
| When the preload is small: | |
| Increase the drive pinion bearing adjusting washer and drive pinion adjusting washer thickness. For select parts refer to parts information. | |
- 7.Remove companion flange, after adjustment.
COMPANION FLANGE RUNOUT- 1.Fit a dial indicator onto the companion flange face (inner side of the propeller shaft mounting bolt holes).
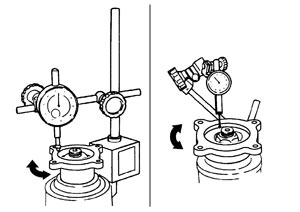
- 2.Rotate companion flange to check for runout.
| Limit | |
| Companion flange runout | : Refer to Companion Flange Runout (GT-R certified NISSAN dealer). |
- 3.Fit a test indicator to the inner side of companion flange (socket diameter).
- 4.Rotate companion flange to check for runout.
| Limit | |
| Companion flange runout | : Refer to Companion Flange Runout (GT-R certified NISSAN dealer). |
- 5.If the runout value is outside the runout limit, follow the procedure below to adjust.
-
(1)Check for runout while changing the phase between companion flange and drive pinion by 90° step, and search for the position where the runout is the minimum.
-
(2)If the runout value is still outside of the limit after the phase has been changed, possible cause will be an assembly malfunction of drive pinion and pinion bearing and malfunction of pinion bearing. Check for these items and repair if necessary.
-
(3)If the runout value is still outside of the limit after the check and repair, replace companion flange.
Inspection After Disassembly
DRIVE GEAR AND DRIVE PINION- Clean up the disassembled parts.
- If the gear teeth never mesh or line-up correctly, determine the cause and adjust or replace as necessary.
- If the gears are worn, cracked, damaged, pitted or chipped (by friction) noticeably, replace with new drive gear and drive pinion as a set.
BEARING- Clean up the disassembled parts.
- If any chipped (by friction), pitted, worn, rusted or scratched marks, or unusual noise from the bearing is observed, replace as a bearing assembly (as a new set).
SIDE GEAR AND PINION MATE GEAR- Clean up the disassembled parts.
- If any cracks or damage on the surface of the tooth is found, replace.
- If any worn or chipped mark on the contact sides of the thrust washer is found, replace.
SIDE GEAR THRUST WASHER AND PINION MATE THRUST WASHER- Clean up the disassembled parts.
- If it is chipped (by friction), damaged, or unusually worn, replace.
OIL SEAL- Whenever disassembled, replace.
- If wear, deterioration of adherence (sealing force lips), or damage is detected on the lips, replace them.
DIFFERENTIAL CASE- Clean up the disassembled parts.
- If any wear or crack on the contact sides of the differential case is found, replace.
COMPANION FLANGE- Clean up the disassembled parts.
- If any chipped mark [about 0.1 mm, (0.004 in)] or other damage on the contact sides of the lips of the companion flange is found, replace.