Dismount the vacuum control by first removing the retaining clip from the
breaker plate and then the mounting screw to the distributor.
Remove the two dust covers protecting the pickup coil and control unit.
Remove the two screws retaining the pickup coil assembly to the breaker
plate.
Remove the two screws mounting the ignition control unit to the distributor.
Slide the wiring grommet out of the side of the distributor and disconnect
the wiring at the connector.
To install:
Mount the ignition control unit and then the pickup coil (with mounting
screws loose).
Adjust the air gap to 0.008–0.016 in. (0.20–0.40mm) with a non-metallic
feeler gauge. Then, tighten screws.
Install the two dust covers.
Install the vacuum control unit by first engaging the retaining clip and
fastening the mounting screw.
Remove the distributor cap, rotor and dust shield.
Unmount the vacuum control by removing the mounting screws.
Unplug the wire connectors from the control unit. Remove the wires and mounting
grommet from the groove in the side of the distributor. Remove the dust seal.
Use a small gear puller and lift the reluctor up off the rotor shaft. Be
careful to retain the roll pin that retains the reluctor.
Loosen and remove the screws that mount the pickup coil and control unit.
Remove the control unit and pick-up coil.
To install:
Install the control unit and pick-up coil (with mounting screws loose).
Install the reluctor on the rotor shaft and install the roll pin.
Loosen stator mounting screws, adjust the air gap to 0.012–0.020 in.
(0.30–0.50mm), and tighten the mounting screws.
Install the dust seal, mounting grommet and the wires. Engage the wire connectors
to the control unit.
Mount the vacuum control and fasten the screws.
Install the dust shield, rotor and distributor cap.
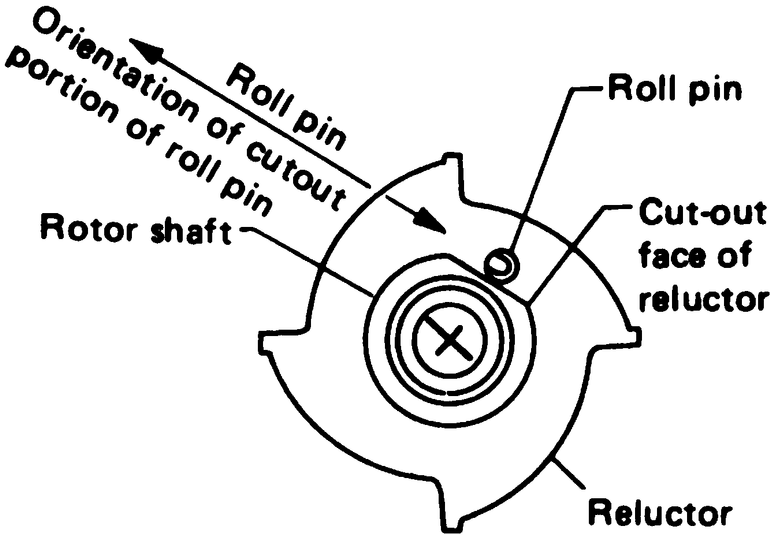
Fig. 1: Orientation of the roll pin in the reluctor
Disconnect the negative battery cable and remove the cap and rotor. Then,
unfasten and remove the screw connecting the vacuum controller rod to the
breaker plate.
Unfasten and remove the screw attaching the vacuum controller to the distributor
housing, and remove the controller.
Disconnect the wiring connectors at the igniter unit. Remove the screw which
attaches the grommet to the distributor, and then slide the wiring grommet
up and out of the distributor.
Using a flat bladed screwdriver under either side of the reluctor resting
against the edge of the distributor body, gently force the reluctor off the
top of the distributor shaft. Make sure you don't drop the roll pin that keeps
the reluctor from turning on the shaft as you do this! Remove the reluctor
and pin from the distributor.
Remove the two retaining screws from the igniter unit, and then remove the
igniter unit and the two spacers underneath from the distributor.
To install:
Install the two spacers and the igniter unit, fasten the two retaining screws.
Install the reluctor on the distributor shaft and install the roll pin.
When installing the reluctor and roll pin, make sure to position the pin with
the cutout portion of the pin parallel to the cutout portion of the top of
the rotor shaft.
Install the wiring grommet and fasten the retaining screw. Engage the wiring
connectors at the igniter unit.
Measure the air gap between the stator and one of the reluctor prongs with
a nonmetallic feeler gauge. You'll have to turn the engine over so one of
the prongs on the reluctor lines up with one of the vertical prongs on the
stator. The clearance must be 0.012–0.020 in. (0.30–0.50mm) If
not, loosen the stator mounting screws, shift the position of the stator,
and retighten. Repeat this operation until the clearance is within the specified
range.
Install the vacuum controller to the distributor shaft and fasten the retaining
screw.
Fasten the screw attaching the vacuum control to the breaker plate and install
install the rotor and distributor cap.