NOTE: You will need an assistant during this procedure. Be
careful not to scratch coated surfaces of the body and window glass during removal.
Place a cloth over the affected area. Be careful not to damage the trim panels.
Have an assistant help you when handling heavy parts. Be careful not to damage
or lose small parts.
- Remove the clips from the trim panel using Clip Puller (925580000) or equivalent
and detach the trim panel. Be careful not to damage the clips or their holes.
- Unfasten the connector from the rear gate defogger terminal. Do not pull
the lead wire, but unlock the connector and disengage.
- Disengage the wiper connector and rear washer hose.
- Unlock the connector and disengage from rear gate door switch. Do not pull
the lead wire.
- Disengage the license lamp connector.
- Disengage the high mount stop lamp connector, if applicable
- Disengage the auto door lock actuator connector.
- If the disengaged harness is re-used, tie connector with a string and place
on the upper side of the rear gate for ready use.
WARNING
Do not forcefully pull cords, lead wires, etc. since damage may result.
Carefully extract them in a wavy motion while holding the connectors.
- Remove the rear wiper arm, the cap and nut.
- Detach the trim panel, unfasten the bolt from the rear wiper and remove
the wiper.
- Completely open the rear gate.
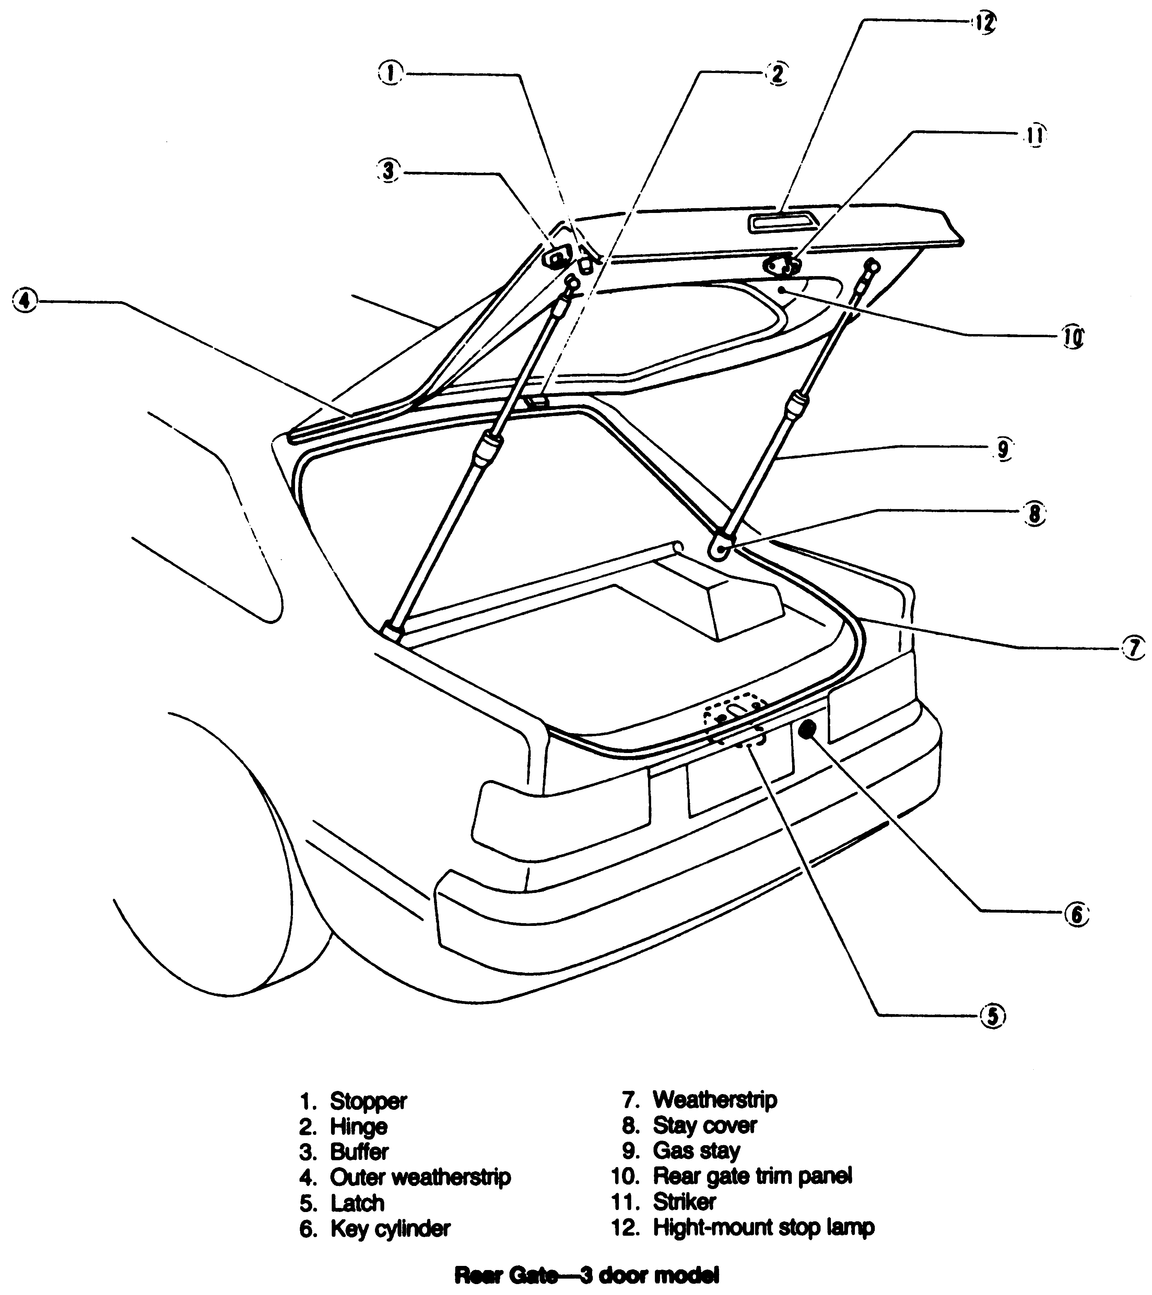
- Remove the bolts which secure the gas stay to the rear gate.
- Remove trim side rail, and unfasten roof trim clips as far as the center
pillar.
- Hang roof trim down to prevent it from bending.
- Remove the nuts which hold the hinge with a ratchet wrench placed between
the roof trim and the car body, and detach the hinge.
WARNING
Remove the bolts one at a time. Have a helper hold the rear gate while removing
the bolts to prevent it from dropping. Be sure to place a folded cloth between
the rear gate and body to prevent scratches.
- Remove the rear gate.
To install:
- Position the rear gate onto the roof hinge.
- Install the rear gate retaining nuts and tighten securely.
- Position the roof trim and secure it using the retaining clips.
- Install the trim side rails.
- Install the gas stays to the rear gate and tighten the retaining bolts.
- Close the rear gate and install the rear wiper, trim panel and wiper arm.
- Connect the wiring harness to the rear wiper system.
- Engage the auto door lock actuator connector.
- Engage the license lamp connector.
- Engage the high mount stop lamp connector.
- Connect the rear gate door switch.
- Engage the wiper connector and rear washer hose.
- Engage the connector to the rear gate defogger terminal.
- Position the rear gate trim panel and install the retaining clips.
- Fold the left and right rear backrest forward.
| Fig. 1: Hatchback components
|
- Remove the shoulder anchors of the left and right front seat belts.
- Remove the left and right tonneau cover levers.
- Remove the left and right rear quarter upper trim.
- Remove the rear skirt trim.
- Remove the rear quarter rear trim panel.
- Using Clip Puller (925580000) or equivalent, remove the clips which secure
the rear gate trim panel.
- Remove the trim panel.
WARNING
Be careful not to damage clip and clip holes.
- Disengage the gas stay harness connector from the rear gate.
- Remove the stud bolts which secure gas stay to rear gate.
- Remove the rear rail trim panel.
WARNING
Remove the bolts one at a time. Have a helper hold the rear gate while removing
the bolts to prevent it from dropping. Be sure to place a folded cloth between
the rear gate and body to prevent scratches.
- With a wrench inserted into the access hole, loosen the nuts which secure
the hinge and remove the rear gate from the roof panel.
To install:
- Position the rear gate onto the hinges and tighten the retaining nuts.
- Install the rear trim panel.
- Install the gas stays to the rear gate and tighten the stud bolts.
- Connect the gas stay harness to the rear gate.
- Position the rear gate trim panel onto the rear gate and install the retainer
clips.
- Install the rear quarter, left and right upper and skirt trim.
- Install the left and right tonneau cover levers.
- Install the shoulder anchors of the left and right front seat belts.
- Raise the left and right rear backrest.
- Open the trunk lid and mark the hinge to trunk lid position.
- Unfasten the trunk lid mounting bolts and remove the trunk lid from the
hinges.
- Installation is the reverse of removal. Make sure to line up the marks on
the trunk lid with the hinges during installation.