NOTE: During installation, lubricate all moving components
with oil. When the engine is first started, oil pressure will take time to build.
The oil used to lubricate the engine during the first few seconds of operation
must be placed on moving surfaces during installation.
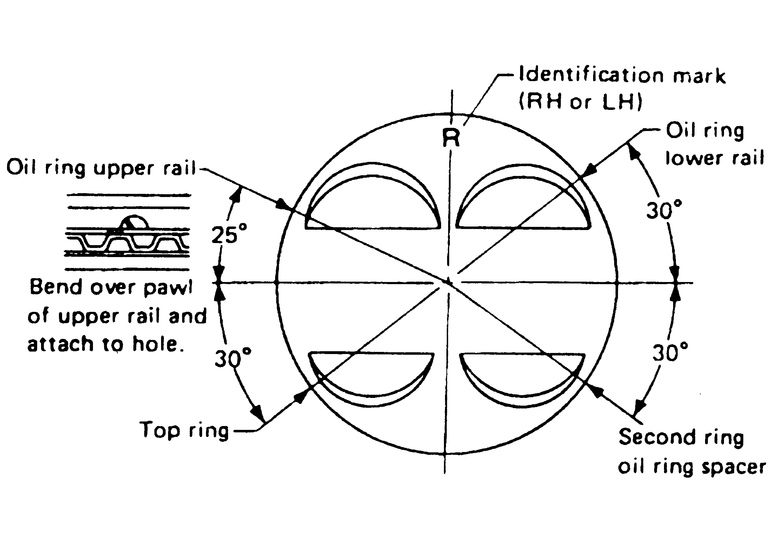
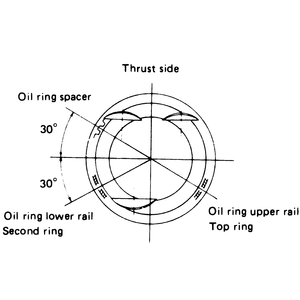
| Fig. 1: Piston ring end-gap alignment — except
1.2L engine
|
| Fig. 2: Installing the piston into the bore using a ring
compressor and a handle of a hammer
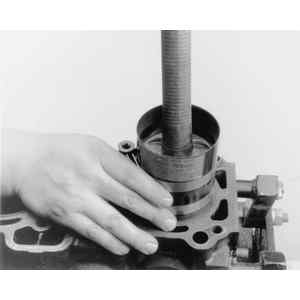
|
- Install the connecting rods onto the crankshaft and tighten the cap bolts
to specification.
- Install new crankshaft bearings into the cylinder blocks and the crankshaft
assembly into the left-hand cylinder block.
- Using Three-bond® 1215 sealant or equivalent, apply it along the
mating surface of the cylinder block. Install the right-hand cylinder block
onto the assembly. Tighten the cylinder block bolts to 17–20 ft. lbs.
(23–26 Nm) for the 8mm bolts and 29–35 ft. lbs. (39–47 Nm)
for the 10mm bolts.
- Using a dial indicator, check the crankshaft thrust clearance. If not within
specification, the crankshaft thrust surface must be corrected.
- Using a piston ring expander tool, install new rings onto the pistons. Position
the piston rings gaps as shown in the illustration.
- Using engine oil, lubricate the piston assembly. Turn the crankshaft so
that the No. 1 and No. 2 connecting rods are positioned at BDC.
- Using the Piston Ring Compression tool No. 398744300 or equivalent, compress
the piston rings into the piston assembly. Then, using a hammer handle, drive
the piston assembly into the cylinder block.
- Using the Piston Pin Guide tool No. 399284300 or equivalent, install the
piston pin and the circlip through the service hole.
- Repeat this procedure to install the remaining pistons.
- Apply fluid packing to the piston pin plugs and tighten to 46–56 ft.
lbs. (62–76 Nm).
- Install the front and rear oil seals using a driver.
- Install the oil strainer and oil pan.
- Install the cylinder heads and tighten to specification.
- Install the timing belt, belt covers and related components.
- Install the intake manifold and tighten to specification.
- Join the engine and transaxle. Install the engine in the vehicle.
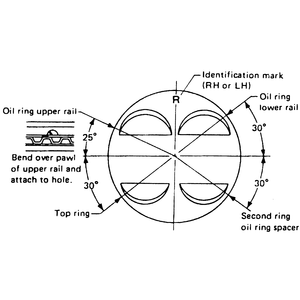
| Fig. 3: Piston ring end-gap alignment — 1.2L
engine
|
- Install the crankshaft lower bearings and place the crankshaft into the
cylinder block after lubricating it with oil. Install the crankshaft so that
the chain connecting the balance shaft and oil pump sprocket is as shown in
the illustration.
- Install the upper bearings in the main caps and install the caps on the
engine. Tighten the main bearing cap bolts/nuts to specification.
- Check the crankshaft end-play. If not within specification, the thrust surface
of the crankshaft must be corrected prior to assembly.
- Install the rod bearing on the connecting rod. Install the piston rings
on the piston using a ring expander.
- Position the piston rings as shown in the illustration and install the ring
compressor. Install rubber boots over the rod bolts.
- Install the piston into its cylinder with the Fuji Industries mark facing
the front of the engine and tap into place using a wooden hammer handle. Remove
the rubber boot, install the rod cap so that the protruding ridge faces the
front of the engine and tighten the bolt/nut to specification.
- Install the oil strainer assembly and oil pan.
- Install the cylinder heads.
- Install the timing belt, belt covers and related components. Adjust the
valve lash.
- Install the engine in the vehicle.