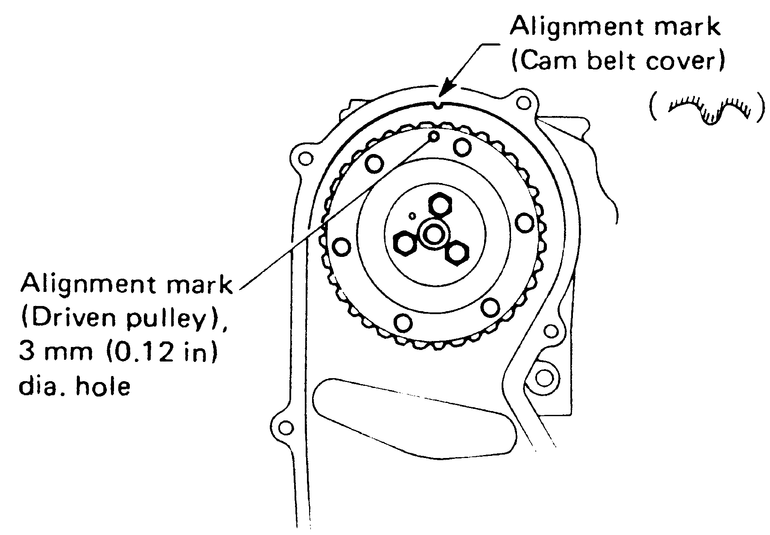
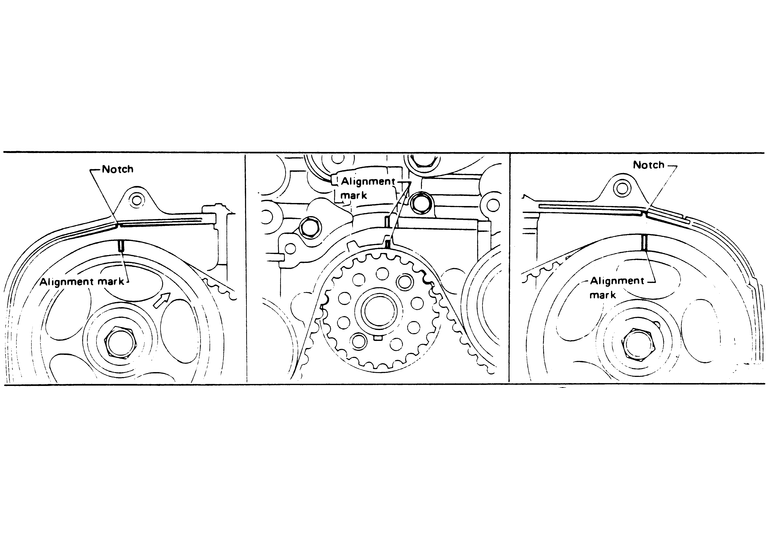
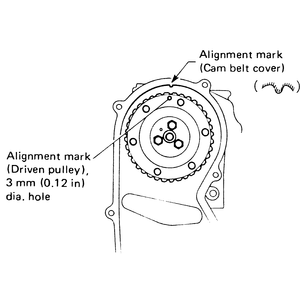
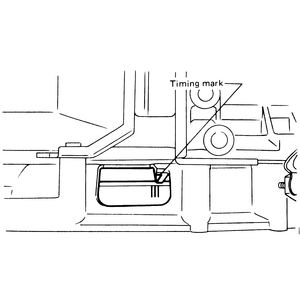
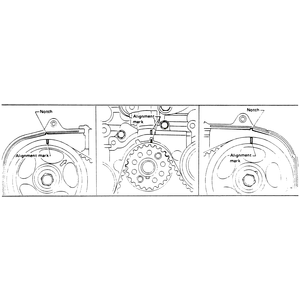
| Fig. 1: Camshaft timing belt alignment mark — 1.2L
engine
|
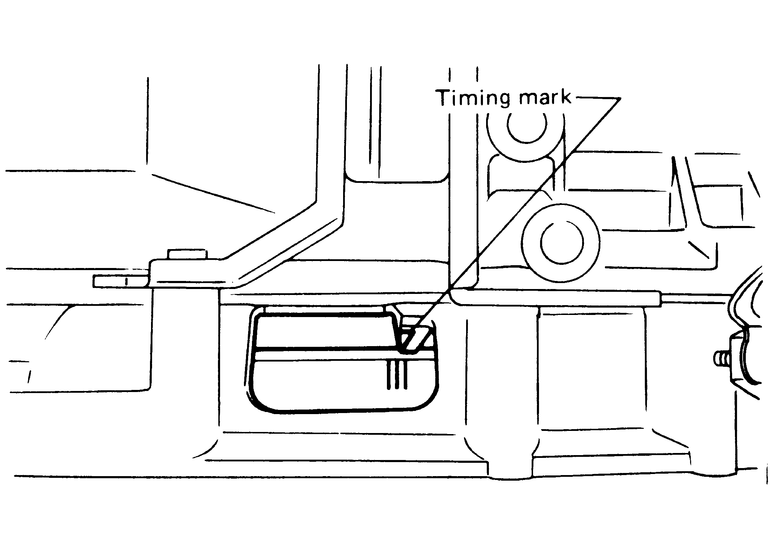
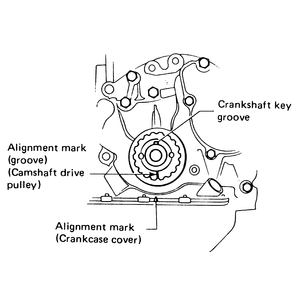
| Fig. 2: Crankshaft timing belt alignment mark — 1.2L
engine
|
- Disconnect the negative battery cable.
- Remove the accessory drive belt.
- Loosen the crankshaft pulley bolts but do not remove.
NOTE: An access hole is provided in the wheelhouse panel
to loosen and then remove the crankshaft pulley bolts.
- Position the crankshaft with No. 3 cylinder at TDC.
- Remove the crankshaft bolts and pulley.
- Remove the front timing belt cover bolts and timing belt cover.
- Loosen the tensioner bolt and rotate the tensioner in the direction that
loosens the belt. With the tensioner fully retracted, tighten the tensioner
bolt.
- Remove the camshaft sprocket mounting bolts. Mark the timing belt, if it
is to be used again, with the direction of rotation for reinstallation. Remove
the belt from the sprockets.
- Remove the camshaft sprocket.
- Slide the crankshaft sprocket off the crankshaft. With the sprocket removed
be careful that the key does not fall out of the crankshaft keyway.
- Remove the tensioner mounting bolts and remove the tensioner and spring
from the engine.
To install:
- Install the tensioner, spring and mounting bolts. Rotate the tensioner to
the fully retracted position and tighten the mounting bolts.
- Install the key into the crankshaft keyway, if removed. Install the crankshaft
sprocket.
- Install the camshaft pulley with the dowel pin lined up with the hole in
the sprocket. Install the three mounting bolts and tighten to 9 ft. lbs. (12
Nm).
- Align the timing marks as follows:
- Align the mark on the crankshaft sprocket with the dot on the crankcase
cover below the sprocket. The keyway should be pointing almost straight
up.
- Align the hole in the camshaft pulley with the notch cut into the top
of the rear timing cover.
- Ensure that each rocker arm can be moved.
- If the old timing belt is being used install the belt with the direction
arrow pointed in the correct direction.
- Loosen the tensioner mounting bolts 1⁄2 turn
and allow the tensioner to seat against the belt.
- Tighten the tensioner bolt below the adjusting wheel first. Tighten the
other bolt. Check to be sure all sprocket and housing matching marks are in
agreement.
- Install the timing belt cover. Install the crankshaft pulley and bolts.
Tighten the crankshaft bolts to 58–72 ft. lbs. (78–98 Nm). Check
and adjust the valve clearance.
- Install the accessory drive belts and tension to specification.
- Connect the negative battery cable.
- Start the engine and allow it to reach operating temperature. Check, and
if necessary, adjust the ignition timing.
| Fig. 3: Flywheel stopper tool installed — manual
transaxle equipped models
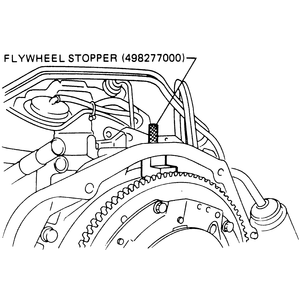
|
| Fig. 4: Driveplate stopper tool installed — automatic
transaxle equipped models
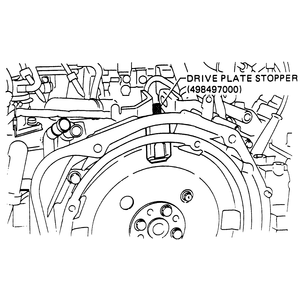
|
| Fig. 5: Aligning the marks on the flywheel with the marks
on the flywheel cover
|
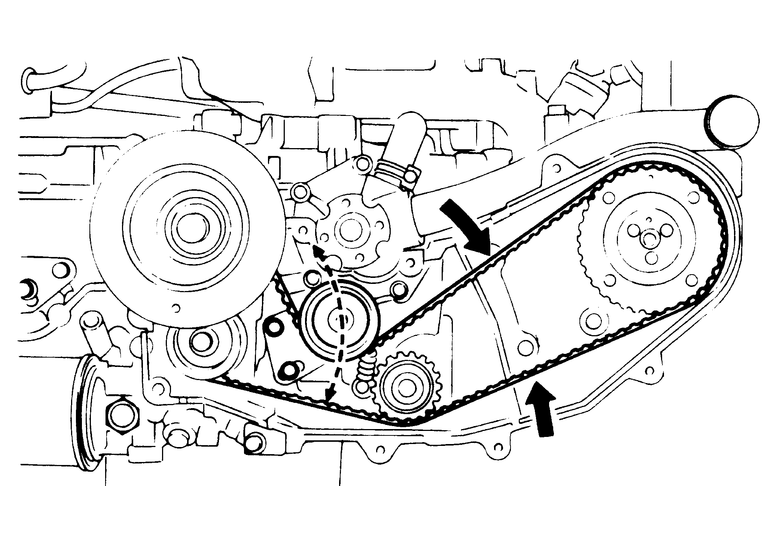
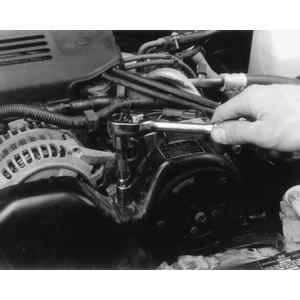
| Fig. 6: Driver side timing belt (No. 2) and No. 2 tensioner — 1.8L
engine
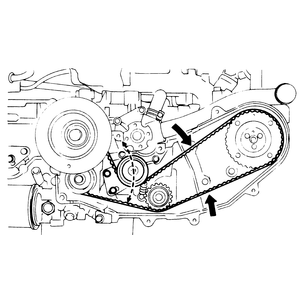
|
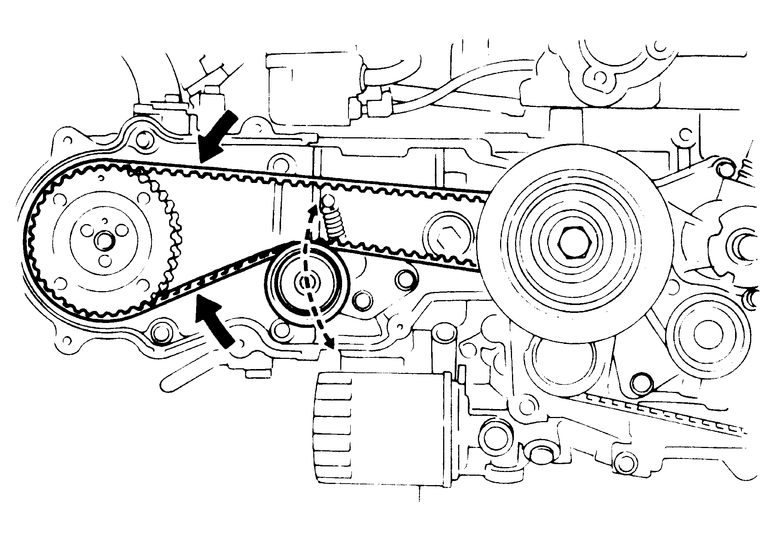
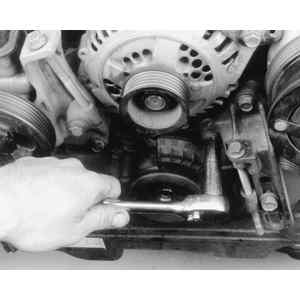
| Fig. 7: Passenger side timing belt (No. 1) and No. 1
tensioner
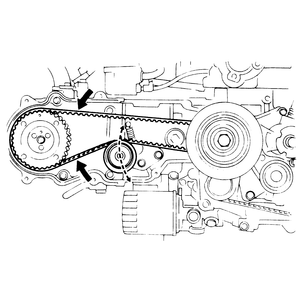
|
- Disconnect the negative battery cable.
- Remove the timing belt covers following the recommended procedure.
- Loosen the tensioner mounting bolts on the number 1 cylinder by 1/2 turn.
- Rotate the tensioner to the fully retracted position and tighten the mounting
bolts.
- Mark the direction of the belt and remove the belt from the engine.
- Loosen the tensioner mounting bolts on the number 2 cylinder by 1/2 turn.
- Rotate the tensioner using a tensioner wrench, to the fully retracted position
and tighten the mounting bolts.
- Mark the direction of the belt and remove the belt from the engine.
- Remove the crankshaft pulley.
- Remove the timing belt after marking the direction of rotation.
- Remove the outer crankshaft sprocket.
- Remove the tensioner mounting bolts and remove the tensioners and spring
on the number 2 tensioner.
- Remove the idler pulley mounting bolt and remove the idler.
- Remove the camshaft sprockets using tool 49920700, or an equivalent camshaft
sprocket wrench.
To install:
- Install the camshaft sprockets using tool 49920700, or an equivalent camshaft
sprocket wrench to hold the camshaft in place while tightening the camshaft
sprocket bolts to 7 ft. lbs. (10 Nm).
- To install the tensioners, perform the following:
- Attach the tensioner spring to the tensioner, then install the assembly
on the cylinder block. Tighten the bolts by hand.
- Attach the tensioner spring to the bolt. Tighten the bolt then loosen
1/2 turn.
- Push the tensioner into the fully retracted position and tighten the
mounting bolts.
- Install the timing belt idler pulley and tighten the mounting bolt to 32
ft. lbs. (43 Nm).
- Install the timing belt.
- Install the crankshaft sprockets.
- Install the crankshaft pulley and tighten the mounting bolt temporarily.
- Line up the center of the three lines scribed on the flywheel with the timing
mark on the flywheel housing.
- Align the timing mark on the left side camshaft sprocket with the notch
in the belt cover.
- Attach timing belt No. 2 to the crankshaft sprocket No. 2, oil pump sprocket,
belt idler and camshaft sprocket in that order, avoiding downward slackening
of the belt.
- Loosen tensioner No. 2 mounting bolts by 1/2 turn and let the tensioner
contact the belt.
- Push on the belt by hand to ensure smooth tensioner operation.
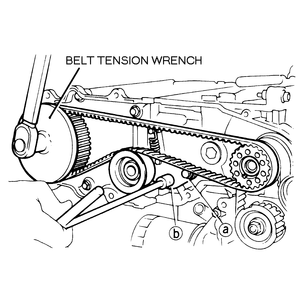
- Apply torque to the camshaft sprocket in the counterclockwise direction
using a belt tension wrench. While applying the torque tighten the tensioner
mounting bolts temporarily.
- Tighten the slide bolt to 14 ft. lbs. (18 Nm).
- Tighten the pivot bolt to 14 ft. lbs. (18 Nm).
- Verify the timing marks are still in alignment.
- Rotate the crankshaft one full turn and line up the center of the three
lines on the flywheel with the housing mark.
- Align the right side camshaft sprocket timing mark with the notch in the
cover.
- Attach the timing belt to the crankshaft sprocket and camshaft sprocket.
Avoid slackening the belt on the upper side.
- Loosen the tensioner mounting bolts 1/2 turn and allow the tensioner to
contact the belt.
- Push on the belt by hand to ensure smooth tensioner operation.
- Apply torque to the camshaft sprocket in the counterclockwise direction
using a belt tension wrench. While applying the torque tighten the tensioner
mounting bolts temporarily.
- Tighten the slide bolt to 14 ft. lbs. (18 Nm).
- Tighten the pivot bolt to 14 ft. lbs. (18 Nm).
- Verify the timing marks are still in alignment.
- Remove the crankshaft pulley.
- Install the timing belt covers.
- Install the crankshaft pulley.
- Connect the negative battery cable.
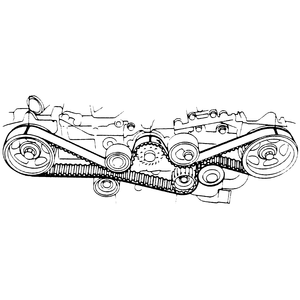
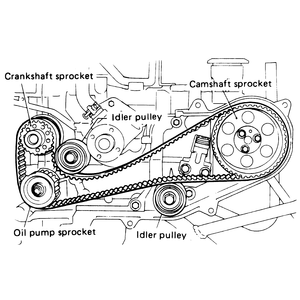
| Fig. 8: Timing belt routing — 2.2L engine
shown
|
| Fig. 9: Remove the drive belt cover and retainer bolts
|
| Fig. 10: Loosen the drive belt adjuster to remove the
drive belt
|
| Fig. 11: Remove the drive belt adjuster assembly, in
order to access and remove the timing belt cover
|
| Fig. 12: Loosen the timing belt cover retainer bolts.
Do not forget the bottom retainer bolts
|
| Fig. 13: Remove the timing belt covers and seal
|
| Fig. 14: Aligning the camshaft and crankshaft timing
marks
|
| Fig. 15: Align the timing marks on the No. 2 camshaft
sprocket . . .
|
| Fig. 16: . . . also align the No. 1 camshaft sprocket
timing marks
|
| Fig. 17: Loosen and remove the tensioner pulley . . .
|
| Fig. 18: . . . and remove the timing belt
|
| Fig. 19: Remove the lower timing belt pulleys . . .
|
| Fig. 20: . . . and camshaft sprocket, if needed
|
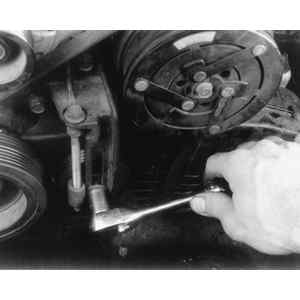
| Fig. 21: Remove the tensioner retainer bolts . . .
|
| Fig. 22: . . . and remove the tensioner from the engine
block
|
| Fig. 23: Compress the tensioner in a vise and lock in
place with a pin or Allen wrench
|
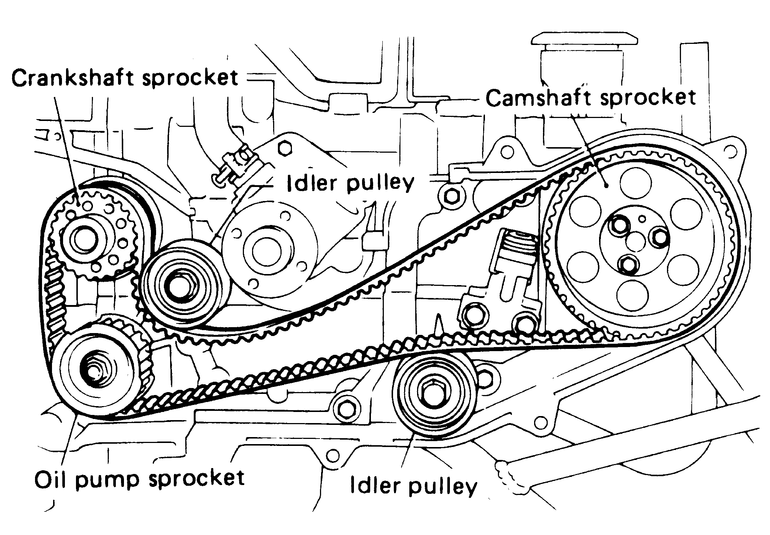
The engine uses a single cam belt drive system with a serpentine type belt.
The left side of the engine uses a hydraulic cam belt tensioner which is self-
adjusting.
NOTE: It is recommended that the timing belt be replaced every
60,000 miles (96,618 km).
- Disconnect the negative battery cable.
- Position the No. 1 piston to TDC of its compression stroke.
- Remove the engine drive belts.
- Remove the timing belt covers.
- Align the camshaft sprockets so each sprocket notch aligns with the cam
cover notches. Align the crankshaft sprocket top tooth notch, located at the
rear of the tooth, with the notch on the crank angle sensor boss. Mark the
three alignment points as well as the direction of cam belt rotation.
- Loosen the tensioner adjusting bolts. Remove the bottom three idlers, the
cam belt and the cam belt tensioner. The cam sprockets can then be removed
with a modified camshaft sprocket wrench tool.
- Remove the sprockets, if necessary. Note the reference sensor at the rear
of the left cam sprocket.
To install:
- Install the sprockets, if removed and tighten the retaining bolts to 47–54
ft. lbs. (64–74 Nm).
- Install the crankshaft sprocket and the non-adjustable right side idler.
Do not install the tensioner idler at this time.
- Compress the hydraulic tensioner in a vise slowly and temporarily secure
the plunger with a pin or suitable Allen wrench. Install the tensioner and
the pulley with the adjustable idler pulley. Temporarily tighten the tensioner
while the tensioner is pushed to the right.
- Align the crankshaft sprocket notch on the rear sprocket tooth with the
crank angle sensor boss. This places the sprocket notch in the 12 o'clock
position.
- Align the camshaft sprockets with the notches in the cam rear belt cover.
This places the sprocket notch in the 12 o'clock position for each camshaft.
- Install the timing belt with the directional mark and alignment marks properly
positioned (if belt was reused).
- Loosen the tensioner retaining bolts and slide the tensioner to the left.
Tighten the mounting bolts.
- After verifying the timing marks are correct, remove the stopper pin from
the tensioner.
- Verify the correctness of the timing by noting that the notches on the 2
cam pulleys and the notch on the crankshaft pulley all point to the 12 o'clock
position when the belt is properly installed.
- Complete the engine component assembly by installing the cam belt covers,
the crankshaft pulley bolt and pulley and the remaining components.
- Connect the negative battery cable.
The engine uses a single cam belt drive system with a serpentine type belt.
The left side of the engine uses a hydraulic cam belt tensioner which is self-adjusting.
NOTE: It is recommended that the timing belt be replaced every
60,000 miles (96,618 km).
- Disconnect the negative battery cable.
- Disconnect the radiator electric fan motor wiring connectors.
- Remove the coolant reservoir tank.
- Remove the four bolts that secure the radiator shroud and remove the fan
assembly.
- Position the No. 1 piston to TDC of its compression stroke.
- Remove the engine drive belts.
- Remove the A/C compressor drive belt tensioner.
- Using holding tool ST499977000 or equivalent, remove the bolt that secures
the crankshaft sprocket and remove the sprocket.
- Remove the left, right then the center timing belt covers.
- Align the camshaft sprockets so each sprocket notch aligns with the rear
cover notches. Align the crankshaft sprocket top tooth notch, located at the
rear of the tooth with the notch. The crankshaft notch will be at 12 o'clock
and the keyway will be at 6 o'clock.
NOTE: Mark the sprocket alignment points as well as the
direction of cam belt rotation for reinstallation purposes if the belt is
to be reused.
- Loosen the tensioner adjusting bolts.
- Remove the lower timing belt idler.
- Remove the timing belt from the pulleys.
WARNING
After the timing belt is removed, DO NOT rotate the camshaft sprockets or
the crankshaft. Severe internal damage will result from the valve and/or
piston contact.
- Remove the timing belt tensioner and the timing belt tension adjuster.
To install:
NOTE: Inspect the timing belt and tensioner for wear or
damage and replace as necessary.
- Inspect the timing belt tensioner as follows:
- When compressing the pushrod of the tensioner with a force of 33 lbs.
(147 N), the tensioner should not sink.
- When compressing the pushrod of the tensioner with a force of 33–110
lbs. (147–490 N), the tensioner should not sink within 8.5 seconds.
- Measure the extension of the rod beyond the body of the tensioner for
a length of 0.606–0.646 inch (15.4–16.4mm). If not within
specifications, replace the tensioner.
NOTE: Check the idler sprockets for smooth operation.
Replace as necessary.
- Using a press, compress the tensioner gradually, taking three minutes or
more, and insert a 0.059 inch (1.5mm) pin to secure the rod.
- Install the tensioner and the pulley with the adjustable idler pulley. Temporarily
tighten the tensioner while the tensioner is pushed to the right.
- Align the crankshaft sprocket notch on the rear sprocket tooth with the
crank angle sensor boss. This places the sprocket notch in the 12 o'clock
position and the and the key way at the 6 o'clock position.
- Align the camshaft sprockets with the notches in the cam rear belt cover.
This places the sprocket notch in the 12 o'clock position for each camshaft.
- Install the timing belt in a clockwise direction starting at the crankshaft
with the directional mark and alignment marks properly positioned (if belt
was reused).
- Install the lower timing belt idler and tighten the mounting bolt to 29
ft. lbs. (39 Nm).
WARNING
Make sure all the timing marks are properly aligned.
- Loosen the tensioner retaining bolts and slide the tensioner to the left.
Tighten the mounting bolts to 18 ft. lbs. (25 Nm).
- After verifying the timing marks are correct, remove the stopper pin from
the tensioner and recheck the timing marks.
- Install the center, right and then the center timing belt covers. Torque
the bolts to 44 inch lbs. (5 Nm).
- Install the crankshaft sprocket and tighten the mounting bolt to 94 ft.
lbs. (127 Nm) while securing the crankshaft pulley.
- Install the A/C drive belt tensioner.
- Install the engine drive belts.
- Install the fan shroud and motor assembly.
- Connect the negative battery cable.
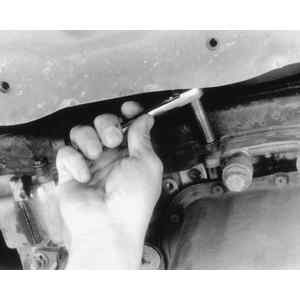
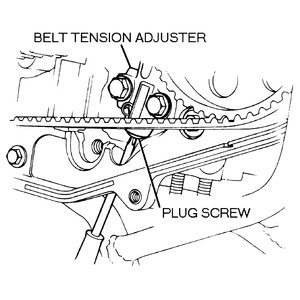
| Fig. 24: Plug below the passenger side timing belt
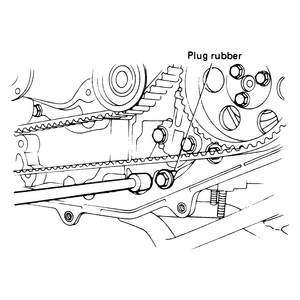
|
| Fig. 25: Passenger side timing belt
|
| Fig. 26: Driver side timing belt
|
| Fig. 27: Timing belt tensioner adjustment
|
- Disconnect the negative battery cable.
- Loosen the water pump pulley mounting bolts.
- Remove the drive belt.
- Remove the water pump pulley mounting bolts and remove the water pump pulley.
- Remove the crankshaft pulley.
- Disconnect the electrical harness to the oil pressure switch.
- Remove the dipstick tube.
- Remove the three timing belt covers.
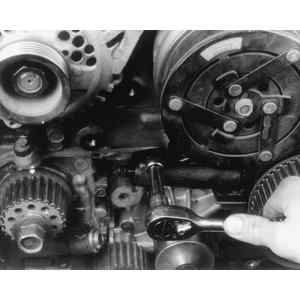
- To remove the right side timing belt use the following procedure:
- Loosen the tensioner mounting bolts on the number 1 cylinder about 1⁄2 turn.
- Rotate the tensioner to remove tension from the belt. With the tensioner
fully retracted tighten the mounting bolt.
- Mark the direction of rotation on the belt and remove it.
- Remove the tensioner mounting bolts and remove the tensioner and spring.
- Remove the outer crankshaft sprocket.
- Remove the camshaft sprocket mounting bolts and remove the camshaft
sprocket.
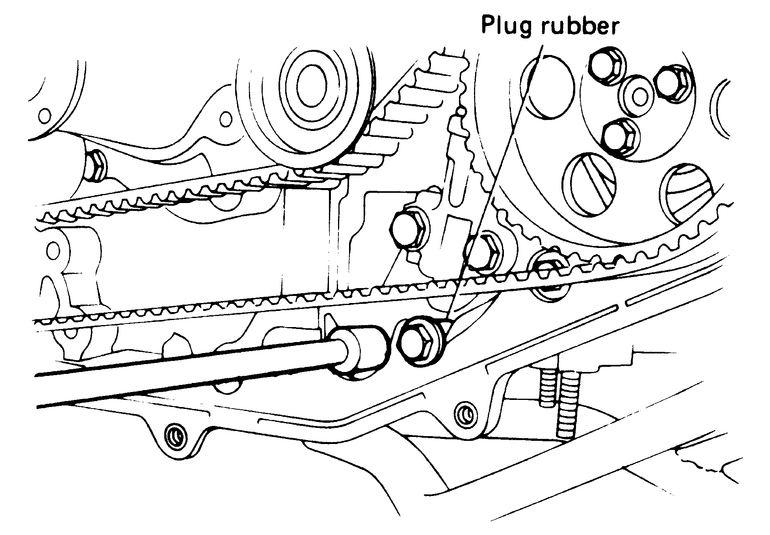
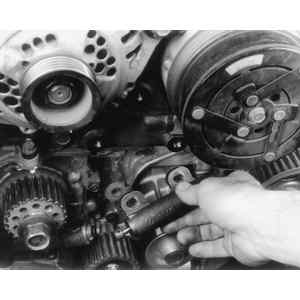
- To remove the left side timing belt use the following procedure:
- Remove the idler pulley mounting bolt and remove the idler pulley.
- Remove the plug rubber.
- Remove the plug screw from the lower side of the tension adjuster.
- Using a flat blade screwdriver, turn the adjuster screw inside the tension
adjuster to loosen tension on the belt.
- Mark the direction of rotation on the belt and remove it.
- Remove the idler pulley.
- Remove the inner crankshaft sprocket.
- Remove the two bolts and remove the belt tension adjuster.
- Remove the camshaft sprocket mounting bolts and remove the camshaft
sprocket.
To install:
- To install the left side timing belt proceed as follows:
- Install the camshaft sprocket and camshaft sprocket mounting. Tighten
the mounting bolts to 8 ft. lbs. (12 Nm).
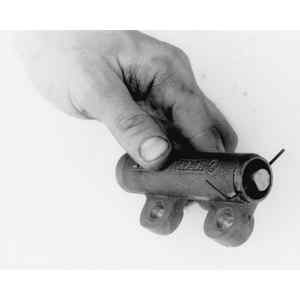
- De-adjust the tension adjuster fully and install a belt adjuster stopper,
13082AA0000, or the equivalent. Using a syringe fill the adjuster with
engine oil until the boot overflows. Install a new plug screw.
- Install the belt tension adjuster. Tighten the mounting bolts to 18
ft. lbs. (25 Nm).
- Install the plug rubber.
- Install the idler pulley. Tighten the mounting bolt to 32 ft. lbs. (43
Nm).
- Install the inner crankshaft sprocket.
- Align the center of the three lines scribed on the flywheel with the
mark on the flywheel housing. Align the timing mark on the camshaft pulley
with the notch in the timing belt rear cover.
- Install the timing belt in the correct direction of rotation.
- Install the tensioner and mounting bolt.
- Remove the belt adjuster stopper and tighten the mounting bolt to 32
ft. lbs. (43 Nm).
- To install the right side timing belt as follows:
- Rotate the crankshaft one full turn from the position it was in for
installation of the left side belt and line up the timing marks again.
- Install the camshaft sprocket and camshaft sprocket mounting. Tighten
the mounting bolts to 8 ft. lbs. (12 Nm).
- Align the timing mark on the camshaft pulley with the notch in the timing
belt rear cover.
- Install the tensioner and spring and the mounting bolts. Push the tension
down fully and tighten the mounting bolts.
- Install the outer crankshaft sprocket.
- Install the timing belt in the correct direction of rotation.
- Loosen the tensioner mounting bolts on the number 1 cylinder about 1/2
turn and allow the tensioner pulley to contact the belt.
- Tension the belt with a belt tensioner and tighten the tension mounting
bolts to 18 ft. lbs. (25 Nm).
- Verify all timing marks are in alignment.
- Install the three timing belt covers.
- Install the dipstick tube.
- Connect the electrical connector to the oil pressure switch.
- Install the crankshaft pulley.
- Install the water pump pulley and pulley mounting bolts.
- Install the drive belt and tension to specification.
- Tighten the water pump pulley mounting bolts.
- Connect the negative battery cable.
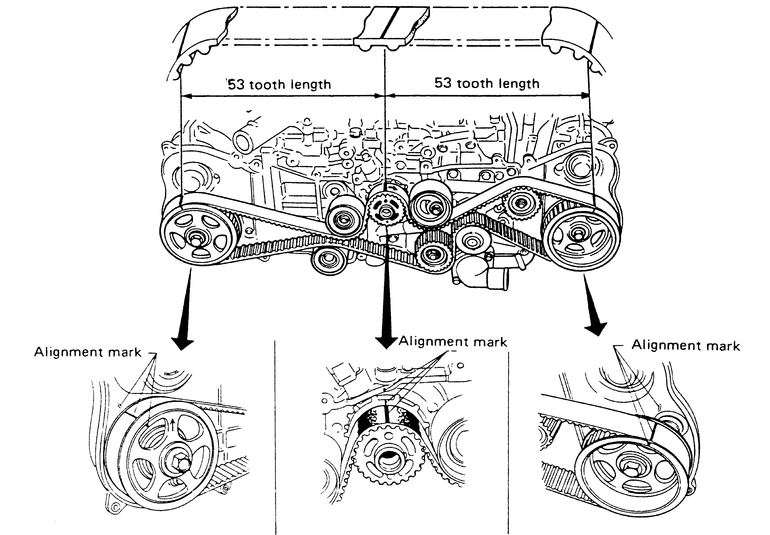
| Fig. 28: Timing belt routing and alignment marks — 3.3L
engine
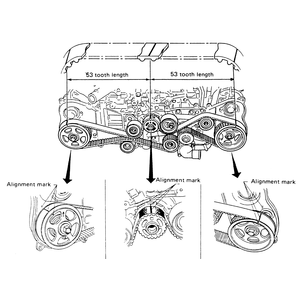
|
- Disconnect the negative battery cable.
- Remove the timing belt covers.
- Matchmark the timing belt to the sprocket, cover and block marks as follows:
- Turn the crankshaft to align the timing marks on the crankshaft sprocket
with the mark on the block.
- With the crankshaft marks aligned make sure the left and right camshaft
sprocket marks are lined up with marks on the timing covers.
- If all the marks are in line, use white paint to mark the direction
of rotation of the belt as well as mark the spots on the belt where it
crosses over the timing marks on the pulleys.
- Loosen the belt tensioner bolts.
- Remove belt idler pulley No. 1., idler pulley No. 2 and timing belt.
- Remove the tensioner pulley bolt and extract the tensioner pulley.
- Remove the two bolts and the tensioner assembly.
- Remove the left side camshaft mounting bolt. To keep the camshaft from turning
use camshaft sprocket wrench 499207100 or equivalent. Remove the sprocket.
- Remove the right side camshaft mounting bolt. To keep the camshaft from
turning use camshaft sprocket wrench 499207100 or equivalent. Remove the sprocket.
- Remove the crankshaft sprocket.
To install:
- Install the crankshaft sprocket.
- Install the right side camshaft sprocket and mounting bolt. Tighten the
mounting bolt to 29 ft. lbs. (39 Nm).
- Install the left side camshaft sprocket and mounting bolt. Tighten the mounting
bolt to 29 ft. lbs. (39 Nm).
- Insert a 0.059 inch (1.5mm) diameter stopper pin into place while pushing
the tension adjuster rod into the tensioner body.
- Install the tensioner and tighten the bolts to 18 ft. lbs. (24 Nm), while
the tensioner is pushed all the way to the right.
- Install the tensioner pulley and mounting bolt. DO NOT tighten the idler
pulley bolt completely.
- Make sure the crankshaft and both camshaft sprockets are still lined up
with their respective timing marks.
- Install the timing belt onto the sprockets with the direction of rotation
arrow in the correct direction and the timing marks on the belt in line with
the marks on the sprockets.
- Install the number 1 and 2 idler pulleys and tighten the mounting bolts
to 29 ft. lbs. (39 Nm).
- Loosen the tensioner pulley bolt and the tensioner assembly mounting bolts.
Slide the tensioner assembly all the way to the left and tighten the bolts
to 18 ft. lbs. (24 Nm).
- Check again that all the timing marks are still in alignment. If they are
remove the stopper pin from the tensioner assembly.
- Install the timing belt covers.
- Connect the negative battery cable.