| Fig. 1: Camshaft assembly — 1.2L engine
|
- Disconnect the negative battery cable.
- Remove the rocker arm cover.
- Place matchmarks on the distributor body and cylinder head, then remove
the distributor hold-down bolt and distributor.
- Remove the timing belt cover and timing belt. Refer to the procedure earlier
in this section.
- Loosen the rocker arm lash adjusters until the rocker arms move freely.
- Remove the rocker arm shaft and rocker arms.
- Carefully remove the camshaft from the cylinder head.
To install:
- Coat the camshaft lobes with clean engine oil and carefully install the
camshaft into the cylinder head.
- Install the rocker arms and shaft. Adjust the valve lash.
- Installing the timing belt and cover. Refer to the procedure in this section
for installation details.
- Install the distributor.
- Install the rocker arm cover.
- Connect the negative battery cable.
- Start the vehicle and check the ignition timing and adjust as necessary.
| Fig. 2: Tightening the camshaft thrust plate — 1.6L
engine
|
| Fig. 3: Aligning the camshaft and crankshaft gears
|
The camshaft turns on journals that are machined directly into the crankcase.
- Refer to the engine removal and Installation procedures in this section
and remove the engine from the vehicle, then separate the transaxle from the
engine.
- Remove the clutch assembly/flywheel (MT) or the torque converter drive plate
(AT).
- Remove the flywheel housing-to-engine bolts and the housing from the engine.
- Remove the crankshaft gear from the crankshaft.
- Straighten the lockwashers and remove the camshaft thrust plate-to-engine
bolts.
NOTE: The lockwashers are straightened and the bolts removed
through the access holes in the camshaft gear.
- Remove the rocker arm-to-cylinder head covers, the rocker arm-to-cylinder
head assemblies, the pushrods and valve lifters.
NOTE: When removing the pushrods and valve lifters, be
sure to keep the items in order for reassembly purposes.
- Pull the camshaft toward the rear of the engine and remove it from the engine;
be careful not to damage the bearing journals and/or the camshaft lobes.
NOTE: Remove the oil seal; be sure to replace it with a
new one when reassembling the engine.
- Inspect the camshaft.
To install:
- Using a putty knife, clean the gasket mounting surfaces.
- Install the camshaft and tighten the thrust plate bolts. Using a feeler
gauge or a dial indicator, move the camshaft (fore and aft), then measure
the end–play, it should be 0.008 inch (0.2032mm) or less.
- To complete the installation, use new gaskets and sealant where necessary.
Assemble the engine and reverse the removal procedures. Refill the cooling
system and the crankcase. Start the engine, allow it to reach normal operating
temperatures and check for leaks.
| Fig. 4: Camshaft assembly — 1.8L engine

|
| Fig. 5: Camshaft assembly — 2.7L engine
|
- Disconnect the negative battery cable.
- Tag and disconnect the spark plug wires from the distributor cap. Matchmark
the distributor to the engine and remove the distributor.
- Remove the timing belts covers and timing belts. Refer to the procedures
in the section.
- Drain the cooling system.
CAUTION
When draining the coolant, keep in mind that cats and dogs are attracted
to ethylene glycol antifreeze, and could drink any that is left in an uncovered
container or in puddles on the ground. This will prove fatal in sufficient
quantity. Always drain the coolant into a sealable container. Coolant should
be reused unless it is contaminated or several years old.
- Remove the water pipe.
- Remove the oil fill pipe.
- Disconnect the PCV hoses from the valve covers.
- Remove the EGR pipe cover, clamps and EGR pipe, if equipped.
- Remove the rocker arm covers.
NOTE: When removing the camshaft carrier the rocker arms
may fall off the lash adjusters. Place a suitable container beneath the
cylinder head to catch the rocker arms.
- Remove the camshaft case mounting bolts.
- Remove the camshaft case and place on a clean surface.
- Remove the camshaft retainer from the front of the camshaft carrier.
- Slide the camshaft out from the carrier.
To install:
- Slide the camshaft into the carrier and install the camshaft retainer and
bolts. Tighten the retainer bolts to 5 ft. lbs. (7 Nm).
- Apply grease to the spherical and sliding surface of each valve rocker,
then secure the rockers to the valve lash adjusters and valves.
NOTE: Failure to apply grease to the rocker arms will result
in the rocker arms falling off.
- Apply sealer to the groove of the camshaft carrier.
- Install the carrier assembly using the mounting bolts. Tighten the bolts
to 14 ft. lbs. (19 Nm).
- Coat the camshaft with clean engine oil.
- Install the rocker arm covers using new gaskets. Install the mounting bolts
and tighten to 4 ft. lbs. (5 Nm). Install all remaining components. Start
the vehicle, adjust the ignition timing if needed and check for fluid leaks.
| Fig. 6: Camshaft assembly — 2.2L engine
|
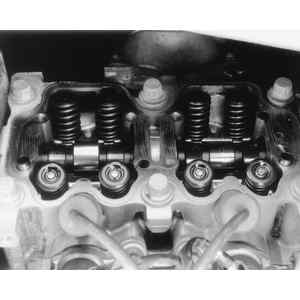
| Fig. 7: With the valve cover removed, the camshaft assembly
is clearly visible — 2.2L engine
|
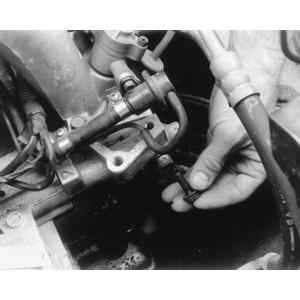
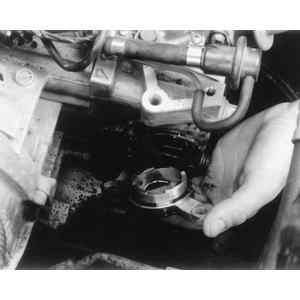
| Fig. 8: Remove the retainer bolt securing the camshaft
support in place
|
| Fig. 9: Remove the camshaft support
|
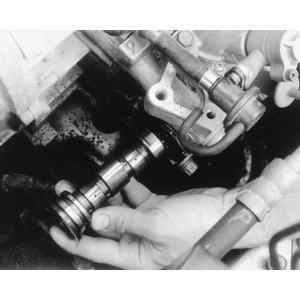
| Fig. 10: Carefully slide the camshaft out
|
- Disconnect the negative battery cable.
- Remove the timing belt covers, timing belt and camshaft sprockets.
- Remove the valve rocker covers.
- Remove the rocker arm assemblies.
- To remove the left camshaft:
- Remove the cam angle sensor.
- Unbolt and remove the oil dipstick tube.
- Remove the camshaft support.
- Remove the camshaft O-ring.
- Remove the camshaft and rear seal.
- To remove the right camshaft:
- Remove the camshaft support on the right side.
- Remove the camshaft O-ring.
- Remove the camshaft and rear seal. Remove the oil seal from the camshaft
support.
To install:
- To install the left camshaft:
- Lubricate the camshaft journals with clean engine oil. Install the rear
oil seal, then install the camshaft into the cylinder head.
- Install the O-ring into the camshaft support and install the support.
Tighten the front retainer bolts to 7 ft. lbs. (9 Nm), and the rear bolts
to 12 ft. lbs. (16 Nm).
- Install oil seal into the camshaft support.
- Install the bolt into the dipstick tube and tighten to 10 ft. lbs. (13
Nm). Install the camshaft sensor.
- To install the right camshaft:
- Lubricate the camshaft journals with clean engine oil and install the
right camshaft.
- Install the O-ring into the camshaft support and install the support.
Tighten the retainer bolts to 12 ft. lbs. (16 Nm).
- Install a new oil seal in the rear of the cylinder head.
- Install the rocker arm assemblies, tightening the retainer bolts to 9 ft.
lbs. (12 Nm).
- Install the camshaft sprockets, timing belt, timing belt covers and related
components.
- Connect the negative battery cable.
- Check the fluid levels and start the engine.
- Allow the engine to reach normal operating temperature and check for leaks.
| Fig. 11: Camshaft and cylinder head assembly — 2.5L
engine
|
- Disconnect the negative battery cable.
- Remove the timing belt covers, timing belt and camshaft sprockets.
- Remove the camshaft position sensor.
- Remove the ignition coils.
- Remove the valve rocker covers and gaskets.
- Loosen the intake camshaft cap bolts in sequence, in small increments.
- Paint alignment marks on the camshafts for installation.
NOTE: Be sure to keep the intake and exhaust bearing caps
and camshafts in proper order for reassembly. Also note the positioning
and location of the camshafts for reinstallation.
- Remove the intake camshaft bearing caps, then remove the camshaft.
- Loosen the exhaust camshaft cap bolts in sequence, in small increments.
- Remove the exhaust camshaft bearing caps, then remove the camshaft.
To install:
NOTE: Lubricate the camshaft bearings prior to camshaft
installation.
- Install the camshafts so the base circle (non-lobe portion) of the camshafts
are in contact with the lash adjusters. This will position the lobes of the
camshafts away from the valves.
NOTE: The left camshaft will need to be rotated for timing
belt alignment.
- Apply liquid sealant to the front bearing cap mating surfaces, then install
the bearing caps. Tighten the caps in sequence in two progressive steps to
14.5 ft. lbs. (20 Nm).
- Install new oil seals to the camshafts using a suitable seal installation
tool.
WARNING
Only rotate camshafts the specified amount. If the camshafts are rotated
beyond the specified amount, the valves will contact each other and cause
severe internal damage.
- For correct timing belt alignment, rotate the intake camshaft 80 degrees
clockwise and the exhaust camshaft 45 degrees counterclockwise.
- Using a new gasket, install the rocker covers. Be sure to apply liquid sealant
to the front edges of the gasket at the camshaft opening.
- Install the ignition coils.
- Install the camshaft position sensor.
- Install the camshaft sprockets and tighten the retaining bolts to 58 ft.
lbs. (78 Nm). Be sure to secure the sprockets when tightening the bolts.
- Check the timing sprockets for proper alignment and install the timing belt.
- Connect the negative battery cable.
- Check the fluid levels and start the engine.
- Allow the engine to reach operating temperature and check for leaks.
| Fig. 12: Camshaft cap bolt removal sequence
|
| Fig. 13: Camshaft cap bolt tightening sequence
|
| Fig. 14: Align the notches on the front of the camshafts
|
| Fig. 15: There are also alignment marks on the rear of
the camshaft gears
|
CAUTION
Fuel injection systems remain under pressure after the engine has been turned
OFF. Properly relieve fuel pressure before disconnecting any fuel lines. Failure
to do so may result in fire or personal injury.
- Disconnect the negative battery cable.
- Remove the timing belt followed by the camshaft sprockets.
- Detach the cam angle sensor connector and remove the bracket.
- Disconnect the ignition coil harness and remove the individual ignition
coils.
- Disconnect the blow-by hose and remove the cylinder head cover and gasket.
- Remove the front camshaft cap.
- Remove the camshaft oil seal and plug.
WARNING
Since the camshaft thrust clearance is small, the camshaft must be removed
by holing it parallel to the cylinder head. If the camshaft is not parallel
to the cylinder head, the cylinder head thrust bearing journal may be damaged.
- Rotate the intake (upper) and exhaust (lower) camshafts until the notch
at the front of the camshafts face the 6 o'clock position on the left cylinder
head, and the 12 o'clock position on the right cylinder head.
- Inspect the rear of the camshaft and check that the matchmarks on the rear
gears are aligned.
- Install a service bolt to the sub-gear mounting bolt hole of the intake
camshaft gear to lock the sub-gear and driven gear.
- Loosen the intake camshaft bolt caps in sequence. Make sure that, as the
bolts are turned, the clearance between the camshaft journal and the cylinder
head journal bearing increase evenly. If not, tighten the bolts and repeat
the loosening procedure.
- Remove the camshaft caps while securing the intake camshaft with one hand.
When the caps are removed, then lift out the intake camshaft.
- Arrange the camshaft caps in the order they were removed. They must be installed
to their original positions.
- If you are removing the exhaust camshaft, rotate the camshaft clockwise
for additional access.
- Loosen the exhaust camshaft bolt caps in sequence. Make sure that, as the
bolts are turned, the clearance between the camshaft journal and the cylinder
head journal bearing increase evenly. If not, tighten the bolts and repeat
the loosening procedure.
- Remove the camshaft caps while securing the exhaust camshaft with one hand.
When the caps are removed, then lift out the intake camshaft.
- Arrange the camshaft caps in the order they were removed. They must be installed
to their original positions.
- Remove the hydraulic lash adjusters. Keep the lash adjusters in the order
they were removed. They must be installed into their original positions.
To install:
- Measure the thrust clearance of the camshaft with the hydraulic lash adjusters
not installed. If thrust clearance exceeds 0.0051 inch (0.13mm) for the intake
and 0.0047 inch (0.12mm) for the exhaust, replace the camshaft caps and the
cylinder head as an assembly. If necessary replace the camshaft.
- Measure the camshaft journal oil clearance with the lash adjusters not installed.
If clearance exceeds 0.0039 inch (0.10mm), replace the camshaft.
- Measure the camshaft gear backlash with the intake sub-gear not installed.
If backlash exceeds 0.0118 inch (0.30mm), replace the camshafts as a set.
- Lubricate and install the hydraulic lash adjusters.
- Lubricate and install the camshafts with the notch on the front facing the
6 o'clock position for the left cylinder head camshafts and the 12 o'clock
position for the right cylinder head camshafts. Ensure that the marks for
both camshafts are facing the same position.
- Install the camshaft caps and bolts and hand-tight.
- Tighten the camshaft bolts on the caps equally, in small increments, in
the correct sequence. Make sure that, as the bolts are turned, the clearance
between the camshaft journal and the cylinder head journal bearing decreases
evenly. If not, loosen the bolts and repeat the tightening procedure.
- Tighten the camshaft cap bolts to a final tighten of 7 ft. lbs. (10 Nm).
- Ensure that the matchmarks on the rear side of the camshaft gears are aligned.
- Remove the sub-gear securing bolt from the camshaft.
- Install the front camshaft cover using new gaskets.
- Lubricate and install new oil seals.
- Install the camshaft plug.
- Install the camshaft cover and connect the blow-by hose.
- Connect the ignition coil harnesses and coils.
- Connect the cam angle sensor and bracket.
- Install the timing belt and camshaft sprockets.
- Connect the negative battery cable.