- Disconnect the negative battery cable.
- Remove the rear seat back and bottom cushion.
- Remove the fuel sender access hole cover plate.
- Relieve the fuel system pressure.
- Disconnect the electrical harness from the fuel pump.
- Disconnect and cap the fuel lines from the fuel sender assembly.
- Remove the eight screws securing the fuel assembly into the fuel tank.
- Remove the fuel sender assembly.
- Remove the filter strainer from the fuel pump.
- Disconnect the electrical harness from the fuel pump.
- Disconnect the fuel lines from the pump.
- Remove the pump from the sender assembly.
- Installation is the reverse of removal. Secure all components to specifications.
- Start the vehicle and check for leaks.
| Fig. 1: Fuel pump assembly — 1.8L MPFI
engines
|
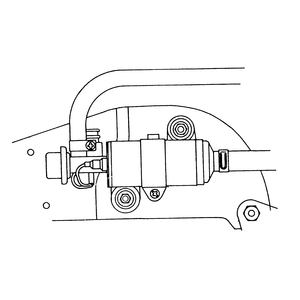
- Release the fuel system pressure.
- Disconnect the negative battery cable.
- Keep the fuel pump harness disconnected after releasing the fuel system
pressure.
- Raise and support the vehicle safely on jackstands.
- Clamp the middle portion of the hose connecting the pipe to the fuel pump
to prevent fuel from flowing out of the tank.
- Loosen the hose clamp and disconnect the hose.
- Remove the three pump bracket mounting bolts and remove the pump together
with the pump damper.
- Installation is the reverse of removal. Tighten all hoses and components.
- Connect the negative battery cable and test the fuel pump for proper operation.
- Check for leaks.
| Fig. 2: Fuel pump assembly — 2.2L, 2.5L
and 2.7L engines
|
CAUTION
Fuel injection systems remain under pressure after the engine has been turned
OFF. Properly relieve fuel pressure before disconnecting any fuel lines. Failure
to do so may result in fire or personal injury.
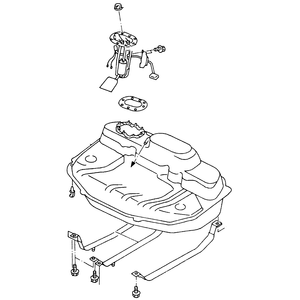
- Relieve the fuel system pressure.
- Disconnect the negative battery cable.
- Remove the rear seat bottom to reach the fuel pump access cover.
- On Legacy models, fold the seat back, then roll the floor mat back.
- Remove the fuel pump cover mounting bolts, then remove the fuel pump cover.
- Disconnect the electrical harness from the pump assembly.
- Tag and disconnect the fuel lines from the fuel pump.
- Remove the eight fuel pump mounting nuts.
- Remove the fuel pump assembly from the tank.
- Using a new gasket, install the fuel pump assembly into the fuel tank and
install the fuel pump mounting nuts. Tighten the nuts to 20–33 inch
lbs. (2–4 Nm) on Impreza models, 24–48 inch lbs. (3–6 Nm)
for Legacy models.
- Attach all remaining components, start the engine and check for leaks.
| Fig. 3: Fuel pump assembly — 3.3L engine
|
| Fig. 4: Carefully remove the fuel pump assembly from
the tank
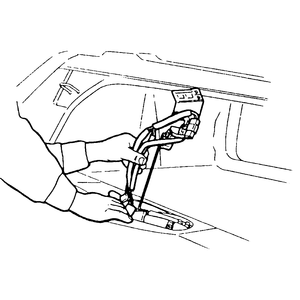
|
CAUTION
Fuel injection systems remain under pressure after the engine has been turned
OFF. Properly relieve fuel pressure before disconnecting any fuel lines. Failure
to do so may result in fire or personal injury.
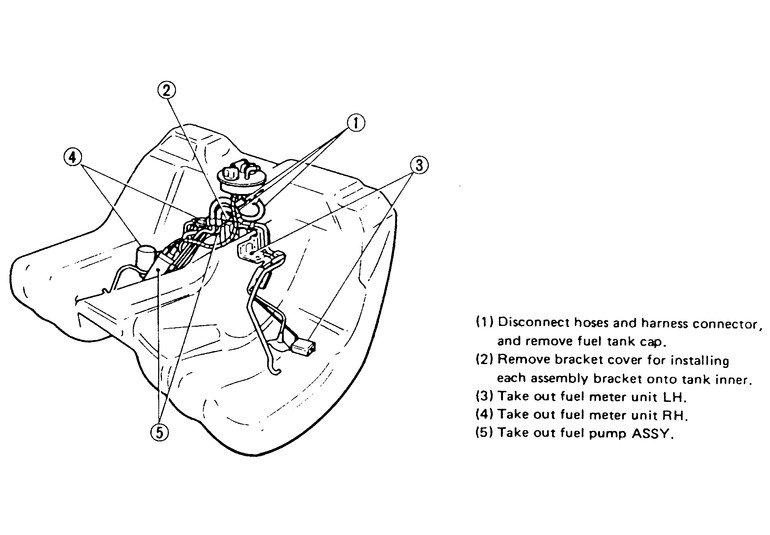
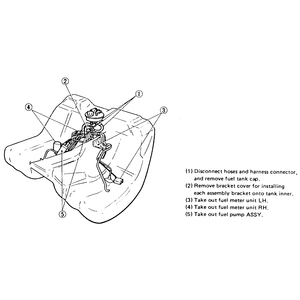
- Relieve the fuel system pressure.
- Disconnect the negative battery cable.
- Disconnect and tag the four hoses from the fuel sender assembly.
- Remove the fuel sender retaining cap using 42911PA000 or equivalent.
- Take out the left side fuel meter assembly.
- Take out the right side fuel meter assembly.
- Remove the fuel pump assembly.
- Installation is the reverse of removal.
- Connect the negative battery cable and check the system.