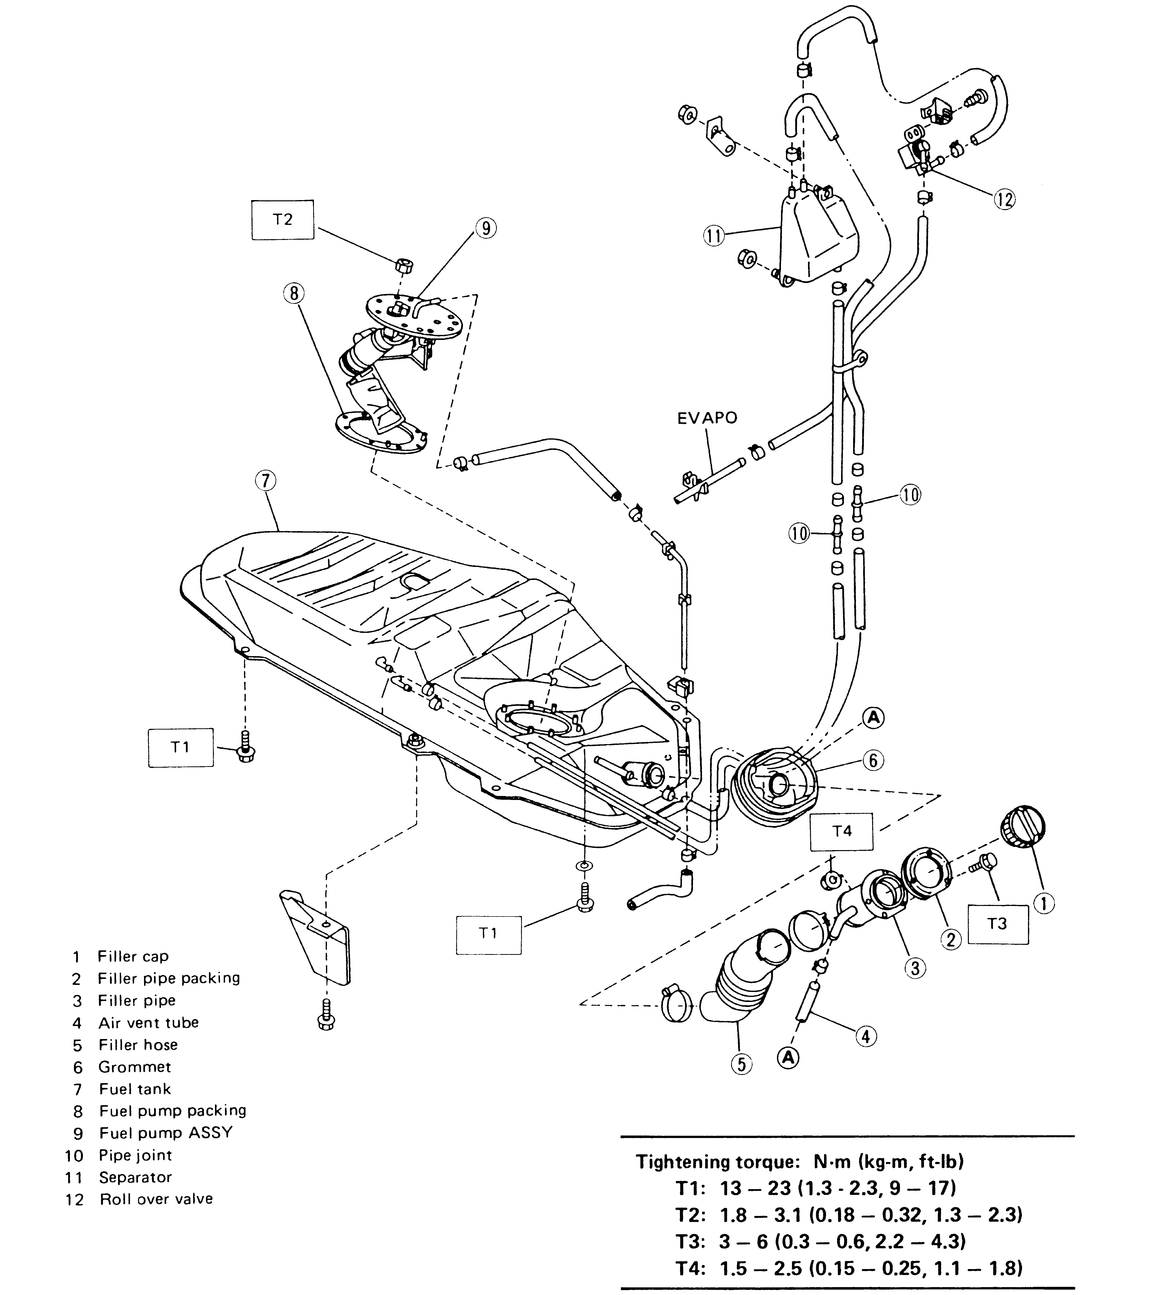
| Fig. 1: Fuel tank assembly — 3-door Justy
with fuel injection shown (carbureted similar)
|
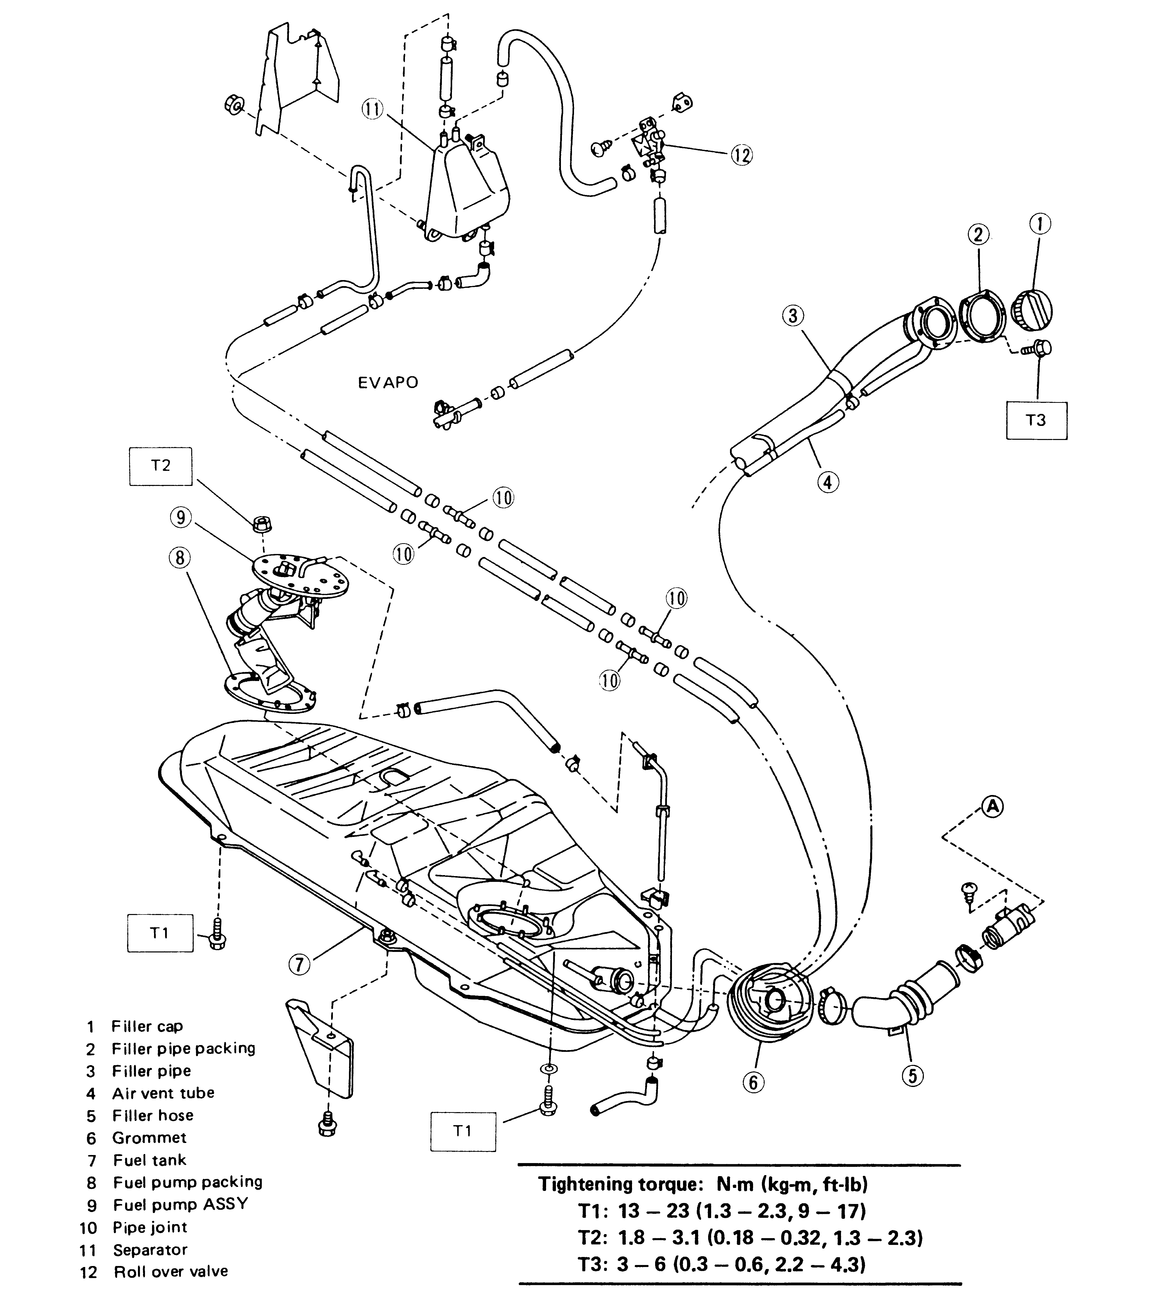
| Fig. 2: Fuel tank assembly — 5-door Justy
with fuel injection
|
- Disconnect the negative battery cable.
- Release the fuel system pressure, if equipped with fuel injection.
- Drain any fuel from the tank into a suitable container. Observe all fire
precautions.
- Remove the rear seat back and lower cushion assemblies.
- Remove the left side sill trim, then remove the filler pipe cover.
- Remove the separator and roll-over valve, and disconnect the tube from the
separator by moving the clip out of place.
- Remove the access hole plate, and disconnect the electrical harness from
the sender unit.
- Disconnect the fuel filler hose from the fuel tank.
- Disconnect the air vent hose from the filler pipe.
- Raise and safely support the vehicle on jackstands.
- Remove the two parking brake cable mounting bolts and lower the cable assembly.
- Remove the fuel filter bracket mounting bolts.
- Disconnect and cap the fuel lines from the tank-to-fuel filter and fuel
tank-to-return pipe.
- Support the tank with a suitable jack.
- Remove the six tank mounting bolts and lower the tank from the vehicle.
To install:
- Raise the fuel tank into position and install the six mounting bolts. Tighten
the mounting bolts to 13 ft. lbs. (18 Nm).
- Connect the fuel lines from the fuel filter-to-fuel tank and the fuel tank-to-return
pipe.
- Position the fuel filter bracket and install the mounting bolts.
- Position the parking brake cable assembly and install the mounting bolts.
- Lower the vehicle. Install the remaining components and secure to specifications.
- Install the rear seat back and lower cushion.
- Connect the negative battery cable.
- Start the vehicle and check for leaks.
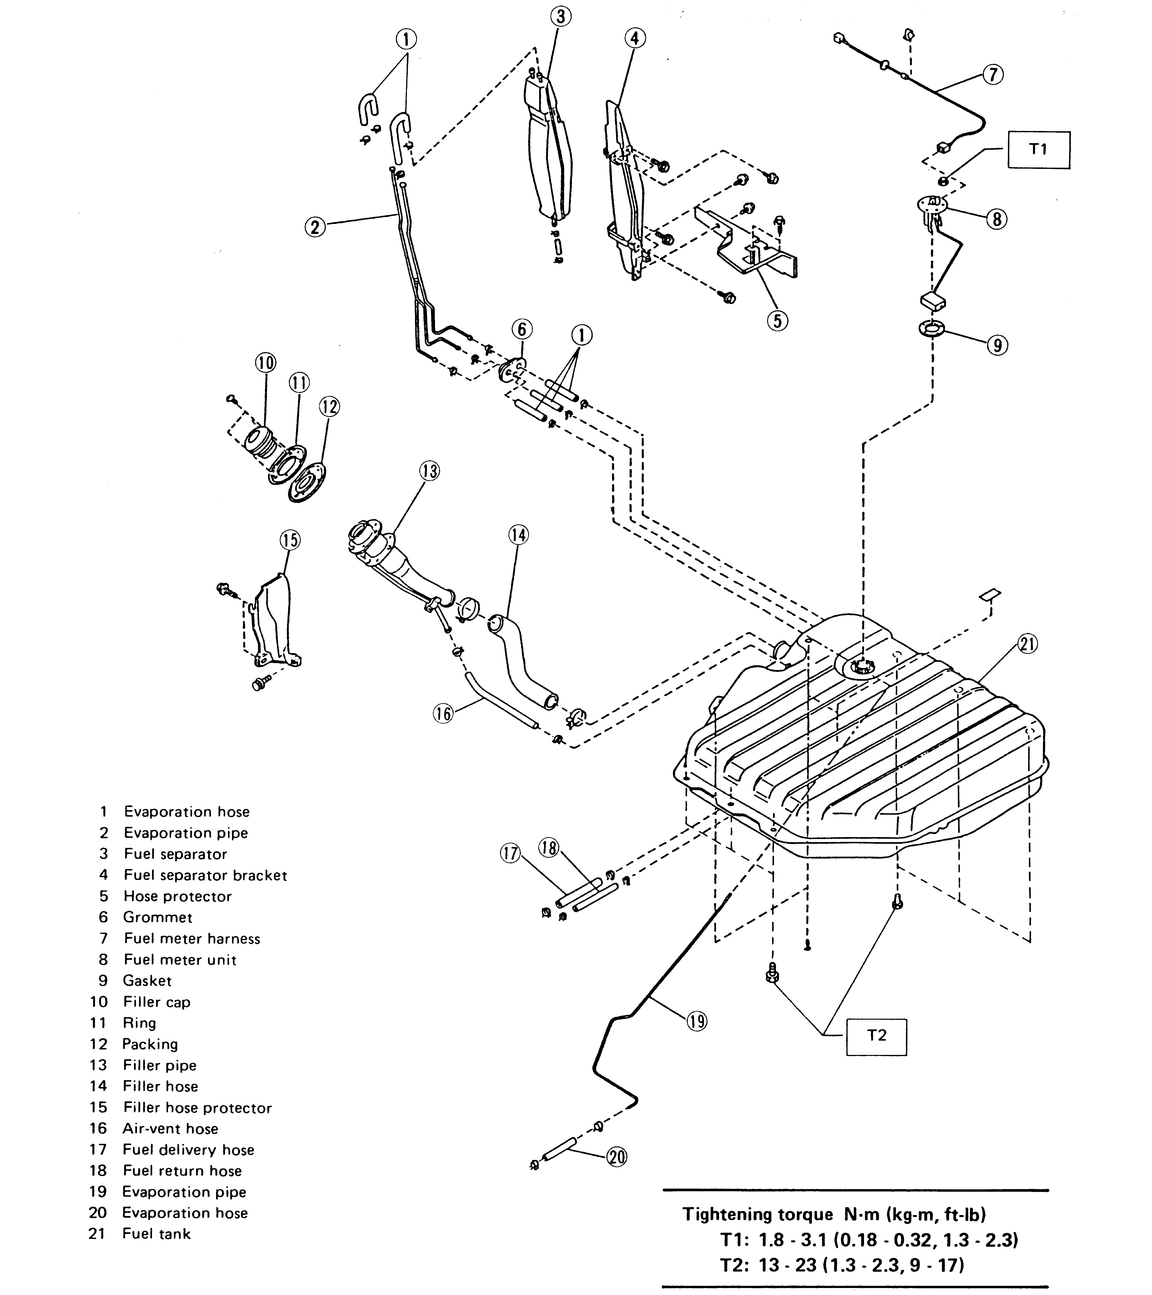
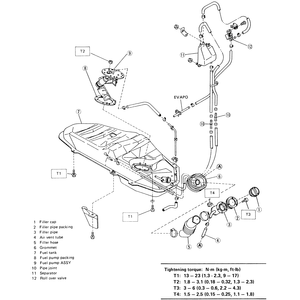
| Fig. 3: Fuel tank assembly — Coupe, XT,
Sedan, Wagon, Loyale and Brat
|
- Release the fuel system pressure, if equipped with fuel injection.
- Disconnect the negative battery cable.
- Raise and safely support the vehicle on jackstands.
- Remove the muffler and differential assembly, if equipped with 4WD.
- Remove the fuel filler cap and drain the fuel tank into a suitable container.
- Remove the fuel filler pipe protector.
- Remove the clamp and disconnect the fuel filler hose from the filler pipe.
- Remove the clamp and disconnect the vent hose from the vent pipe.
- Loosen the clamps and disconnect the fuel delivery, return and vent hoses
from the tank sender unit.
- Support the tank with a suitable jack and remove the tank mounting bolts.
- Lower the tank slightly and unfasten the electrical connector from the fuel
sender.
- Remove the tank from the vehicle.
To install:
- Raise the tank into position, fasten the electrical harness to the sender
and install the six mounting bolts.
- Connect the fuel delivery, return and vent hoses to the sender assembly,
then tighten the clamps.
- Connect the fuel filler and vent hoses and tighten the clamps.
- Install the fuel filler pipe protector.
- Install the differential carrier and muffler, if removed.
- Lower the vehicle.
- Refill the fuel system.
- Connect the negative battery cable.
- Start the vehicle and check for leaks.
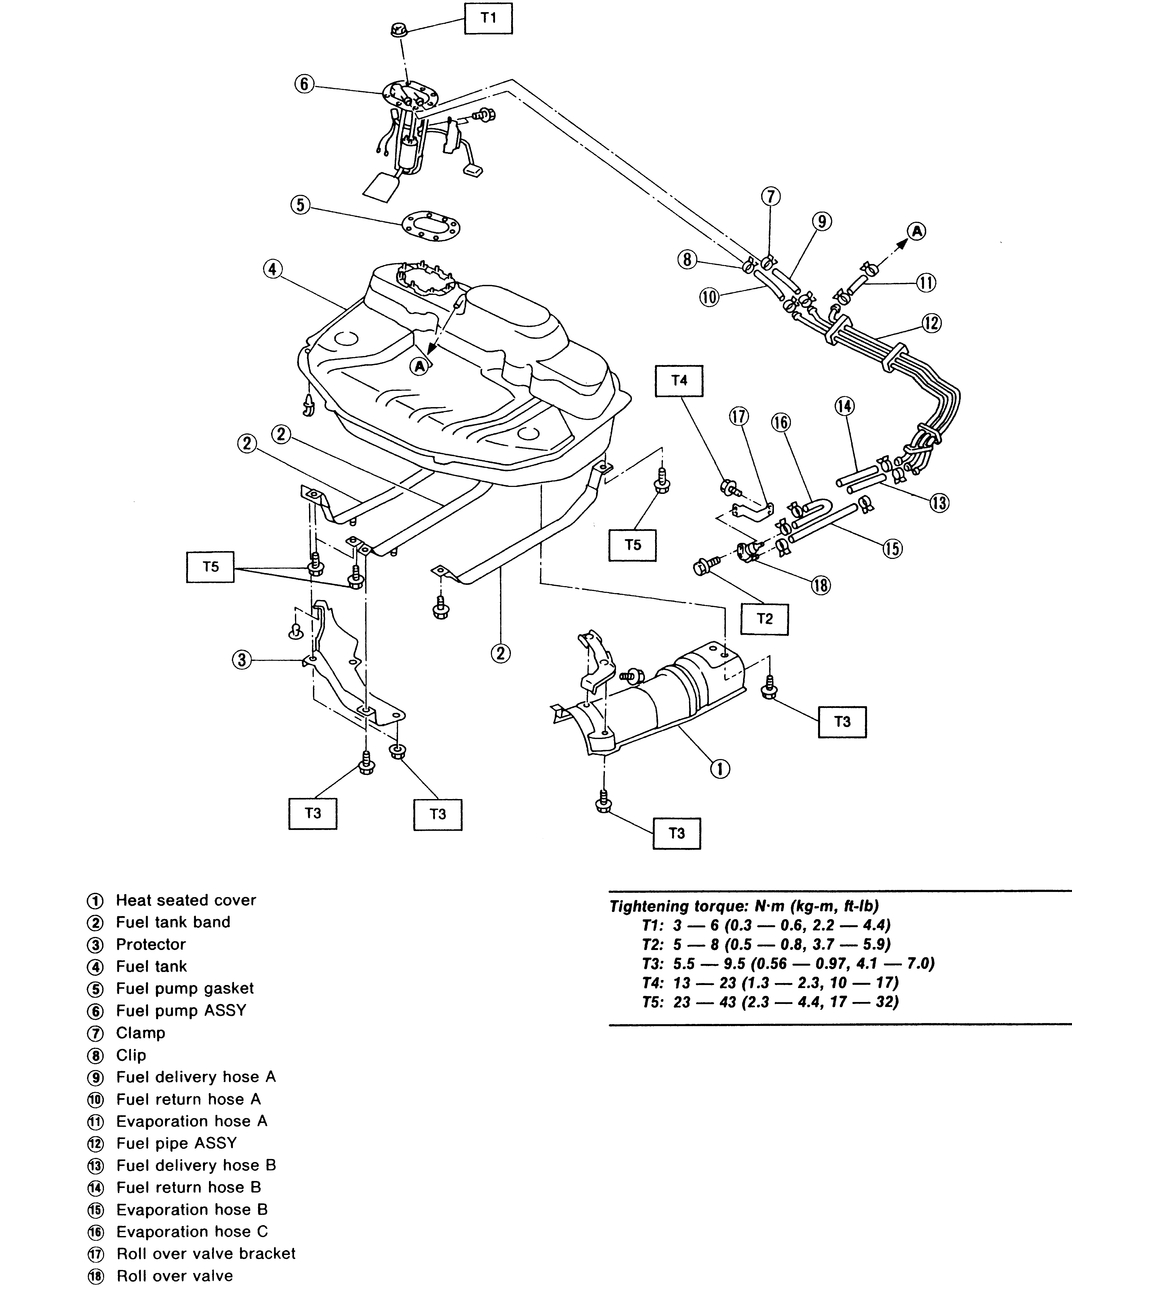
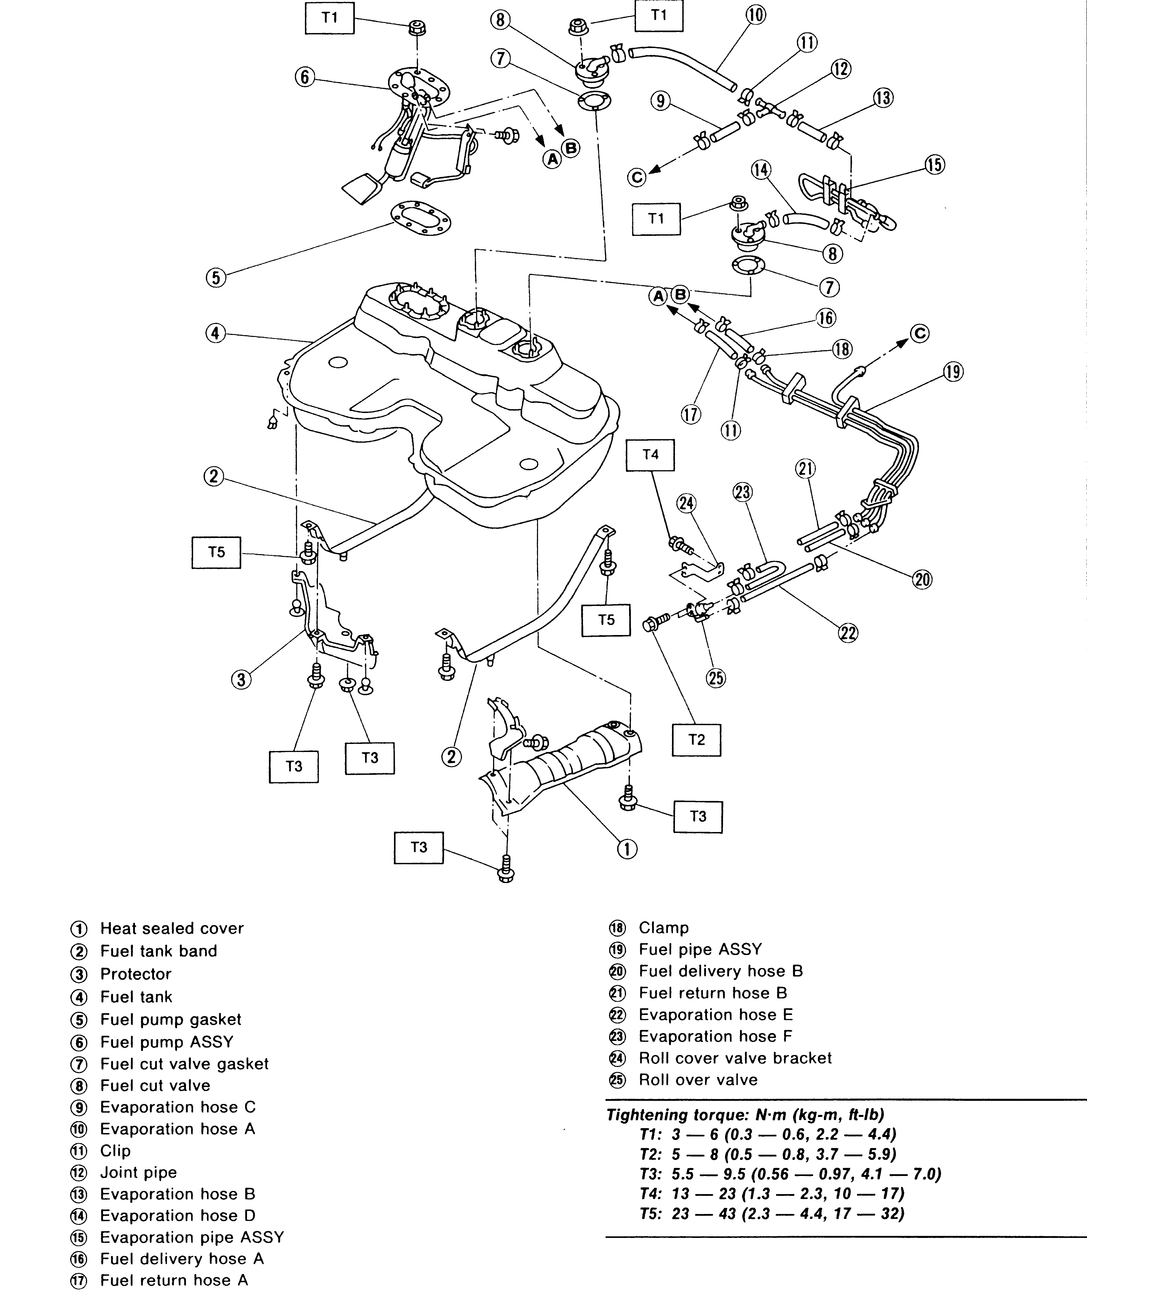
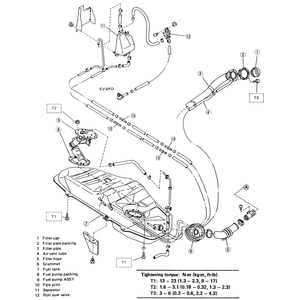
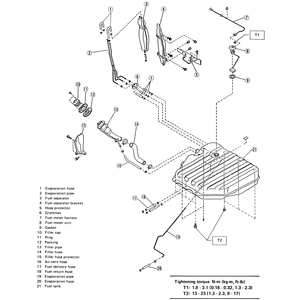
| Fig. 4: Fuel tank assembly — FWD Impreza
and Legacy
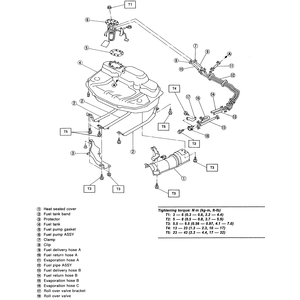
|
| Fig. 5: Fuel tank assembly — AWD Impreza
and Legacy
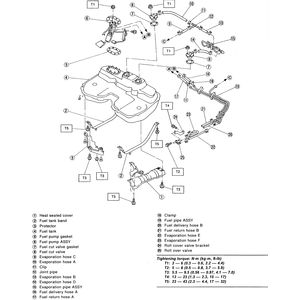
|
CAUTION
Fuel injection systems remain under pressure after the engine has been turned
OFF. Properly relieve fuel pressure before disconnecting any fuel lines. Failure
to do so may result in fire or personal injury.
- Relieve the fuel system pressure.
- Disconnect the negative battery cable.
- Remove the rear exhaust pipe and muffler assembly.
- On All Wheel Drive (AWD) vehicles, remove the rear differential assembly
and the rear crossmember.
- Remove the fuel filler cap and drain the fuel into a suitable container.
- Remove the fuel filler pipe protector.
- Raise and support the vehicle safely on jackstands.
- Remove the fuel filler, air vent and delivery hoses.
- On AWD vehicles, disconnect the air breather hoses and evaporation hose
from the pipes.
- Support the fuel tank with a floor jack or equivalent lifting device.
- Loosen the attaching bolts and lower the fuel tank slightly.
- Disconnect the fuel pump harness and, if equipped with AWD, disconnect the
fuel meter connector.
To install:
- Connect the pump harness.
- Raise the fuel tank into position and install the attaching bolts. Tighten
the bolts to 9–17 ft. lbs. (13–23 Nm).
NOTE: Ensure that the hoses and connectors are not pinched.
- On AWD vehicles, connect the air breather and evaporation hoses.
- Connect the fuel filler, air vent and delivery hoses.
- Install the fuel filler pipe protector.
- Install the fuel filler cap.
- On AWD vehicles, install the crossmember and rear differential assembly.
- Install the rear muffler assembly and exhaust pipe.
- Lower the vehicle.
- Fill the fuel tank with gasoline.
- Connect the negative battery cable.
- Start the vehicle and check for leaks.
CAUTION
Fuel injection systems remain under pressure after the engine has been turned
OFF. Properly relieve fuel pressure before disconnecting any fuel lines. Failure
to do so may result in fire or personal injury.
- Properly release the fuel system pressure.
- Disconnect the negative battery cable.
- Disconnect the fuel hose and air vent hose. Remove the fuel tank cap using
special tool 42911PA000 or equivalent.
- Properly drain the fuel from the tank into a suitable container.
- Install the fuel tank cap.
- Unfasten the fuel tank electrical connector.
- Raise and safely support the vehicle on jackstands.
- Remove the rear exhaust pipe and muffler assembly.
- Separate the rear axle shaft from the rear differential assembly.
- Remove the propeller shaft and the rear differential assembly.
- Remove the rear subframe.
- Separate the fuel filler duct from the pipe.
- Disconnect the fuel delivery, return and evaporative hoses from each pipe.
- Place a floor jack under the fuel tank to support it while removing it.
- While supporting the fuel tank, remove the bolts from the bands and lower
the fuel tank slowly.
To install:
- Position the fuel tank to the vehicle and install the band retaining bolts
snugly.
- Connect the fuel hoses.
- Tighten the band mounting bolts to 17–31 ft. lbs. (23–42 Nm).
- Connect the fuel filler pipe to the fuel filler duct. Install the remaining
components in the reverse order of removal.
- Connect the fuel hose and air vent hose.
- Connect the negative battery cable.
- Fill the tank with fuel, start the vehicle and check for leaks.