Previous Next

DRIVELINE

Driveshaft and U-Joints

REMOVAL & INSTALLATION

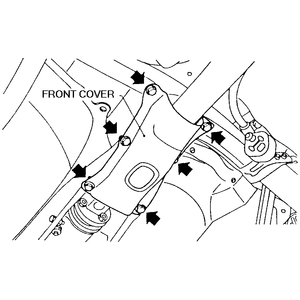
Fig. 1: The rear cover splash shield is secured by the indicated fasteners

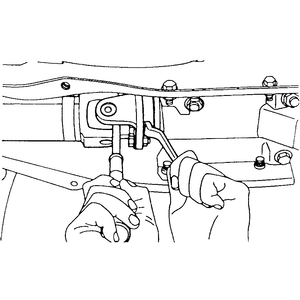
Fig. 2: Removing or installing the driveshaft-to-differential flange bolts

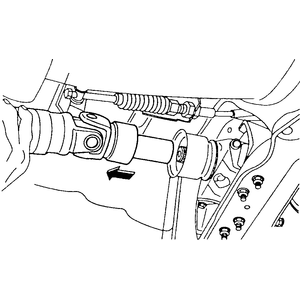
Fig. 3: Removing or installing the center bearing support bolts

Fig. 4: Removing or installing the driveshaft at the transfer case tailshaft

  1. Raise and support the vehicle safely.
  2. Remove the differential mount front cover, if so equipped.
  3. Remove the exhaust shield, exhaust pipe and muffler if necessary.
  4. Remove the driveshaft flange to rear differential flange bolts.

    NOTE: If equipped with a center bearing, remove the center bearing to chassis bolts and lower the assembly from the vehicle. Also note that the SVX uses an double offset type joint at the center of the driveshaft.

  5. Position a drain pan under the rear of the transaxle. Remove the driveshaft from the vehicle.
  6. Inspect the driveshafts. Replace the parts as required if any of the following conditions are found:
    1. Driveshaft tube is dented or has cracks on the surface.
    2. Deformation or abnormal wear of the shaft splines.
    3. The driveshaft run-out exceeds 0.024 in. (0.6mm)
    4. U-joints making abnormal noise or rough operation.
  7. Inspect the center bearing. Replace the center bearing if any of the following conditions are found:
    1. Center bearing has excessive free-play or makes abnormal noise.
    2. Center bearing oil seals worn or damaged.
    3. Center bearing is broken.

      To install:

  8. Install the driveshaft and tighten the flange bolts to 17–24 ft. lbs. (24–32 Nm).
  9. If equipped with a center bearing, raise the assembly and install the center bearing bolts. Tighten center bearing attaching bolts to 25–33 ft. lbs. (34–44 Nm).
  10. Install the exhaust shield, exhaust pipe and muffler if removed.
  11. Install the differential mount front cover, if removed.
  12. Lower the vehicle, check the transaxle fluid level and test drive.

Previous Next