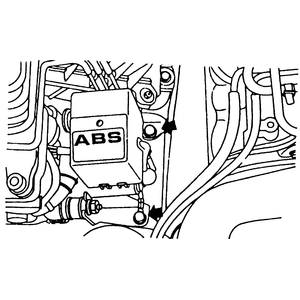
Fig. 1: ABS hydraulic assembly and mounting bolts in
engine compartment
Disconnect the harness connectors at the hydraulic unit.
Remove the emission canister from the engine compartment to allow access.
Disconnect the inlet and outlet lines from the top of the actuator. Label
the lines before removal; exact reinstallation is required.
Immediately plug the lines and ports to prevent entry of dirt and debris
into the system.
Remove the screw holding the ABS relay cover and remove the cover.
Remove the bolts holding the hydraulic unit bracket to the body. Note that
one of these bolts has the pump motor ground lug attached.
Lift the actuator and bracket clear of the vehicle. Keep the unit upright
at all times; do not drop or bump it.
The brackets and relays may be removed for transfer to a replacement unit.
Except for the 2 relays, the hydraulic unit contains no replaceable components.
Never attempt to disassemble the unit or repair it.
To install:
Install or transfer the relays and brackets. The nuts on the bushing bolts
holding the hydraulic unit to the brackets should be tightened to 6 ft. lbs.
(8 Nm).
Install the hydraulic unit and brackets into the engine compartment. The
nuts and bolts holding the brackets to the body should be tightened to 25
ft. lbs. (34 Nm). Make certain the pump motor ground lug is engaged beneath
the proper bolt.
Check that the relays are firmly seated in place. Install the relay cover
box and tighten the screw just snug. Do not overtighten. Install the remaining
components in the reverse order of removal.
Bleed all 4 wheels, then bleed the hydraulic actuator. Both the primary
and secondary circuits must be bled.