CAUTION
The fuel injection system remains under pressure after the engine has been turned
OFF. Properly relieve fuel pressure before disconnecting any fuel lines.
Failure to do so may result in fire or personal injury.
- Before servicing the vehicle, refer to the precautions in the beginning
of this section.
- Relieve the fuel system pressure.
- Drain the engine oil and coolant.
- Discharge and recover the air conditioning system.
- Remove or disconnect the following:
- Negative battery cables and battery
- Engine undercover
- Radiator hoses and fan motor harness
- Radiator
- Air conditioning compressor and cap the lines
- Air intake duct
- Air cleaner element and upper cover
- Evaporative Emissions (EVAP) canister and bracket
- Front Oxygen (O2S) sensor
- If equipped with California emissions specifications, disconnect the rear
O2S sensor.
- Remove or disconnect the following:
- Engine ground terminal
- Crankshaft Position (CKP) sensor connector
- Camshaft Position (CMP) sensor connector
- Knock Sensor (KS) connector
- Alternator connector and terminal
- Air conditioning compressor connectors, if equipped
- Accelerator cable
- Cruise control cable, if equipped
- Brake booster hose
- Heater inlet and outlet hoses
- Alternator drive belt
- Wires from the spark plugs on the left side of the engine
- Power steering pump line bracket
- Power steering pump, leaving the lines connected and position it aside
- Exhaust Y-pipe
- Lower starter nuts
- Lower engine-to-transmission nuts
- Front engine mount-to-crossmember nuts
- Starter
- If equipped with an automatic transmission, perform the following:
- Remove the torque converter service hole plug.
- Matchmark the torque converter-to-driveplate.
- Rotate the engine to remove the torque converter-to-driveplate bolts
as they become accessible.
- Remove or disconnect the following:
- Flywheel cover, if equipped with a manual transmission
- Pitching stopper
- Fuel delivery, return and evaporation hoses
- Support the engine with a suitable lifting device attached to the engine
lifting eyes.
- Slightly raise the engine.
- Raise the transmission with a floor jack.
- If equipped with a manual transmission, pull the engine forward then up
and out of the vehicle to clear the transmission mainshaft.
- If equipped with an automatic transmission, pull the engine forward then
up and out of the vehicle.
To install:
- If equipped with a manual transmission, apply a small amount of grease to
the splines of the mainshaft.
- Position the engine in the engine compartment and align it with the transmission.
- Install the engine. Torque the upper bolts to 34–40 ft. lbs. (44–54
Nm).
- Remove the lifting device and floor jack.
- Install or connect the following:
- Pitching stopper. Torque the bolts to 49 ft. lbs. (67 Nm) on the body
side and 40 ft. lbs. (54 Nm) on the bracket side.
- Flywheel cover, if equipped with a manual transmission
- If equipped with an automatic transmission, perform the following:
- Align the matchmarks, install the torque converter-to-driveplate bolts
while rotating the engine and tighten to 20 ft. lbs. (26 Nm).
- Install the service hole cover.
- Install or connect the following:
- EVAP canister and bracket
- Power steering pump. Tighten the retainer bolts to 22–36 ft. lbs.
(29–47 Nm).
- Accessory drive belt
- Starter. Torque the bolts to 34–40 ft. lbs. (44–52 Nm).
- Lower engine-to-transmission nuts. Tighten them to 34–40 ft. lbs.
(44–52 Nm).
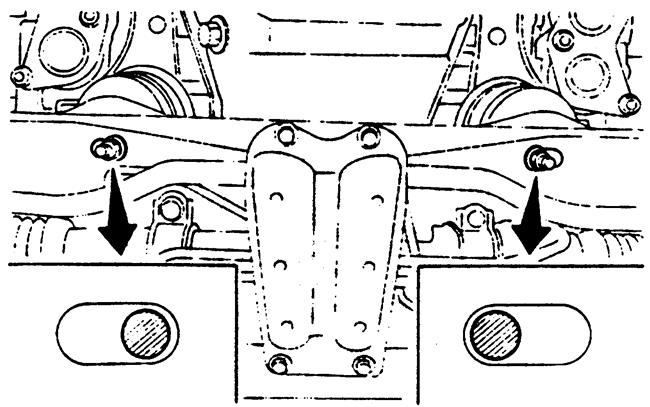
| Fig. 1: Be sure to tighten the front cushion
rubber mounting bolts in the innermost elliptical hole in the
front crossmember

|
- Lower engine mounting nuts. Tighten them to 61 ft. lbs. (83 Nm) in the
inner most elliptical hole in the front crossmember so the clearance is
0.16–0.24 in. (4–6mm).
- Exhaust Y-pipe with new gaskets and nuts
- Brake booster hose
- Heater inlet and outlet hoses
- Accelerator cable
- Cruise control cable, if equipped
- Engine harness connectors
- Engine ground terminal
- CKP sensor connector
- CMP sensor connector
- Knock sensor connector
- Alternator connector and terminal
- Air conditioning compressor connectors, if equipped
- Front O2S sensor, and if removed, the rear O2S sensor.
- Air cleaner element and cover
- Air conditioning lines with new O-rings, if equipped. Torque the bolts
to 23 ft. lbs. (31 Nm).
- Radiator
- Engine undercover
- Negative battery cable
- Fill the crankcase to the proper level with clean engine oil.
- Fill and bleed the cooling system.
- Charge the air conditioning system using an approved recovery/recycling
machine.
- If equipped, check the automatic transmission fluid level and add Dexron® II
if necessary.
- Start the engine and allow it to reach normal operating temperature. Check
for leaks.