Previous Next

Control Arm

Removal & Installation

To Remove:

  1. Before servicing the vehicle, refer to the precautions at the beginning of this section.
  2. Disconnect ground cable from battery.
  3. Safely raise and support the vehicle.
  4. Remove or disconnect the following:

To Install:

  1. Temporarily tighten the two bolts used to secure rear bushing of the transverse link to body.

    Note: These bolts should be tightened so they can still move back and forth in the bracket.

  2. Install bolts used to connect transverse link to crossmember and temporarily tighten with nut.

    CAUTION
    Discard loosened self-locking nut and replace with a new one.

  3. Insert ball joint into housing.

  4. Connect stabilizer link to transverse link, and temporarily tighten bolts.

    CAUTION
    Discard loosened self-locking nut and replace with a new one.

  5. Lower the vehicle.
  6. Tighten transverse link to stabilizer.
  7. Tighten transverse link to crossmember
  8. Tighten transverse link rear bushing and body

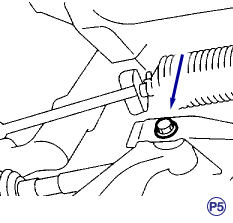
    Note: Before tightening, move rear bushing back and forth until transverse link-to-rear bushing clearance is established (as indicated in figure.)

  9. Install sub frame.
  10. Check wheel alignment and adjust if necessary.

Previous Next