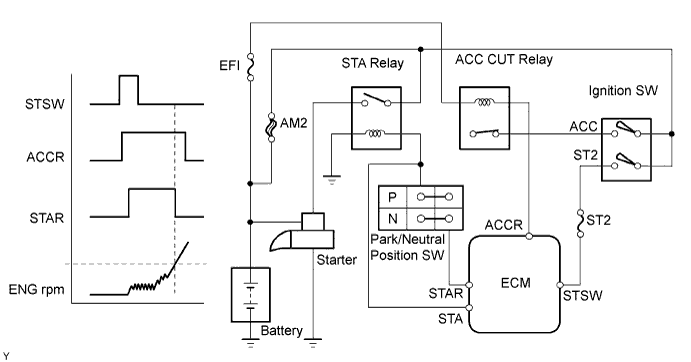
SFI SYSTEM > Cranking Holding Function Circuit |
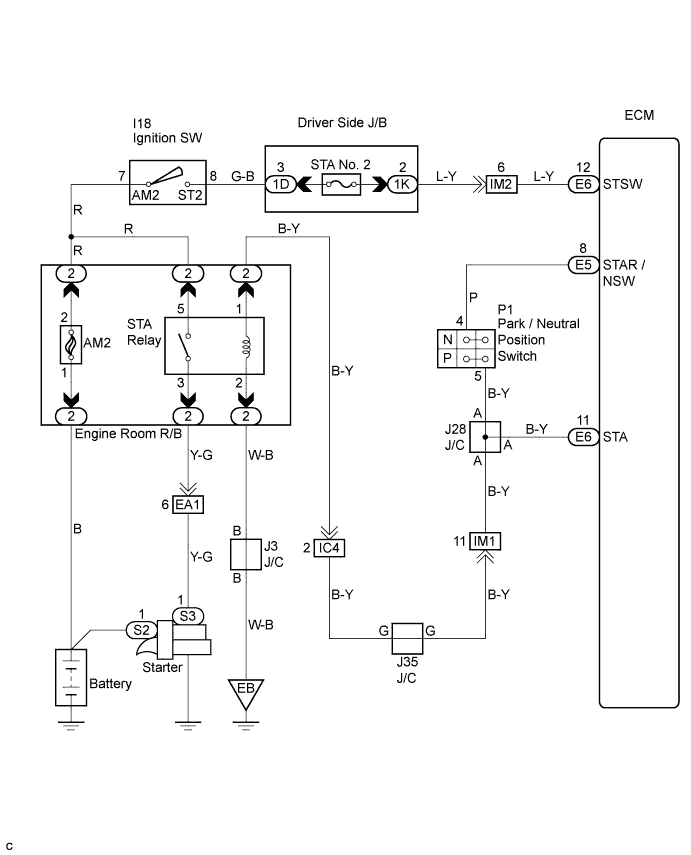
| 1.CHECK OPERATION OF ENGINE CRANKING |
When turning the ignition switch to the START position check if the starter motor starts.
|
| ||||
| NG | |
 |
| 2.READ VALUE OF INTELLIGENT TESTER (STA SIGNAL) |
Connect the intelligent tester to the DLC3 with CAN VIM.
Enter the following menu: DIAGNOSIS / ENHANCED OBDII / DATA LIST / PRIMARY / STARTER SIG.
Confirm the starter signal status when the ignition switch is operated.
| Ignition Switch Position | STARTER SIG |
| ON | OFF |
| Start | ON |
|
| ||||
| NG | |
|
| 3.INSPECT ECM (STA AND STSW VOLTAGE) |
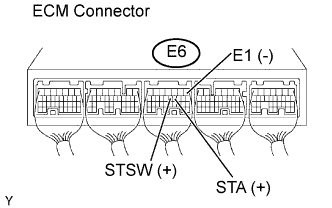 |
Measure the voltage of the E6 ECM connector while cranking the engine (ignition switch is in the START position).
| Tester Connection | Specified Condition |
| STA (E6-11) - E1 (E6-1) | 9 to 14 V |
| STSW (E6-12) - E1 (E6-1) |
| Terminal STSW | Terminal STA | Proceed to |
| 9 to 14 V | 9 to 14 V | A |
| 0 V | B | |
| 0 V | C |
|
| ||||
|
| ||||
| A | |
|
| 4.INSPECT PARK / NEUTRAL POSITION SWITCH |
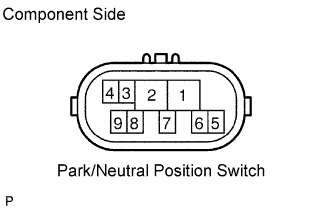 |
Disconnect the P1 park / neutral position switch connector.
Measure the resistance between each terminal shown below when the shift lever is moved to each position.
| Shift Position | Tester Connection | Specified Condition |
| P | 2 - 6, 4 - 5 | Below 1 Ω |
| R | 1 - 2 | |
| N | 2 - 9, 4 - 5 | |
| D | 2 - 7 | |
| 2 | 2 - 3 | |
| L | 2 - 8 |
Reconnect the park / neutral position switch connector.
|
| ||||
| OK | ||
 | ||
| ||
| 5.INSPECT STARTER RELAY |
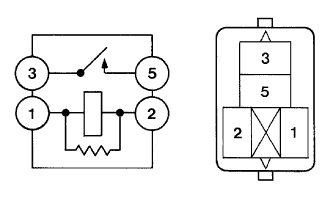 |
Remove the starter relay from the engine room relay block.
Measure the resistance of the starter relay.
| Tester Connection | Specified Condition |
| 3 - 5 | 10 kΩ or higher |
| 3 - 5 | Below 1 Ω (when battery voltage applied to terminals 1 and 2) |
Reinstall the starter relay.
|
| ||||
| OK | |
|
| 6.CHECK HARNESS AND CONNECTOR (PARK / NEUTRAL POSITION SWITCH - STARTER RELAY, STARTER RELAY - BODY GROUND) |
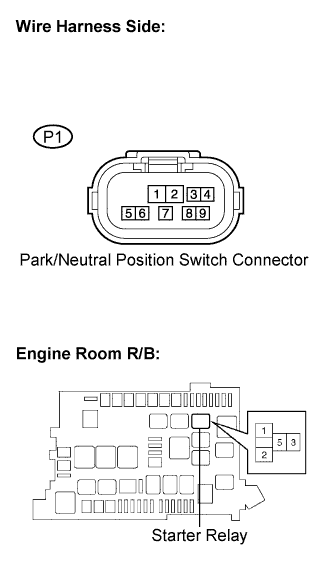 |
Check the harness and the connector between the park / neutral position switch connector and the starter relay.
Disconnect the P1 park/neutral position switch connector.
Remove the starter relay from the engine room relay block.
Measure the resistance between the wire harness side connectors.
| Tester Condition | Specified condition |
| Park/Neutral position switch (P1-6) - Starter relay (1) | Below 1 Ω |
| Tester Condition | Specified condition |
| Park/Neutral position switch (P1-6) or Starter relay (1) Body ground | 10 kΩ or higher |
Reinstall the starter relay.
Reconnect the park/neutral position switch.
Check the harness and the connector between the starter relay and the body ground.
Remove the starter relay from the engine room relay block.
Measure the resistance between the starter relay and the body ground.
| Tester Condition | Specified condition |
| Starter relay (2) - Body ground | Below 1 Ω |
|
| ||||
| OK | |
|
| 7.INSPECT ENGINE ROOM RELAY BLOCK (STARTER RELAY VOLTAGE) |
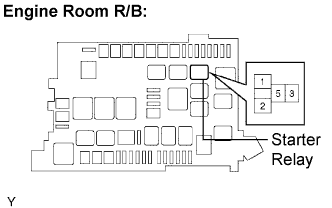 |
Remove the Starter relay from the engine room relay block.
Measure the voltage of the engine room relay block and body ground.
| Tester Connection | Specified Condition |
| Engine room relay block (Starter relay terminal 5) - Body ground | 9 to 14 V |
Reinstall the Starter relay.
|
| ||||
| OK | |
|
| 8.INSPECT STARTER ASSEMBLY |
Inspect the starter assembly (Click here).
|
| ||||
| OK | ||
| ||
| ||
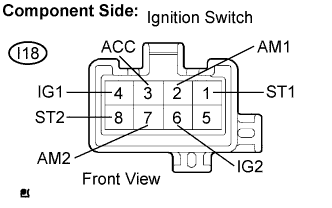
| 9.INSPECT IGNITION SWITCH ASSEMBLY |
 |
Remove the lower finish panel.
Disconnect the I18 ignition switch connector.
Measure the resistance of the connector terminals shown in the chart below.
| Switch Position | Tester Connection | Specified Condition |
| LOCK | All terminals | 10 kΩ or higher |
| ACC | 2 - 3 | Below 1 Ω |
| ON | 2 - 3 2 - 4, 6 - 7 | |
| START | 1 - 2, 2 - 4 6 - 7, 6 - 8 |
Reconnect the I18 ignition switch connector.
|
| ||||
| OK | ||
| ||
| ||

