 |
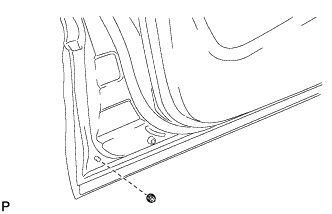
Remove the nut.
OUTSIDE MOULDING > REMOVAL |
| 1. REMOVE FRONT DOOR OUTSIDE MOULDING SUB-ASSEMBLY |
| Item | Temperature |
| Vehicle Body | 40 to 60°C (104 to 140°F) |
| Moulding | 20 to 30°C (68 to 86°F) |
|
Remove the nut.
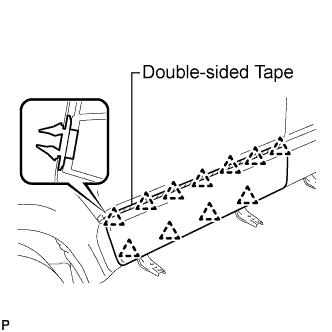 |
Using a heat light, heat the front door outside moulding sub-assembly.
Using a knife, cut the double-sided tape.
Disengage the 11 clips and remove the front door outside moulding sub-assembly.
| 2. REMOVE NO. 3 OUTSIDE MOULDING CLIP |
Remove the 2 No. 3 outside moulding clips.
| 3. REMOVE NO. 4 OUTSIDE MOULDING CLIP |
Remove the 9 No. 4 outside moulding clips.
| 4. REMOVE FRONT DOOR OUTSIDE MOULDING PAD UPPER |
Remove the front door outside moulding pad upper.
| 5. REMOVE NO. 3 OUTSIDE MOULDING RETAINER |
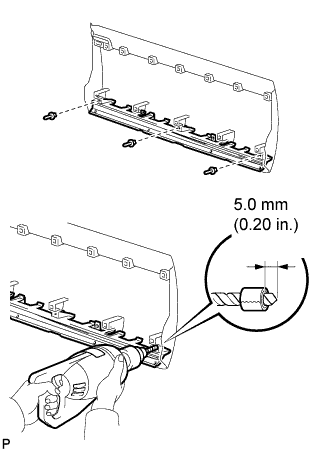 |
Put a 4.0 mm (0.16 in.) drill bit into a drill.
Tape the 4.0 mm (0.16 in.) drill bit without covering the portion that is 5.0 mm (0.20 in.) from the tip.
Lightly press the drill against the rivets, drill off the flanges of the rivets, and remove the 3 rivets.
Using a vacuum cleaner, remove the rivet fragments and shavings from the drilled areas.
Remove the No. 3 outside moulding retainer from the front door outside moulding.
| 6. REMOVE FRONT DOOR OUTSIDE MOULDING |
| 7. REMOVE REAR DOOR OUTSIDE MOULDING SUB-ASSEMBLY |
| Item | Temperature |
| Vehicle Body | 40 to 60°C (104 to 140°F) |
| Moulding | 20 to 30°C (68 to 86°F) |
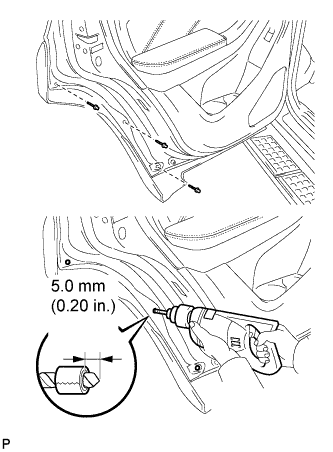 |
Put a 4.0 mm (0.16 in.) drill bit into a drill.
Tape the 4.0 mm (0.16 in.) drill bit without covering the portion that is 5.0 mm (0.20 in.) from the tip.
Lightly press the drill against the rivets, drill off the flanges of the rivets, and remove the 3 rivets.
Using a vacuum cleaner, remove the rivet fragments and shavings from the drilled areas.
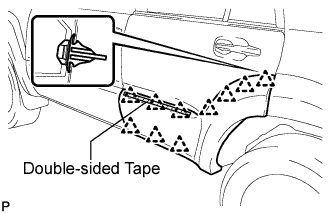 |
Using a heat light, heat the rear door outside moulding sub-assembly.
Using a knife, cut the double-sided tape.
Disengage the 10 clips and remove the rear door outside moulding sub-assembly.
| 8. REMOVE NO. 3 OUTSIDE MOULDING CLIP |
Remove the 4 No. 3 outside moulding clips.
| 9. REMOVE NO. 4 OUTSIDE MOULDING CLIP |
Remove the 6 No. 4 outside moulding clips.
| 10. REMOVE WHEEL HOUSE SEAL FRONT |
Remove the wheel house seal front.
| 11. REMOVE NO. 1 BODY OUTSIDE MOULDING PAD |
Remove the No. 1 body outside moulding pad.
| 12. REMOVE NO. 1 REAR DOOR MOULDING PAD |
Remove the No. 1 rear door moulding pad.
| 13. REMOVE REAR DOOR OUTSIDE MOULDING PAD UPPER |
Remove the rear door outside moulding pad upper.
| 14. REMOVE NO. 5 OUTSIDE MOULDING RETAINER |
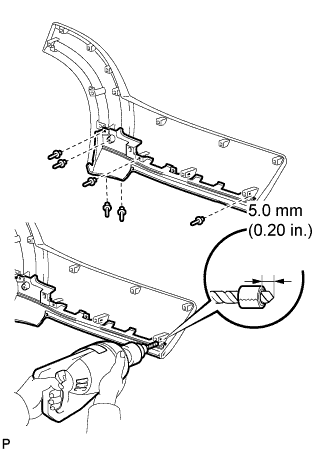 |
Put a 4.0 mm (0.16 in.) drill bit into a drill.
Tape the 4.0 mm (0.16 in.) drill bit without covering the portion that is 5.0 mm (0.20 in.) from the tip.
Lightly press the drill against the rivets, drill off the flanges of the rivets, and remove the 6 rivets.
Using a vacuum cleaner, remove the rivet fragments and shavings from the drilled areas.
Remove the No. 5 outside moulding retainer from the rear door outside moulding.
| 15. REMOVE REAR DOOR OUTSIDE MOULDING |
| 16. REMOVE FRONT BODY MUDGUARD |
Remove the 4 screws, 3 clips and front body mudguard.
| 17. REMOVE STEP SUB-ASSEMBLY |
Remove the 6 bolts.
with Step light:
Disconnect the step light wiring connector.
Remove the step sub-assembly.
| 18. REMOVE ROCKER PANEL MOULDING SUB-ASSEMBLY |
| Item | Temperature |
| Vehicle Body | 40 to 60°C (104 to 140°F) |
| Moulding | 20 to 30°C (68 to 86°F) |
Remove the 2 screws and 4 clips.
Using a heat light, heat the rocker panel moulding sub-assembly.
Using a knife, cut the double-sided tape.
Disengage the 8 clips and remove the rocker panel moulding sub-assembly.
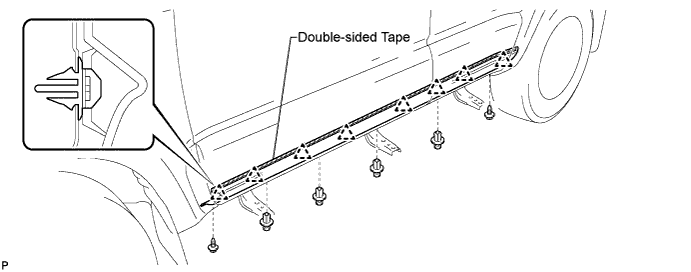
| 19. REMOVE NO. 1 OUTSIDE MOULDING CLIP |
Remove the 3 No. 1 outside moulding clips.
| 20. REMOVE NO. 2 OUTSIDE MOULDING CLIP |
Remove the 5 No. 2 outside moulding clips.
| 21. REMOVE NO. 1 ROCKER PANEL MOULDING PROTECTOR |
Remove the No. 1 rocker panel moulding protector.
| 22. REMOVE ROCKER PANEL MOULDING FRONT |
| 23. REMOVE DISCONNECT BATTERY NEGATIVE TERMINAL |
| 24. REMOVE FRONT BUMPER ASSEMBLY |
| 25. REMOVE FRONT BUMPER SIDE SUPPORT |
| 26. REMOVE FRONT WHEEL OPENING EXTENSION SUB-ASSEMBLY |
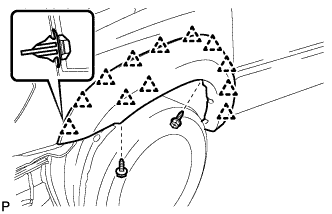 |
Remove the 2 screws.
Disengage the 12 clips and remove the front wheel opening extension sub-assembly.
| 27. REMOVE NO. 1 OUTSIDE MOULDING CLIP |
Remove the 3 No. 1 outside moulding clips.
| 28. REMOVE NO. 2 OUTSIDE MOULDING CLIP |
Remove the 9 No. 2 outside moulding clips.
| 29. REMOVE FRONT FENDER OUTSIDE MOULDING PAD |
Remove the front fender outside moulding pad.
| 30. REMOVE BODY OUTSIDE MOULDING PAD |
Remove the body outside moulding pad.
| 31. REMOVE FRONT WHEEL OPENING OR ARCH MOULDING EXTENSION |
| 32. REMOVE QUARTER PANEL MUDGUARD SUB-ASSEMBLY REAR LH |
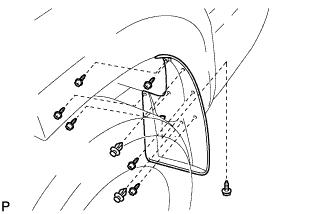 |
Using a clip remover, remove the 2 clips.
Remove the 7 screws and quarter panel mudguard sub-assembly rear LH.
| 33. REMOVE QUARTER PANEL MUDGUARD SUB-ASSEMBLY REAR RH |
| 34. REMOVE REAR BUMPER ASSEMBLY |
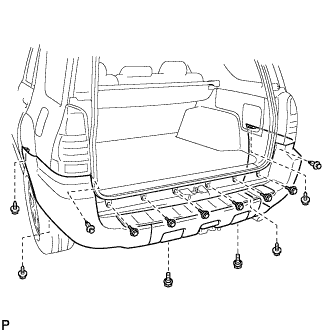 |
Using a clip remover, remove the 2 clips.
Remove the 8 bolts and 4 screws.
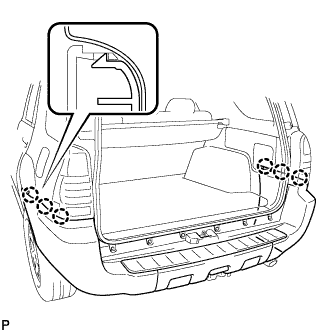 |
Disengage the 6 claws and remove the rear bumper assembly.
| 35. REMOVE REAR QUARTER OUTSIDE MOULDING SUB-ASSEMBLY |
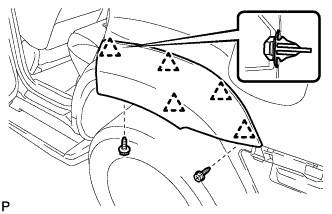 |
Remove the 2 screws.
Disengage the 5 clips and remove the rear quarter outside moulding sub-assembly.
| 36. REMOVE NO. 3 OUTSIDE MOULDING CLIP |
Remove the 2 No. 3 outside moulding clips.
| 37. REMOVE NO. 4 OUTSIDE MOULDING CLIP |
Remove the 3 No. 4 outside moulding clips.
| 38. REMOVE NO. 1 QUARTER PANEL MOULDING PAD |
Remove the No. 1 quarter panel moulding pad.
| 39. REMOVE REAR QUARTER OUTSIDE MOULDING |