 |
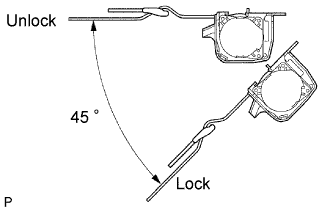
Check the degree of tilt when the belt begins to lock the ELR.
- NOTICE:
- Do not disassemble the retractor.
REAR CENTER SEAT OUTER BELT ASSEMBLY (for Rear No. 1 Seat) > INSTALLATION |
| 1. INSTALL REAR SEAT BELT ASSEMBLY OUTER CENTER (for Rear No. 1 Seat) |
|
Check the degree of tilt when the belt begins to lock the ELR.
Check the amount of inclination required to lock the retractor.
When the inclination of the retractor is 15° or less, check that the belt can be pulled from the retractor. When the inclination of the retractor is over 45°, check that the belt locks.
If operation is not as specified, replace the belt assembly.
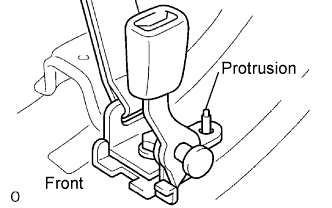 |
Install the belt with the bolt as shown in the illustration.
Install the belt on the retractor side with the nut.
Install the seat shoulder belt cover.
Install the seatback board RH.
Install the belt outer on the floor anchor side with the bolt.
Check the ELR lock.
With the belt installed, check that the belt locks when it is pulled out quickly.
If operation is not as specified, replace the belt assy.
Check the fastening function of the child restraint system.
When the belt is pulled out fully, the belt should automatically try to retract.
After the belt has fully retracted, the belt should be able to be pulled out and retract again.
If operation is not as specified, replace the belt assembly.
| 2. INSTALL ROOF SIDE GARNISH ASSEMBLY INNER RH (w/ Rear No. 2 Seat) |
| 3. INSTALL ROOF SIDE GARNISH ASSEMBLY INNER RH |
| 4. INSTALL DECK TRIM SIDE PANEL ASSEMBLY (w/ Rear No. 2 Seat) |
| 5. INSTALL DECK TRIM SIDE PANEL ASSEMBLY |
| 6. INSTALL REAR FLOOR CARPET ASSEMBLY |
| 7. INSTALL DECK TRIM COVER REAR |
| 8. INSTALL REAR DOOR WEATHERSTRIP RH |
| 9. INSTALL REAR DOOR SCUFF PLATE RH |
| 10. INSTALL QUARTER SCUFF PLATE INNER RH (w/ Rear No. 2 Seat) |
| 11. INSTALL SIDE TRIM BOX ASSEMBLY RH |
| 12. INSTALL DECK TRIM SIDE BOARD UPR RH |
| 13. INSTALL DECK TRIM COVER REAR |
| 14. INSTALL DECK FLOOR BOX RH |
| 15. INSTALL REAR FLOOR MAT SUPPORT PLATE REAR |
| 16. INSTALL DECK BOARD ASSEMBLY (w/o Rear No. 2 Seat) |
| 17. INSTALL DECK BOARD SUB-ASSEMBLY (w/o Rear No. 2 Seat) |
| 18. INSTALL BACK DOOR GLASS WEATHERSTRIP |
| 19. INSTALL REAR NO. 2 SEAT LOCK ASSEMBLY RH |
| 20. INSTALL NO.2 SEAT LEG COVER (w/ Rear No. 2 Seat) |
| 21. INSTALL REAR NO. 2 SEAT ASSEMBLY RH (w/ Rear No. 2 Seat) |
| 22. INSTALL REAR NO. 2 SEAT ASSEMBLY LH (w/ Rear No. 2 Seat) |
| 23. INSTALL TONNEAU COVER RETRACTOR SUB-ASSEMBLY (w/ Rear No. 2 Seat) |