 |
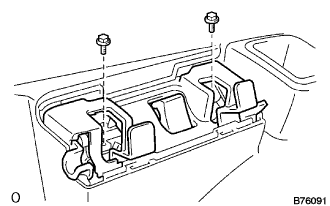
Remove the 2 bolts and seat lock.
ROOF HEADLINING > REMOVAL |
| 1. REMOVE TONNEAU COVER RETRACTOR SUB-ASSEMBLY |
| 2. REMOVE REAR NO. 2 SEAT ASSEMBLY (for 50/50 Split Seat Type) |
| 3. REMOVE NO. 3 SEAT LEG COVER NO. 2 (for 50/50 Split Seat Type) |
| 4. REMOVE REAR NO. 2 SEAT LOCK ASSEMBLY LH (for 50/50 Split Seat Type) |
|
Remove the 2 bolts and seat lock.
| 5. REMOVE REAR NO. 2 SEAT LOCK ASSEMBLY RH (for 50/50 Split Seat Type) |
Remove the 2 bolts and seat lock.
| 6. REMOVE SEAT ANCHOR RAIL NO. 4 (for 50/50 Split Seat Type) |
Using a screwdriver, remove the 2 covers, 2 bolts and anchor rail.
| 7. REMOVE BACK DOOR WEATHERSTRIP |
| 8. REMOVE DECK BOARD SUB-ASSEMBLY |
Remove the 2 bolts and the deck board sub-assembly.
| 9. REMOVE DECK BOARD ASSEMBLY |
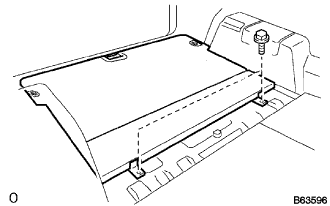 |
Remove the 2 bolts and the deck board assembly.
| 10. REMOVE REAR FLOOR MAT SUPPORT PLATE REAR |
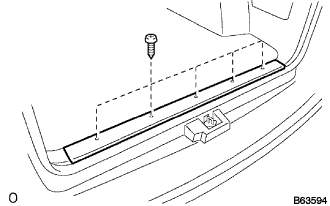 |
Remove the 5 bolts and mat support plate.
| 11. REMOVE DECK FLOOR BOX LH |
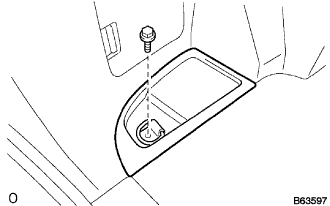 |
Using a screwdriver, disengage the claws and remove the cover.
Remove the bolt, deck floor box and luggage hold belt striker.
| 12. REMOVE DECK FLOOR BOX RH |
| 13. REMOVE DECK TRIM COVER REAR |
Using a screwdriver, pry out the trim cover.
| 14. REMOVE DECK TRIM SIDE BOARD UPR LH |
Remove the screw and side board.
| 15. REMOVE DECK TRIM SIDE BOARD UPR RH |
Remove the screw and side board.
| 16. REMOVE SIDE TRIM BOX ASSEMBLY LH |
Remove the screw and side trim box.
| 17. REMOVE SIDE TRIM BOX ASSEMBLY RH |
Remove the screw and side trim box.
| 18. REMOVE QUARTER SCUFF PLATE INSIDE LH (for 50/50 Split Seat Type) |
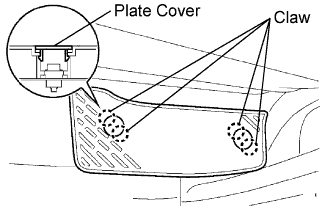 |
Using a screwdriver, disengage the 4 claws and covers.
Remove the 2 bolts and scuff plate.
| 19. REMOVE QUARTER SCUFF PLATE INSIDE RH (for 50/50 Split Seat Type) |
| 20. REMOVE REAR DOOR SCUFF PLATE LH |
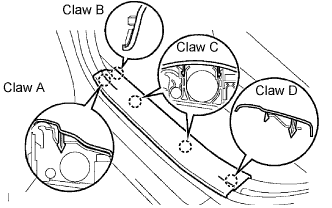 |
Using a screwdriver, disengage the claw labeled A, claw labeled B, 2 claws labeled C and claw labeled D. Remove the scuff plate.
| 21. REMOVE REAR DOOR SCUFF PLATE RH |
| 22. REMOVE FRONT DOOR SCUFF PLATE LH |
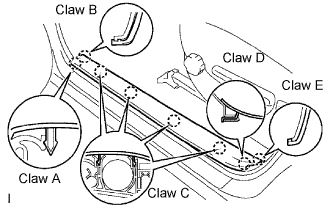 |
Using a screwdriver, disengage the claw labeled A, claw labeled B, 4 claws labeled C, claw labeled D and claw labeled E. Remove the scuff plate.
| 23. REMOVE FRONT DOOR SCUFF PLATE RH |
| 24. REMOVE COWL SIDE TRIM BOARD LH |
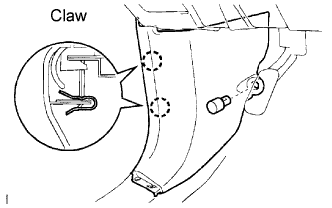 |
Remove the cap nut.
Using a screwdriver, disengage the 2 claws and remove the trim board.
| 25. REMOVE COWL SIDE TRIM BOARD RH |
| 26. REMOVE REAR DOOR OPENING TRIM WEATHERSTRIP LH |
| 27. REMOVE REAR DOOR OPENING TRIM WEATHERSTRIP RH |
| 28. REMOVE FRONT DOOR OPENING TRIM WEATHERSTRIP LH |
| 29. REMOVE FRONT DOOR OPENING TRIM WEATHERSTRIP RH |
| 30. REMOVE DECK TRIM COVER REAR |
| 31. REMOVE REAR FLOOR CARPET ASSEMBLY |
| 32. REMOVE DECK TRIM SIDE PANEL ASSEMBLY LH |
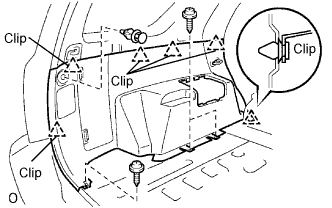 |
Remove the screw and deck trim cover.
Remove the 3 screws and clips.
Using a screwdriver, disengage the 6 clips and remove the side panel.
| 33. REMOVE DECK TRIM SIDE PANEL ASSEMBLY RH |
| 34. REMOVE DECK TRIM SIDE PANEL ASSEMBLY LH (for 50/50 Split Seat Type) |
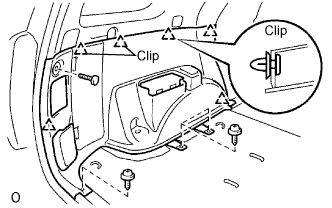 |
Remove the bolt and 3 screws.
Using a screwdriver, remove the 5 clips and side panel.
| 35. REMOVE DECK TRIM SIDE PANEL ASSEMBLY RH (for 50/50 Split Seat Type) |
| 36. REMOVE ROOF SIDE GARNISH ASSEMBLY INNER LH |
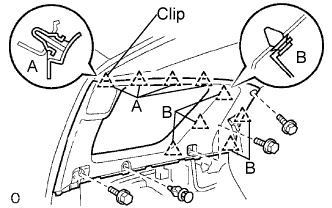 |
Remove the screw and tonneau cover hook.
Remove the 3 bolts and clip.
Using a screwdriver, disengage the 9 clips and remove the side garnish.
| 37. REMOVE ROOF SIDE GARNISH ASSEMBLY INNER RH |
| 38. REMOVE ROOF SIDE GARNISH ASSEMBLY INNER LH (for 50/50 Split Seat Type) |
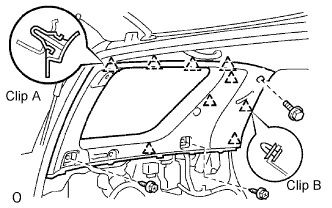 |
Remove the rear No. 2 shoulder anchor bolt.
Remove the 3 screws, disengage the 4 clips labeled A and 5 clips labeled B.
Using a screwdriver, disengage the 4 claws and remove the side garnish.
| 39. REMOVE ROOF SIDE GARNISH ASSEMBLY INNER RH (for 50/50 Split Seat Type) |
| 40. REMOVE CENTER PILLAR GARNISH LOWER LH |
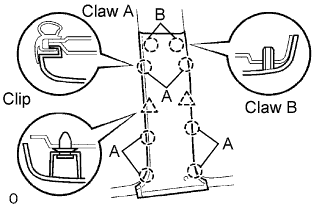 |
Using a screwdriver, disengage the 6 claws labeled A and 2 claws labeled B. Remove the 2 clips and pillar garnish.
| 41. REMOVE CENTER PILLAR GARNISH LOWER RH |
| 42. REMOVE CENTER PILLAR GARNISH UPPER LH |
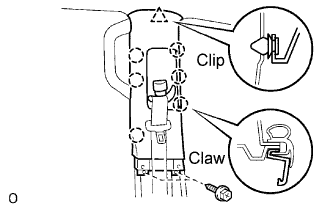 |
Remove the bolt and disconnect the front seat outer belt (floor anchor side).
Remove the 2 bolts.
Using a screwdriver, disengage the 6 claws and clip, and remove the pillar garnish.
| 43. REMOVE CENTER PILLAR GARNISH UPPER RH |
| 44. REMOVE FRONT PILLAR GARNISH LH |
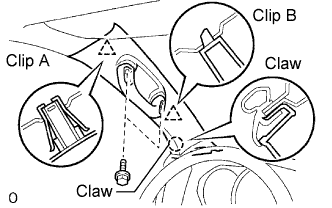 |
Using a screwdriver, remove the 2 assist grip plugs.
Remove the 2 bolts.
Using a screwdriver, disengage the claw. Remove the clip labeled A, clip labeled B and pillar garnish.
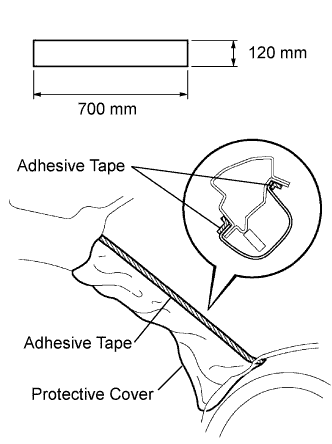 |
Pull the garnish upward, and remove the pillar garnish from the instrument panel.
w/ Curtain shield airbag:
Protect the curtain shield airbag LH.
Thoroughly cover the airbag with cloth or nylon of 700 mm (27.56 in.) x 120 mm (4.72 in.) and fix the ends of the cover with adhesive tape, as shown in the illustration.
| 45. REMOVE FRONT PILLAR GARNISH RH |
| 46. REMOVE INNER REAR VIEW MIRROR ASSEMBLY |
| 47. REMOVE ROOF CONSOLE BOX ASSEMBLY |
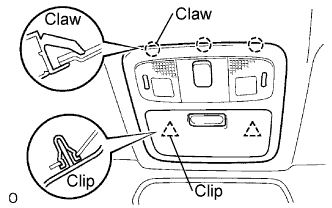 |
Using a moulding remover, disengage the 3 claws and 2 clips.
Disconnect the map light switch connector and sliding roof switch connector, and remove the console box.
| 48. REMOVE INTERIOR LIGHT ASSEMBLY NO. 1 |
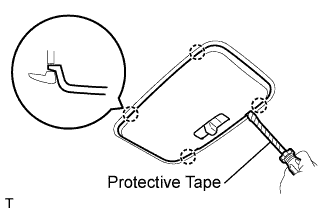 |
Using a screwdriver, disengage the 4 claws and remove the interior light lens.
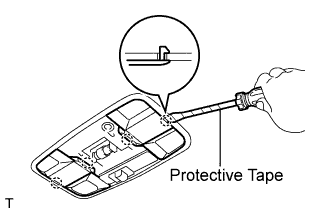 |
Using a screwdriver, disengage the 4 claws and remove the 2 covers.
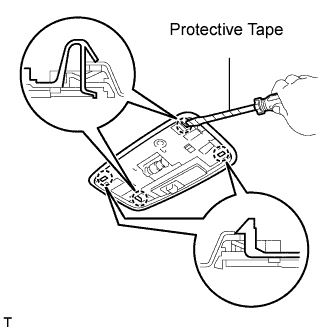 |
Using a screwdriver, disengage the 4 claws.
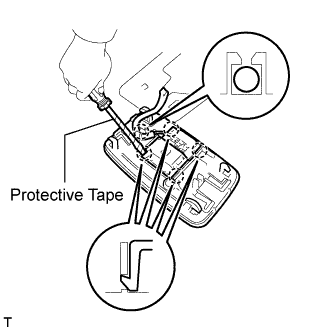 |
Remove the No. 1 roof wire from the claw of the interior light.
Using a screwdriver, disengage the 4 claws and remove the interior light switch base and the interior light.
| 49. REMOVE DOME LIGHT ASSEMBLY (w/ RSE) |
| 50. REMOVE TELEVISION DISPLAY ASSEMBLY (w/ RSE) |
| 51. REMOVE VISOR ASSEMBLY LH |
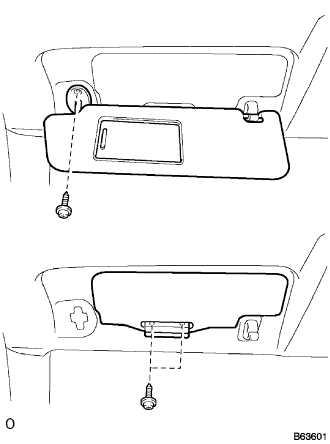 |
Remove the 2 screws and visor assembly.
Remove the 2 screws and visor sub-assembly.
| 52. REMOVE VISOR ASSEMBLY RH |
| 53. REMOVE VISOR HOLDER |
Remove the screw and visor holder.
| 54. REMOVE ROOF HEADLINING ASSEMBLY |
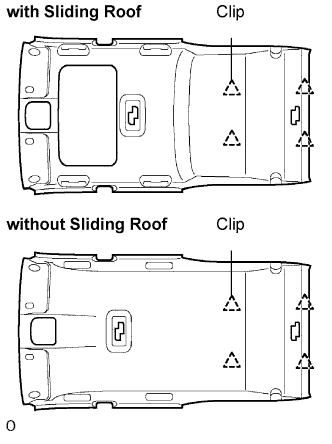 |
Disengage the 4 clips and remove the headlining.