HEIGHT CONTROL SENSOR > INSTALLATION |
| 1. INSTALL HEIGHT CONTROL SENSOR SUB-ASSEMBLY REAR LH |
Install the height control sensor with the 2 bolts.
Align the matchmarks on the link and the bracket.
Connect the sensor link with the nut.
Connect the connector to the height control sensor.
| 2. INSTALL REAR DISC WHEEL |
| 3. MEASURE VEHICLE HEIGHT |
![]() |
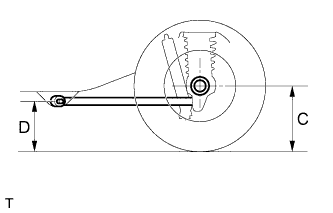
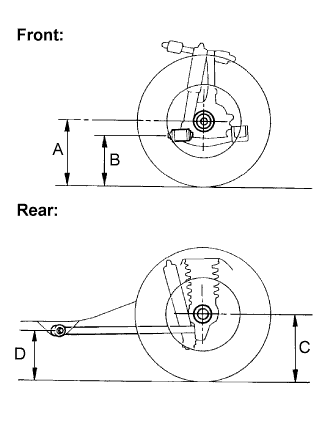
Measure the vehicle height.
| Front A - B | Rear C - D | |
| UZN210L-GKAGKA | 113.6 mm (4.47 in.) | 71.7 mm (2.82 in.) |
| UZN210L-GKAZKA | 113.5 mm (4.47 in.) | 72.3 mm (2.85 in.) |
| GRN210L-GKPGKA | 110.5 mm (4.35 in.) | 70.9 mm (2.79 in.) |
| GRN210L-GKPZKA | 110.4 mm (4.35 in.) | 71.3 mm (2.81 in.) |
| Front A - B | Rear C - D | |
| UZN210L-GKAZKA | 112.7 mm (4.44 in.) | 81.4 mm (3.20 in.) |
| Front A - B | Rear C - D | |
| UZN215L-GKAGKA | 99.9 mm (3.93 in.) | 71.6 mm (2.82 in.) |
| UZN215L-GKAZKA | 99.8 mm (3.93 in.) | 72.1 mm (2.84 in.) |
| GRN215L-GKPGKA | 99.8 mm (3.93 in.) | 71.3 mm (2.81 in.) |
| GRN215L-GKPZKA | 99.8 mm (3.93 in.) | 71.9 mm (2.83 in.) |
| Front A - B | Rear C - D | |
| UZN215L-GKAZKA | 99.2 mm (3.91 in.) | 78.9 mm (3.11 in.) |
| 4. ADJUST VEHICLE HEIGHT |
Suspend the vehicle height control by pressing the height control mode select switch.
Put the vehicle on a level surface.
![]() |
Measure the vehicle height (C - D measurement) on the right side and left side.
If the actual vehicle height differs from the vehicle height (C - D measurement), adjust it by jacking up the frame, etc. (Procedure "A").
Using the intelligent tester (Procedure "B").
Turn the ignition switch to ON or ACC.
Using the intelligent tester, measure each vehicle height value of the right side and the left side sensors.
![]() |
Not using the intelligent tester (Procedure "C").
Disconnect the connector of the height control sensor.
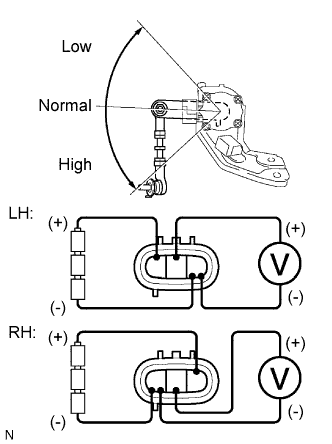
Connect three 1.5 V dry cell batteries in series.
Connect the battery positive (+) and negative (-) to the terminals as shown in the illustration.
| Position | Voltage |
| High | 2.58 to 2.98 V |
| Normal | 2.11 to 2.51 V |
| Low | 1.76 to 2.16 V |
![]() |
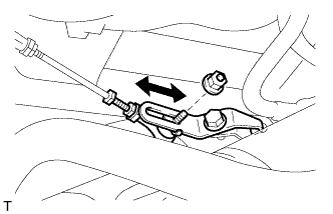
If the procedure "B" or "C" differs from the vehicle height (C - D measurement), adjust it by following the procedures below:
Loosen the nut.
Move the height control sensor link up and down along the slotted hole of the bracket.
Adjust the vehicle height to the vehicle height (C - D measurement) while checking the value on the intelligent tester or voltmeter.
Tighten the nut.
![]() |
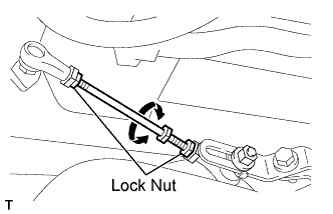
If the vehicle height cannot be adjusted by performing procedure "A" , adjust it again by following the procedures below:
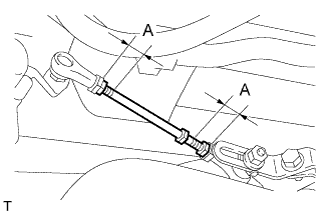
Loosen the 2 lock nuts of the height control sensor link.
Adjust the vehicle height to the vehicle height (C - D measurement) by turning the link while checking the value on the intelligent tester or the voltmeter.
Tighten the 2 lock nuts.
![]() |
Check that the lengths of the screw parts, "A" in the illustration, are within the standard values.
Change the vehicle height. (From the normal position to the high position, and from the high position to the normal position)
Measure the vehicle height (C - D measurement) on the right side and left side (Procedure "D").
Check if the vehicle height (C - D measurement) is within the specified range.