 |
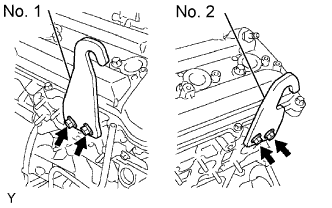
Remove the 2 bolts and No. 1 engine hanger.
ENGINE UNIT > DISASSEMBLY |
| 1. REMOVE NO. 1 ENGINE HANGER |
|
Remove the 2 bolts and No. 1 engine hanger.
| 2. REMOVE NO. 2 ENGINE HANGER |
Remove the 2 bolts and No. 2 engine hanger.
| 3. REMOVE OIL LEVEL GAUGE GUIDE |
Remove the bolt and pull out the oil level gauge guide.
Remove the O-ring from the oil level gauge guide.
| 4. REMOVE CYLINDER BLOCK WATER DRAIN COCK SUB-ASSEMBLY |
Remove the 2 water drain cocks.
| 5. REMOVE VVT SENSOR |
Remove the 2 bolts and 2 VVT sensors.
| 6. REMOVE CRANKSHAFT POSITION SENSOR |
Remove the bolt and crankshaft position sensor.
| 7. REMOVE OIL CONTROL VALVE FILTER |
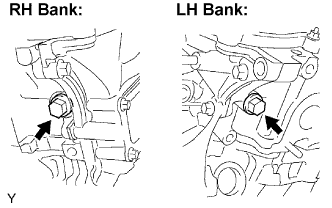 |
Remove the plug, filter and gasket from each cylinder head.
| 8. REMOVE CYLINDER HEAD COVER SUB-ASSEMBLY |
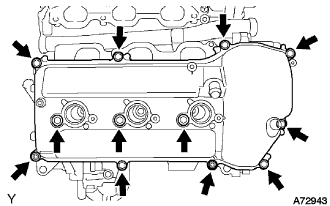 |
Remove the 10 bolts, 3 seal washers, 2 nuts, cylinder head cover and gasket.
| 9. REMOVE CYLINDER HEAD COVER SUB-ASSEMBLY LH |
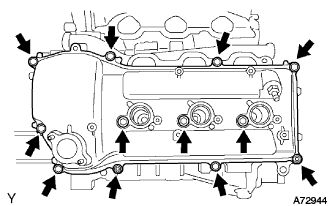 |
Remove the 10 bolts, 3 seal washers, 2 nuts, cylinder head cover and gasket.
Remove the ventilation valve from the cylinder head cover.
| 10. REMOVE CRANKSHAFT PULLEY |
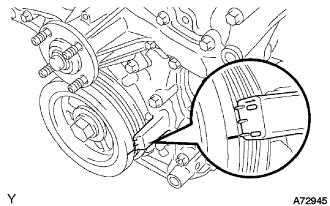 |
Turn the crankshaft pulley, and align the notch with the timing mark "0" of the timing chain cover.
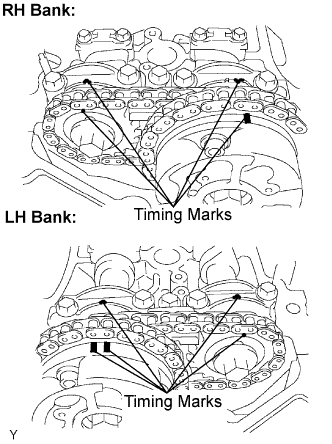 |
Check that the timing marks of the camshaft timing gears are aligned with the timing marks of the bearing caps as shown in the illustration.
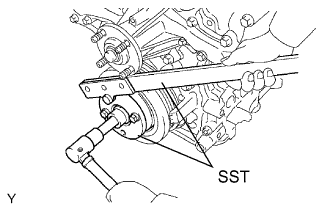 |
Using SST, hold the crankshaft pulley and loosen the pulley set bolt.
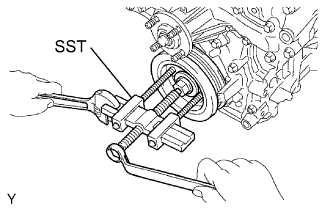 |
Using the pulley set bolt and SST, remove the crankshaft pulley.
| 11. REMOVE OIL PAN DRAIN PLUG |
Remove the drain plug and gasket.
| 12. REMOVE NO. 2 OIL PAN SUB-ASSEMBLY |
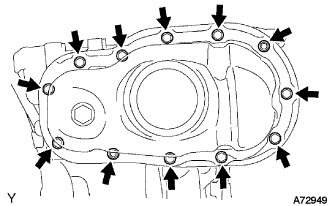 |
Remove the 10 bolts and 2 nuts.
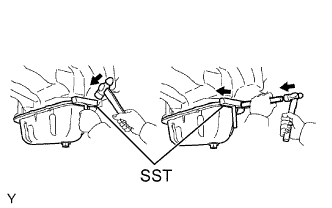 |
Insert the blade of SST between the oil pan and No. 2 oil pan, and cut off applied sealer and remove the No. 2 oil pan.
| 13. REMOVE OIL STRAINER SUB-ASSEMBLY |
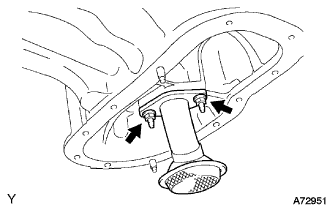 |
Remove the 2 nuts, oil strainer and gasket.
| 14. REMOVE OIL PAN SUB-ASSEMBLY |
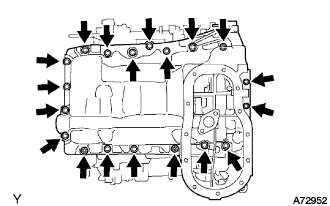 |
Remove the 17 bolts and 2 nuts.
Remove the 4 stud bolts.
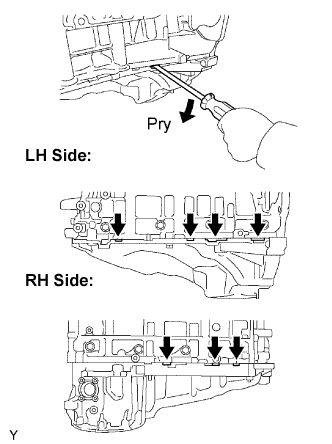 |
Using a screwdriver, remove the oil pan by prying between the oil pan and cylinder block as shown in the illustration.
Remove the O-ring from the oil pump.
| 15. REMOVE WATER PUMP ASSEMBLY |
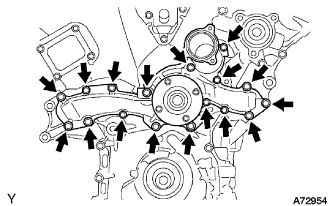 |
Remove the 17 bolts, water pump and gasket.
| 16. REMOVE TIMING CHAIN OR BELT COVER SUB-ASSEMBLY |
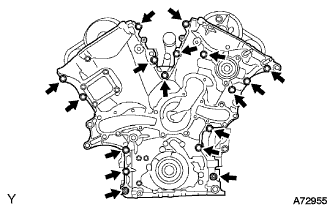 |
Remove the 15 bolts and 2 nuts.
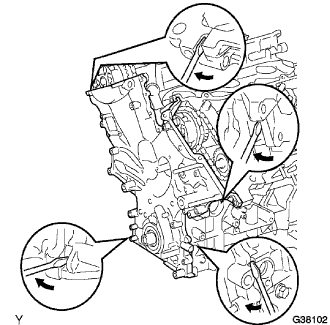 |
Remove the timing chain cover by prying between the timing chain cover and cylinder head or cylinder block with a screwdriver.
Remove the O-ring from the LH cylinder head.
| 17. REMOVE TIMING GEAR CASE OR TIMING CHAIN CASE OIL SEAL |
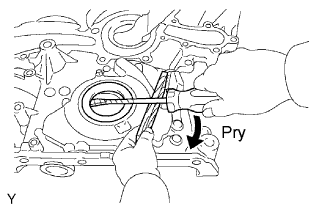 |
Using a screwdriver, pry out the oil seal.
| 18. REMOVE NO. 1 CHAIN TENSIONER ASSEMBLY |
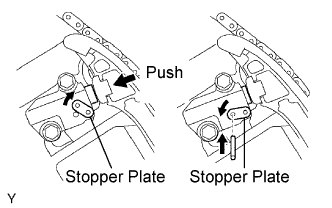 |
While turning the stopper plate of the tensioner clockwise, push in the plunger of the chain tensioner as shown in the illustration.
While turning the stopper plate of the tensioner counterclockwise, insert a bar of φ3.5 mm (0.138 in.) into the holes on the stopper plate and tensioner to fix the stopper plate.
Remove the 2 bolts and chain tensioner.
| 19. REMOVE CHAIN TENSIONER SLIPPER |
| 20. REMOVE NO. 1 IDLE GEAR SHAFT |
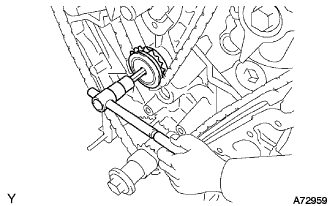 |
Using a 10 mm hexagon wrench, remove the No. 2 idle gear shaft, No. 1 idle gear and No. 1 idle gear shaft.
| 21. REMOVE NO. 2 CHAIN VIBRATION DAMPER |
Remove the 2 No. 2 chain vibration dampers.
| 22. REMOVE CHAIN SUB-ASSEMBLY |
| 23. REMOVE CRANKSHAFT TIMING GEAR OR SPROCKET |
| 24. REMOVE NO. 1 CHAIN VIBRATION DAMPER |
Remove the 2 bolts and No. 1 chain vibration damper.
| 25. REMOVE CAMSHAFT TIMING GEARS AND NO. 2 CHAIN (for Bank 1) |
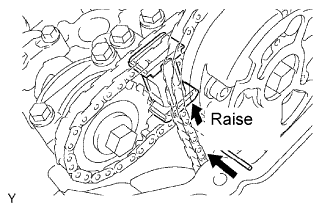 |
While raising the No. 2 chain tensioner, insert a pin of φ1.0 mm (0.039 in.) into the hole to fix it.
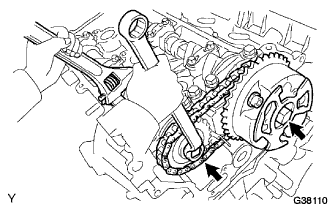 |
Hold the hexagonal portion of the camshaft with a wrench, and remove the 2 bolts, camshaft timing gear, camshaft timing gear assembly and No. 2 timing chain.
| 26. REMOVE NO. 2 CHAIN TENSIONER ASSEMBLY |
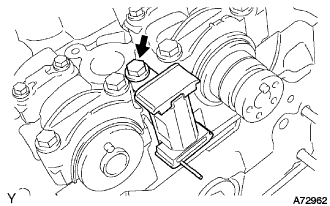 |
Remove the bolt and No. 2 chain tensioner.
| 27. REMOVE CAMSHAFT TIMING GEARS AND NO. 2 CHAIN (for Bank 2) |
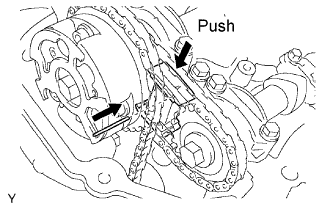 |
While pushing down the No. 3 chain tensioner, insert a pin of φ1.0 mm (0.039 in.) into the hole to fix it.
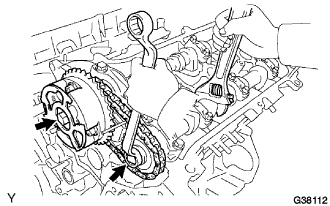 |
Hold the hexagonal portion of the camshaft with a wrench, and remove the 2 bolts, camshaft timing gear, camshaft timing gear assembly and No. 2 timing chain.
| 28. REMOVE NO. 3 CHAIN TENSIONER ASSEMBLY |
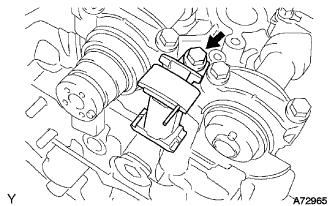 |
Remove the bolt and No. 3 chain tensioner.
| 29. REMOVE CAMSHAFTS |
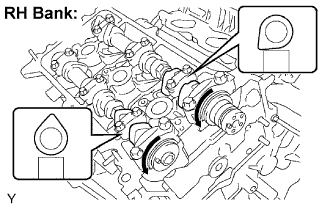 |
Remove the camshafts of the RH bank.
Rotate the camshafts counterclockwise using a wrench so that the cam lobes of No. 1 cylinder face each direction as shown in the illustration.
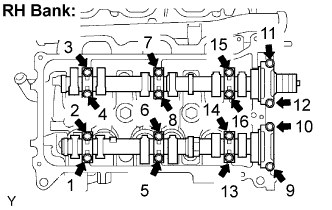 |
Using several steps, loosen and remove the 16 bearing cap bolts uniformly in the sequence as shown in the illustration.
Remove the 8 bearing caps and 2 camshafts.
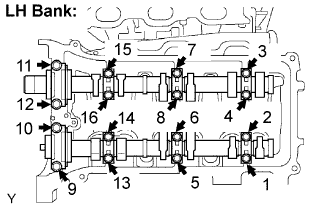 |
Remove the camshafts of the LH bank.
Using several steps, loosen and remove the 16 bearing cap bolts uniformly in the sequence as shown in the illustration.
Remove the 8 bearing caps and 2 camshafts.
| 30. REMOVE NO. 1 CAMSHAFT BEARING |
| 31. REMOVE NO. 2 CAMSHAFT BEARING |
| 32. REMOVE CYLINDER HEADS |
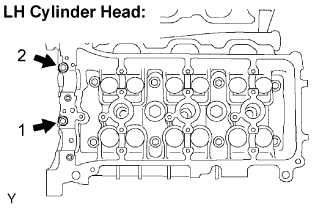 |
Using several steps, remove the 2 cylinder head bolts on the LH cylinder head in the sequence as shown in the illustration.
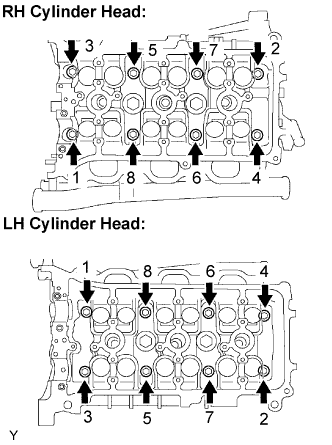 |
Using several steps, loosen the 8 cylinder head bolts on each cylinder head with a 10 mm bi-hexagon wrench in the sequence as shown in the illustration. Remove the 16 cylinder head bolts and plate washers.
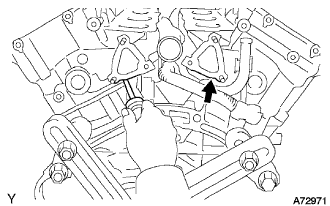 |
Lift the cylinder head from the dowels on the cylinder block, and place the 2 cylinder heads on wooden blocks on a bench.
Remove the RH and LH cylinder head gaskets.
| 33. REMOVE NO. 1 WATER OUTLET PIPE |
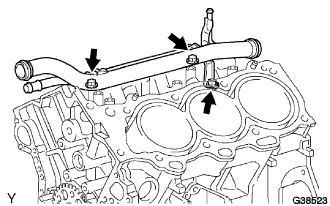 |
Separate the knock sensor wire.
Remove the 3 bolts and water outlet pipe.
| 34. REMOVE KNOCK SENSOR |
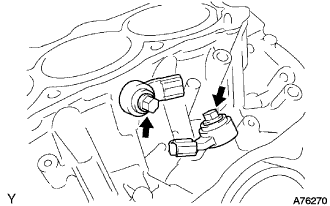 |
Disconnect the knock sensor connectors.
Remove the 2 bolts and 2 knock sensors.
| 35. REMOVE ENGINE REAR OIL SEAL RETAINER |
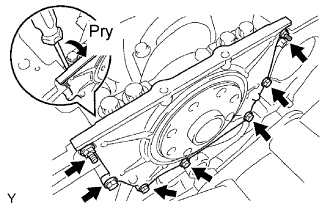 |
Remove the 5 bolts and 2 nuts.
Using a screwdriver, remove the oil seal retainer by prying between the oil seal retainer and crankshaft bearing cap.
| 36. REMOVE ENGINE REAR OIL SEAL |
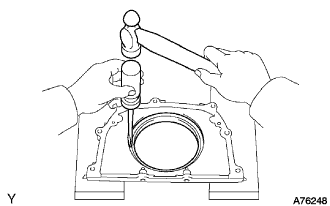 |
Using a screwdriver and hammer, tap out the oil seal.
| 37. REMOVE VALVE LIFTER |
| 38. REMOVE VALVE |
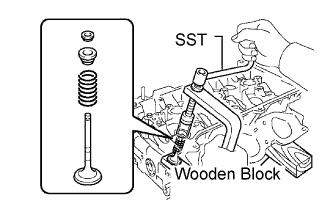 |
Place the cylinder head on a wooden block.
Using SST, compress the inner compression spring and remove the 2 valve spring retainer locks.
Remove the valve, inner compression spring, valve spring and valve spring retainer.
| 39. REMOVE VALVE SPRING SEAT |
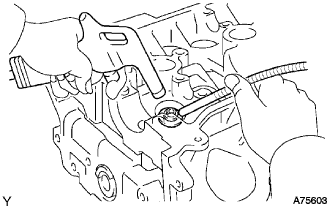 |
Using compressed air and a magnetic finger, remove the valve spring seat by blowing air.
| 40. REMOVE VALVE STEM OIL O SEAL OR RING |
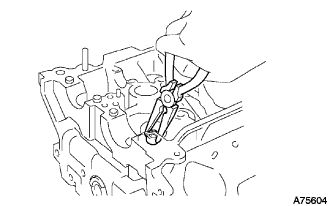 |
Using needle-nose pliers, remove the valve stem oil seal.
| 41. INSPECT CONNECTING ROD THRUST CLEARANCE |
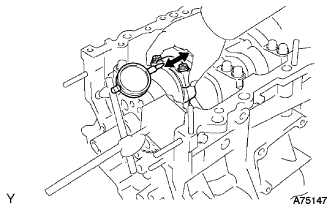 |
Using a dial indicator, measure the thrust clearance while moving the connecting rod back and forth.
| 42. INSPECT CONNECTING ROD OIL CLEARANCE |
Check the matchmarks on the connecting rod and cap are aligned to ensure correct reassembling.
Remove the 2 connecting rod cap bolts.
Clean the crank pin, bearing and connecting rod.
Check the crank pin and bearing for pits and scratches.
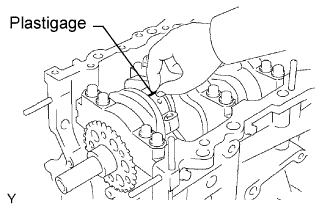 |
Lay a strip of Plastigage across the crank pin.
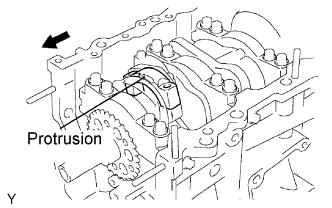 |
Check that the protrusion of the connecting rod cap is facing the correct direction.
Apply a light coat of engine oil to the threads of the connecting rod cap bolts.
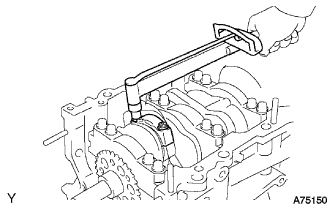 |
Tighten the bolts alternately with the specified torque.
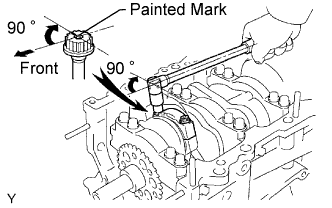 |
Mark the front side of each connecting cap bolt with paint.
Retighten the cap bolts 90° as shown in the illustration.
Remove the 2 bolts, connecting rod cap and lower bearing.
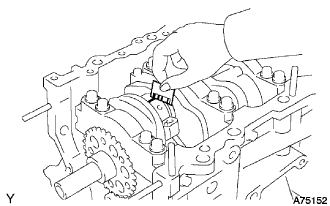 |
Measure the Plastigage at its widest point.
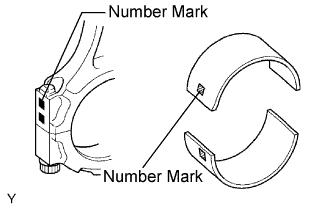 |
If replacing a bearing, replace it with one that has the same number marked on the connecting rod. There are 4 sizes of standard bearings, marked "1 ", "2", "3" and "4" accordingly.
| Mark | mm (in.) |
| "1" | 1.484 to 1.487 (0.0584 to 0.0585) |
| "2" | 1.487 to 1.490 (0.0585 to 0.0587) |
| "3" | 1.490 to 1.493 (0.0587 to 0.0588) |
| "4" | 1.493 to 1.496 (0.0588 to 0.0589) |
| 43. REMOVE PISTON SUB-ASSEMBLY WITH CONNECTING ROD |
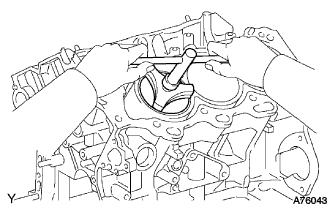 |
Using a ridge reamer, remove all the carbon from the top of the cylinder.
Push in the piston, connecting rod assembly and upper bearing through the top of the cylinder block.
| 44. REMOVE CONNECTING ROD BEARING |
| 45. REMOVE PISTON RING SET |
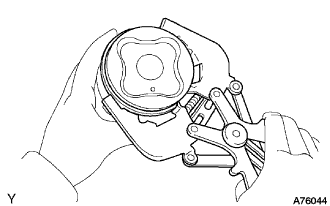 |
Using a piston ring expander, remove the 2 compression rings.
Remove the 2 side rails and oil ring by hand.
| 46. REMOVE PISTON PIN HOLE SNAP RING |
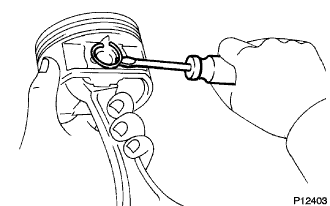 |
Using a screwdriver, pry out the 2 snap rings.
| 47. REMOVE WITH PIN PISTON SUB-ASSEMBLY |
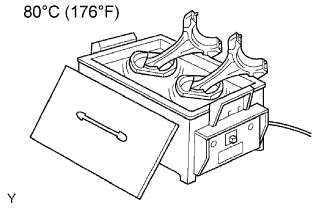 |
Gradually heat the piston to approx. 80°C (176°F).
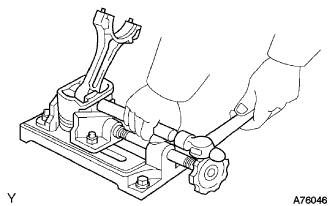 |
Using a plastic-faced hammer and brass bar, lightly tap out the piston pin and remove the connecting rod.
| 48. INSPECT CRANKSHAFT THRUST CLEARANCE |
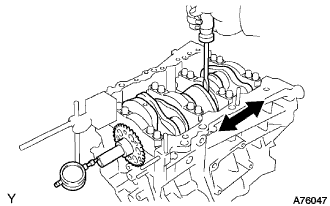 |
Using a dial indicator, measure the thrust clearance while prying the crankshaft back and forth with a screwdriver.
| 49. REMOVE CRANKSHAFT |
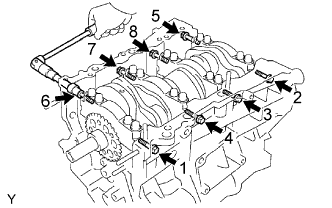 |
Using several steps, loosen and remove the 8 main bearing cap bolts and seal washers uniformly in the sequence as shown in the illustration.
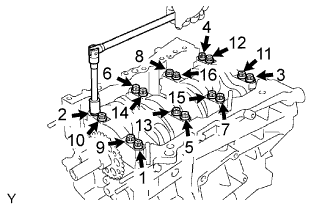 |
Using several steps, loosen and remove the 16 main bearing cap bolts uniformly in the sequence as shown in the illustration.
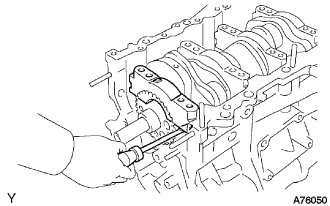 |
Using a screwdriver, pry out the main bearing caps. Remove the 4 main bearing caps and lower bearings.
| 50. REMOVE CRANKSHAFT THRUST WASHER SET |
| 51. REMOVE CRANKSHAFT BEARING |
| 52. REMOVE NO. 1 OIL NOZZLE SUB-ASSEMBLY |
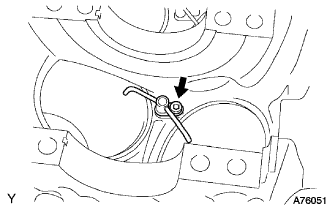 |
Using a 5 mm socket hexagon wrench, remove the 3 oil nozzles.