 |
Remove the service hole cover from the engine under cover No. 1.
VALVE CLEARANCE > ADJUSTMENT |
| 1. DRAIN ENGINE COOLANT |
Remove the radiator cap.
|
Remove the service hole cover from the engine under cover No. 1.
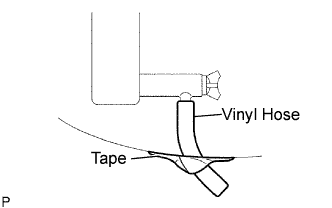
Install a vinyl hose onto the drain on the radiator side.
Fix the vinyl hose with tape.
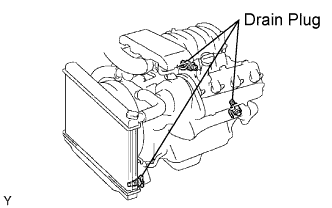 |
Loosen the 3 drain plugs on the engine and radiator, and drain the coolant.
Drain the coolant from the reservoir tank.
Tighten the 3 drain plugs.
Remove the vinyl hose from the radiator.
| 2. SEPARATE BATTERY NEGATIVE TERMINAL |
| 3. REMOVE THROTTLE BODY COVER SUB-ASSEMBLY |
| 4. REMOVE AIR CLEANER HOSE ASSEMBLY |
| 5. REMOVE RADIATOR SUPPORT SEAL UPPER |
| 6. REMOVE FAN AND GENERATOR V BELT |
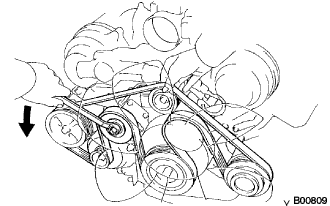 |
Loosen the belt tension by turning the belt tensioner counterclockwise, and then remove the fan and generator V belt.
| 7. REMOVE OIL COOLER PIPE |
Disconnect the 3 hoses.
Remove the bolt, nut and oil cooler pipe.
| 8. REMOVE IGNITION COIL ASSEMBLY |
| 9. REMOVE NO. 3 TIMING BELT COVER SUB-ASSEMBLY LH |
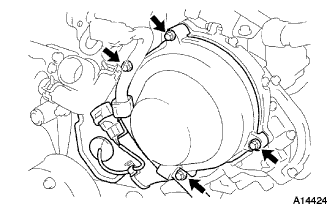 |
Remove the grommet and separate the cam position sensor connector from the No. 3 timing belt cover sub-assembly LH.
Remove the 4 bolts and No. 3 timing belt cover sub-assembly LH.
| 10. REMOVE NO. 2 TIMING CHAIN OR BELT COVER |
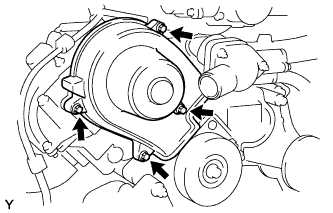 |
Remove the nut, 3 bolts and No. 2 timing belt cover.
| 11. REMOVE CYLINDER HEAD COVER SUB-ASSEMBLY |
Remove the 9 bolts, 9 seal washers and cylinder head cover.
| 12. REMOVE CYLINDER HEAD COVER SUB-ASSEMBLY LH |
Disconnect the PCV hose.
Remove the 9 bolts, 9 seal washers and cylinder head cover.
| 13. SET NO. 1 CYLINDER TO TDC / COMPRESSION |
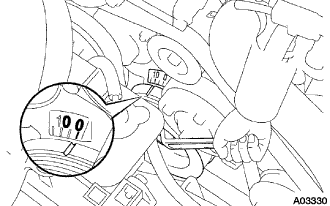 |
Turn the crankshaft pulley to align its notch with timing mark "0" of the No. 1 timing belt cover.
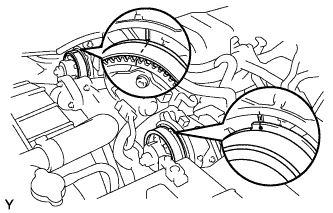 |
Check that the timing marks of the camshaft timing pulleys and timing belt rear plates are aligned.
If not, turn the crankshaft 1 complete revolution (360°) and align the marks as above.
| 14. INSPECT VALVE CLEARANCE |
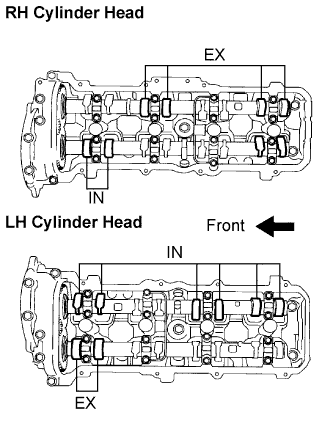 |
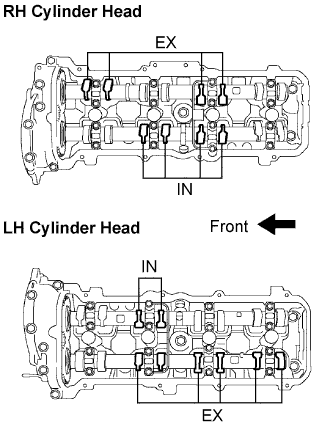
Check only the valves indicated.
Using a feeler gauge, measure the clearance between the valve lifter and camshaft.
Record the out-of-specification valve clearance measurements. They will be used later to determine the required replacement adjusting shim.
 |
Turn the crankshaft 1 complete revolution (360°) and align the camshaft timing marks.
Check only the valves indicated as shown in the illustration. Measure the valve clearance.
| 15. ADJUST VALVE CLEARANCE |
Remove the timing belt .
Remove the camshafts (RH Bank) .
Remove the camshafts (LH Bank) .
Remove the valve lifter and adjusting shim.
 |
Determine the replacement adjusting shim size according to the formula or charts on the following pages.
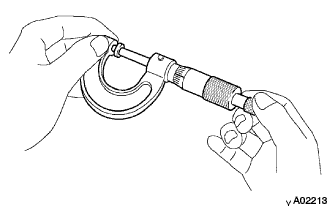
Using a micrometer, measure the thickness of the removed shim.
Calculate the thickness of a new shim so that the valve clearance comes within the specified value.
Select a new shim with a thickness as close as possible to the calculated value.
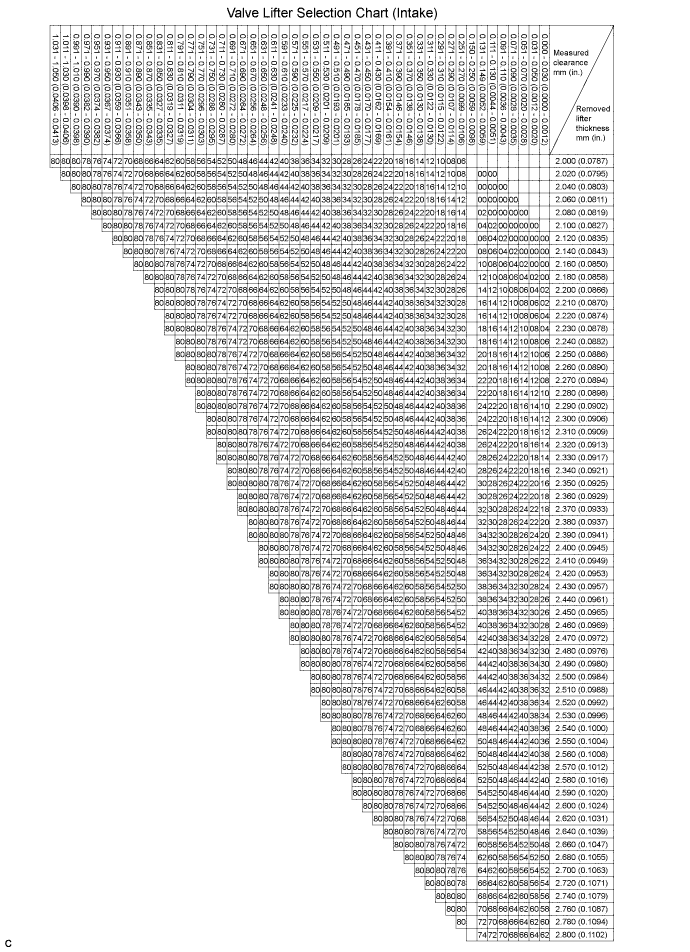
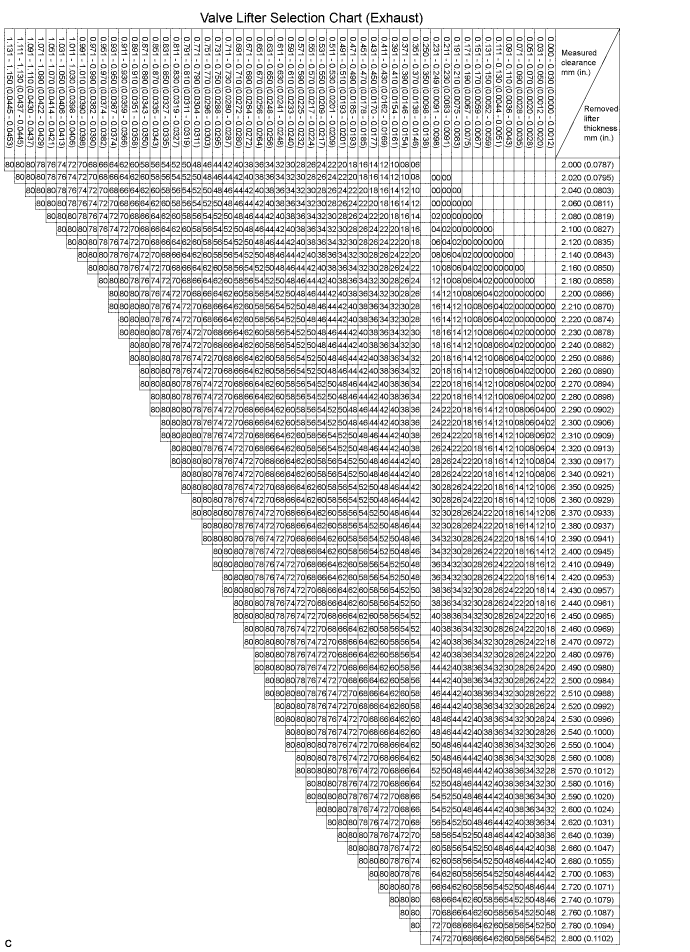
Place a new adjusting shim on the valve.
Place the valve lifter.
Reinstall the camshafts (LH Bank) .
Reinstall the camshafts (RH Bank) .
Reinstall the timing belt .
Recheck the valve clearance.
| 16. INSTALL CYLINDER HEAD COVER SUB-ASSEMBLY LH |
| 17. INSTALL CYLINDER HEAD COVER SUB-ASSEMBLY |
| 18. INSTALL NO. 2 TIMING CHAIN OR BELT COVER |
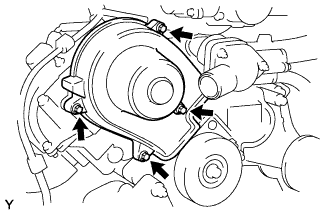 |
Install the timing chain or belt cover with the nut and 3 bolts.
| 19. INSTALL NO. 3 TIMING BELT COVER SUB-ASSEMBLY LH |
|
Install the timing belt cover sub-assembly with the 4 bolts.
Install the camshaft position sensor connector and grommet to the timing belt cover.
| 20. INSTALL IGNITION COIL ASSEMBLY |
| 21. INSTALL OIL COOLER PIPE |
Install the oil cooler pipe with the bolt and nut.
Connect the 3 hoses.
| 22. INSTALL FAN AND GENERATOR V BELT |
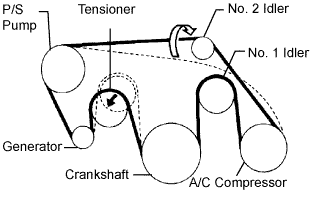 |
Set the V belt onto every parts except the No. 2 idler pulley, as shown in the illustration.
Loosen the V belt by turning the belt tensioner counterclockwise.
Set the V belt to the No. 2 idler pulley.
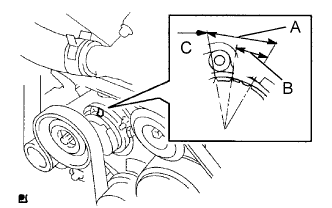 |
After installing a new belt, check that the mark is within the B range as shown in the illustration.
| 23. INSTALL RADIATOR SUPPORT SEAL UPPER |
| 24. INSTALL AIR CLEANER HOSE ASSEMBLY |
| 25. INSTALL THROTTLE BODY COVER SUB-ASSEMBLY |
| 26. CONNECT BATTERY NEGATIVE TERMINAL |
| 27. ADD ENGINE COOLANT |
Slowly fill the system with engine coolant.
Install the radiator cap securely.
Bleed the cooling system.
Open the heater water valve while warming up the engine.
Maintain the engine speed at 2,000 to 2,500 rpm and warm up the engine.
Stop the engine and wait until the coolant cools down.
Add coolant into the reservoir until the coolant level is FULL.