TIMING BELT > INSTALLATION |
| 1. INSTALL TIMING BELT |
Check the No. 1 timing belt idler and No. 2 timing belt idler.
Visually check the seal portion of the idler pulley for oil leakage.
If leakage is found, replace the idler.
Check that the idler turns smoothly.
If necessary, replace the idler.
![]() |
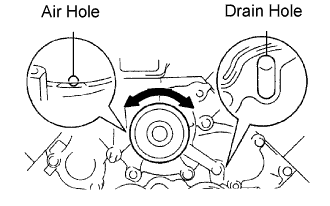
Check the water pump.
Visually check the air hole and water hole for coolant leakage.
If leakage is found, replace the water pump and timing belt.
Turn the pulley, and check that the water pump bearing moves smoothly.
If necessary, replace the water pump.
Remove any oil or water on the crankshaft pulley, oil pump pulley, water pump pulley, No. 1 idler and No. 2 idler, and keep them clean.
![]() |
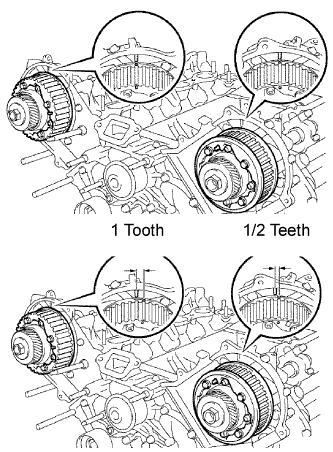
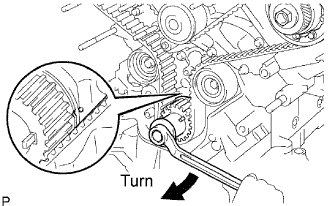
Set the No. 1 cylinder to the TDC/compression.
Turn the hexagonal portion of the camshaft to align the timing marks of the camshaft timing pulleys and timing belt plates.
![]() |
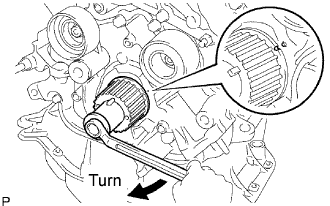
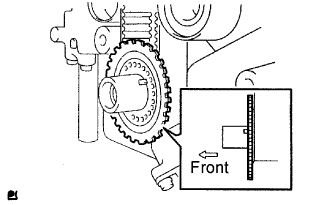
Using the crankshaft damper bolt, turn the crankshaft to align the timing marks of the crankshaft timing pulley and oil pump body.
![]() |
Install the timing belt.
Remove any oil or water on each pulley, and keep them clean.
Face the front mark (arrow) on the timing belt forward.
Put the timing belt on the crankshaft timing pulley.
Put the timing belt on the No. 2 idler.
Put the timing belt on the camshaft timing pulley (LH bank).
Put the timing belt on the water pump pulley.
Put the timing belt on the camshaft timing pulley (RH bank).
Put the timing belt on the No. 1 idler.
![]() |
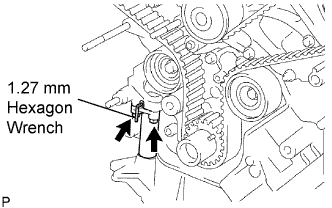
Set the belt tensioner.
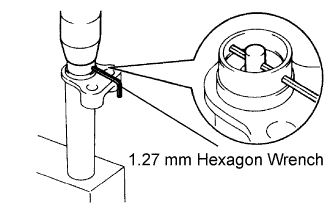
Using a press, slowly press in the push rod using 981 to 9,807 N (100 to 1,000 kgf, 220 to 2,205 lbf) of pressure.
Align the holes of the push rod and housing, and pass a 1.27 mm hexagon wrench through the holes to keep the setting position of the push rod.
Release the press.
Install the dust boot to the belt tensioner.
![]() |
Install the belt tensioner.
Temporarily install the belt tensioner with the 2 bolts.
Alternately tighten the 2 bolts.
Using pliers, remove the 1.27 mm hexagon wrench from the chain tensioner.
![]() |
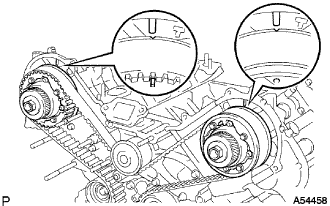
Check the valve timing.
Using the crankshaft damper bolt, slowly turn the crankshaft pulley 2 revolutions from the TDC to TDC.
![]() |
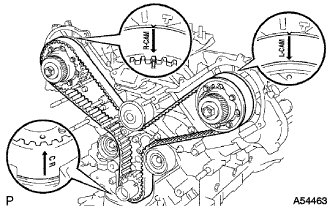
Check that each pulley is aligned with each timing mark as shown in the illustration.
If the timing marks are not aligned, remove the timing belt and reinstall it.
Remove the crankshaft damper bolt.
| 2. INSTALL NO. 1 CRANKSHAFT POSITION SENSOR PLATE |
![]() |
Install the sensor plate as shown in the illustration.
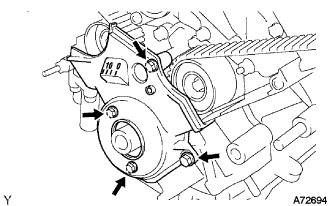
| 3. INSTALL TIMING BELT NO. 1 COVER |
![]() |
Install the timing belt cover with the 4 bolts.
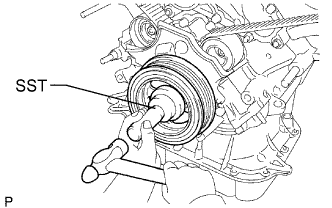
| 4. INSTALL CRANKSHAFT DAMPER SUB-ASSEMBLY |
![]() |
Align the pulley set key with the key groove of the crankshaft damper.
Using SST and a hammer, tap in the crankshaft damper.
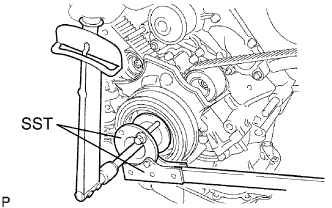
![]() |
Using SST, install the damper bolt.
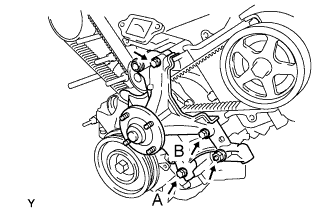
| 5. INSTALL FAN BRACKET SUB-ASSEMBLY |
![]() |
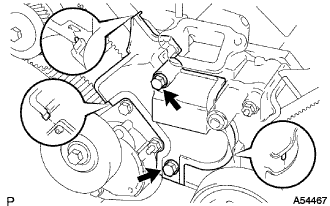
Install the idler pulley with the 2 bolts and 2 nuts.
| 6. INSTALL V-RIBBED BELT TENSIONER ASSEMBLY |
![]() |
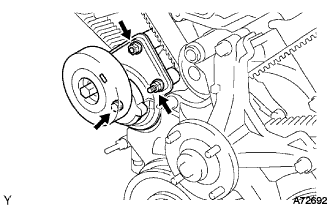
Install the belt tensioner with the bolt and 2 nuts.
| 7. INSTALL NO. 2 TIMING BELT COVER SUB-ASSEMBLY |
![]() |
Install the timing belt cover and fit the claws and pins into each part.
Install the timing belt cover with the 2 bolts.
| 8. INSTALL NO. 3 TIMING BELT COVER SUB-ASSEMBLY LH |
Install the timing belt cover sub-assembly with the 4 bolts.
Install the camshaft position sensor connector and grommet to the timing belt cover.
| 9. INSTALL NO. 2 TIMING CHAIN OR BELT COVER |
Install the timing chain or belt cover with the nut and 3 bolts.
| 10. INSTALL OIL COOLER PIPE |
Install the oil cooler pipe with the bolt and nut.
Connect the 3 hoses.
| 11. INSTALL NO. 2 IDLER PULLEY SUB-ASSEMBLY |
![]() |
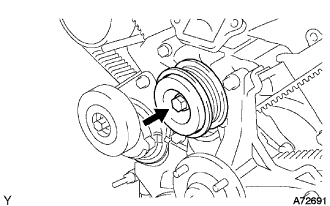
Install the idler pulley and cover plate with the bolt.
| 12. INSTALL COMPRESSOR |
Install the compressor with the stay, nut and 3 bolts.
| 13. INSTALL GENERATOR ASSEMBLY |
Install the generator with the bolt and 2 nuts.
Connect the generator connector.
Connect the generator wire with the nut and rubber cap.
Install the generator wire clamp to the cord clip on the generator.
| 14. INSTALL VANE PUMP ASSEMBLY |
Install the vane pump assembly with the nut and 2 bolts.
| 15. INSTALL FAN WITH FLUID COUPLING |
Install the fan pulley to the engine.
Put the fan with fluid coupling and fan shroud together into the engine room.
Install the fan shroud with the 3 bolts.
Install the fan with fluid coupling with the 4 nuts.
| 16. INSTALL FAN AND GENERATOR V BELT |
![]() |
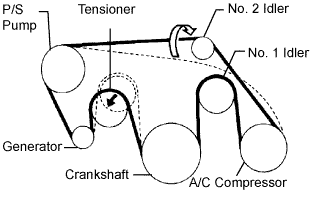
Set the V belt onto every parts except the No. 2 idler pulley, as shown in the illustration.
Loosen the V belt by turning the belt tensioner counterclockwise.
Set the V belt to the No. 2 idler pulley.
![]() |
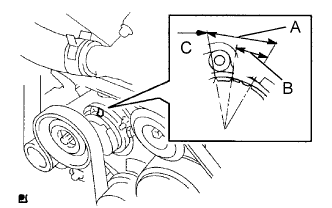
After installing a new belt, check that the mark is within the B range as shown in the illustration.
| 17. INSTALL RADIATOR SUPPORT SEAL UPPER |
| 18. INSTALL AIR CLEANER HOSE ASSEMBLY |
| 19. INSTALL THROTTLE BODY COVER SUB-ASSEMBLY |
Install the throttle body cover sub-assembly with the 2 nuts.
| 20. ADD ENGINE COOLANT |
Slowly fill the system with engine coolant.
Install the radiator cap securely.
Bleed the cooling system.
Open the heater water valve while warming up the engine.
Maintain the engine speed at 2,000 to 2,500 rpm and warm up the engine.
Stop the engine and wait until the coolant cools down.
Add coolant into the reservoir until the coolant level is FULL.
| 21. CHECK FOR ENGINE COOLANT LEAKS |
Fill the radiator with coolant and attach a radiator cap tester.
Pump it to 118 kPa (1.2 kgf/cm2 17.1 psi), then check for leakage.