 |
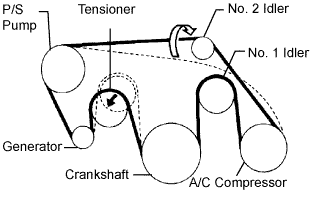
Set the V belt onto every parts except the No. 2 idler pulley, as shown in the illustration.
GENERATOR > INSTALLATION |
| 1. INSTALL GENERATOR ASSEMBLY |
Install the generator with the bolt and 2 nuts.
Connect the generator connector.
Connect the generator wire with the nut and rubber cap.
Install the generator wire clamp to the cord clip on the generator.
| 2. INSTALL VANE PUMP ASSEMBLY |
Install the vane pump assembly with the nut and 2 bolts.
Connect the vacuum hose.
| 3. INSTALL FAN WITH FLUID COUPLING |
Put the fan w/ fluid coupling and fan shroud into the engine room at the same time.
Install the fan shroud with 3 bolts.
Install the fan w/ fluid coupling with 4 nuts.
| 4. INSTALL FAN AND GENERATOR V BELT |
|
Set the V belt onto every parts except the No. 2 idler pulley, as shown in the illustration.
Loosen the V belt by turning the belt tensioner counterclockwise.
Set the V belt to the No. 2 idler pulley.
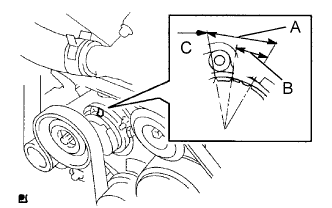 |
After installing a new belt, check that the mark is within the B range as shown in the illustration.
| 5. INSTALL RADIATOR UPPER SUPPORT SEAL |
| 6. CONNECT BATTERY NEGATIVE TERMINAL |