 |
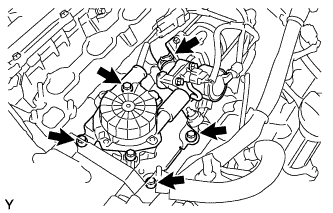
Install the air pump assembly with the 4 bolts.
- Torque:
- 16 N*m{ 163 kgf*cm , 12 ft.*lbf }
STARTER > INSTALLATION |
| 1. INSTALL STARTER ASSEMBLY |
Install the starter assembly with the 2 bolts.
Connect the engine wire protector with the bolt.
Connect the starter cable with the nut.
Connect the starter connector.
| 2. INSTALL AIR PUMP ASSEMBLY |
|
Install the air pump assembly with the 4 bolts.
Connect the pressure sensor connector for the air injection system.
Connect the air switching valve connector.
Connect the No. 2 air hose to the air switching valve.
| 3. INSTALL REAR WATER BY-PASS JOINT RH |
Install 2 new gaskets to the cylinder head.
Install the 4 nuts holding the water by-pass joint to the cylinder heads. Alternately tighten the nuts.
| 4. INSTALL WATER BY-PASS PIPE SUB-ASSEMBLY |
Install a new O-ring to the water by-pass pipe.
Apply soapy water to the O-ring.
Push the water by-pass pipe end into the pipe hole of the water pump.
Install the water by-pass pipe with the bolt.
Install the wire clamp to the bracket of the water by-pass pipe.
| 5. INSTALL INTAKE MANIFOLD ASSEMBLY |
Install 2 new gaskets to the cylinder head.
Install the intake manifold with the 6 bolts and 2 nuts.
| 6. CONNECT WATER BY-PASS HOSE |
Connect the water by-pass hose.
| 7. CONNECT NO. 7 WATER BY-PASS HOSE |
Connect the No. 7 water by-pass hose.
| 8. INSTALL ENGINE WIRE |
Install the engine wire with the 3 bolts.
Connect the water temperature sensor connector,
Connect the throttle position sensor connector.
Connect the 8 fuel injector connectors.
| 9. CONNECT FUEL VAPOR FEED HOSE ASSEMBLY |
Connect the fuel vapor feed hose assembly.
| 10. CONNECT NO. 2 FUEL HOSE |
Connect the No. 2 fuel hose.
| 11. CONNECT FUEL HOSE |
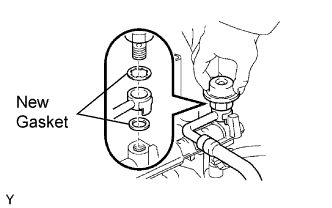 |
Using 2 new gaskets, install the fuel main hose with the fuel pressure pulsation damper.
| 12. INSTALL AIR CLEANER HOSE ASSEMBLY |
Install the air cleaner hose assembly.
| 13. ADD ENGINE COOLANT |
Slowly fill the system with engine coolant.
Install the radiator cap securely.
Bleed the cooling system.
Open the heater water valve while warming up the engine.
Maintain the engine speed at 2,000 to 2,500 rpm and warm up the engine.
Stop the engine and wait until the coolant cools down.
Add coolant into the reservoir until the coolant level is FULL.
| 14. CHECK FOR ENGINE COOLANT LEAKAGE |
Fill the radiator with coolant and attach a radiator cap tester.
Pump it to 118 kPa (1.2 kgf/cm2 17.1 psi), then check for leakage.
| 15. CHECK FOR FUEL LEAKAGE |
When using the intelligent tester
Connect the intelligent tester to the DLC3.
Turn the ignition switch ON and intelligent tester main switch ON.
Select the ACTIVE TEST mode on the intelligent tester.
Please refer to the intelligent tester operator's manual for further details.
 |
When not using the intelligent tester
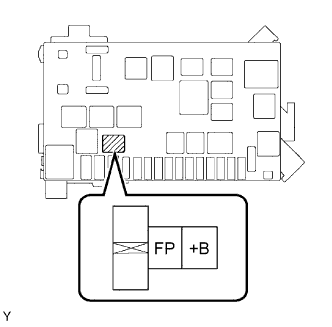
Remove the circuit opening relay.
Using a service wire, connect terminals FP and +B of the relay block.
Turn the ignition switch ON, and check that the fuel pump operates.
Check that there are no fuel leaks after doing maintenance anywhere on the fuel system.
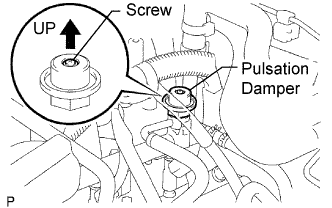 |
Check that the pulsation damper screw rises up when the fuel pump operates.
If operation is not as specified, check the following parts:
Turn the ignition switch OFF.
Disconnect the intelligent tester from the DLC3.
| 16. INSTALL THROTTLE BODY COVER SUB-ASSEMBLY |
| 17. CONNECT BATTERY NEGATIVE TERMINAL |
Connect the battery negative terminal.