 |
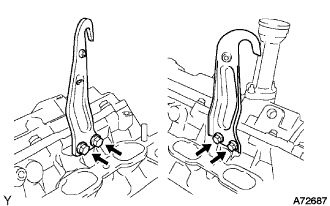
Remove the 4 bolts and engine hangers.
ENGINE UNIT > DISASSEMBLY |
| 1. REMOVE ENGINE HANGERS |
|
Remove the 4 bolts and engine hangers.
| 2. REMOVE CYLINDER BLOCK WATER DRAIN COCK SUB-ASSEMBLY |
Remove the 2 water drain cocks.
| 3. REMOVE SPARK PLUG |
| 4. REMOVE OIL FILLER CAP SUB-ASSEMBLY |
| 5. REMOVE OIL FILLER CAP HOUSING |
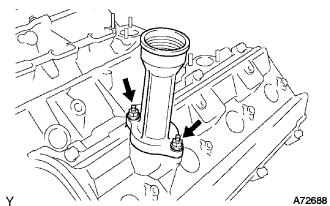 |
Remove the 2 nuts and oil filler cap housing.
| 6. REMOVE CYLINDER HEAD COVER SUB-ASSEMBLY |
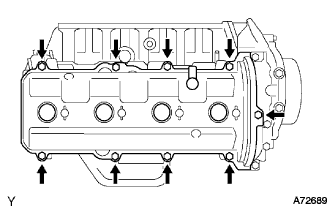 |
Remove the 9 bolts, 9 seal washers, cylinder head cover and gasket.
| 7. REMOVE CYLINDER HEAD COVER SUB-ASSEMBLY LH |
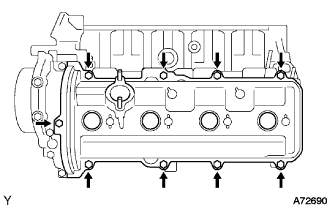 |
Remove the 9 bolts, 9 seal washers, cylinder head cover and gasket.
| 8. REMOVE NO. 2 IDLER PULLEY SUB-ASSEMBLY |
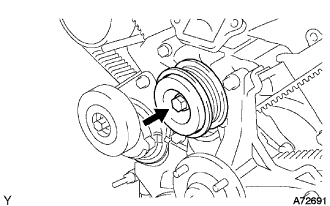 |
Remove the pulley bolt, cover plate and idler pulley.
| 9. REMOVE NO. 2 TIMING BELT COVER SUB-ASSEMBLY |
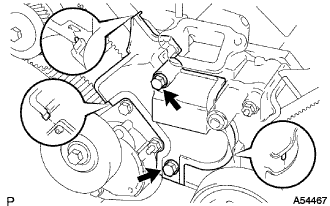 |
Remove the 2 bolts and timing belt cover.
| 10. REMOVE V-RIBBED BELT TENSIONER ASSEMBLY |
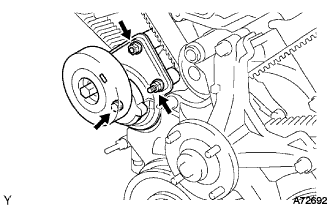 |
Remove the bolt, 2 nuts and belt tensioner.
| 11. REMOVE FAN BRACKET SUB-ASSEMBLY |
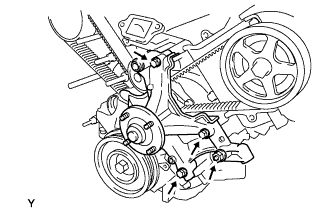 |
Remove the 2 bolts, 2 nuts and fan bracket.
| 12. REMOVE CRANKSHAFT DAMPER SUB-ASSEMBLY |
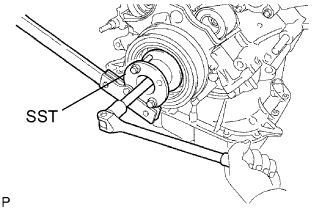 |
Using SST, remove the pulley bolt.
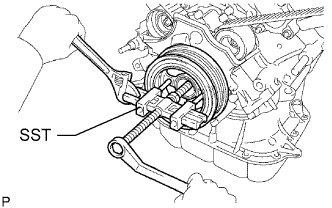 |
Using SST, remove the crankshaft pulley.
| 13. REMOVE NO. 1 TIMING BELT COVER |
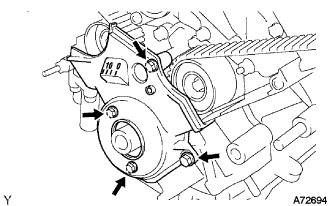 |
Remove the 4 bolts and timing belt cover.
| 14. REMOVE TIMING GEAR COVER SPACER |
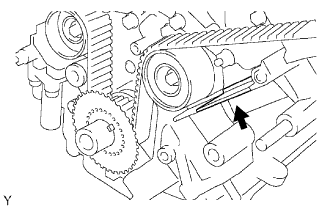 |
Remove the cover spacer and gasket.
| 15. REMOVE NO. 1 CRANKSHAFT POSITION SENSOR PLATE |
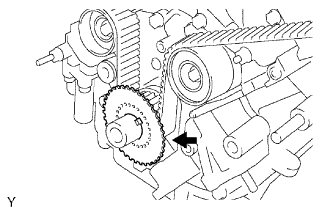 |
Remove No. 1 crankshaft position sensor plate.
| 16. SET NO. 1 CYLINDER TO TDC / COMPRESSION |
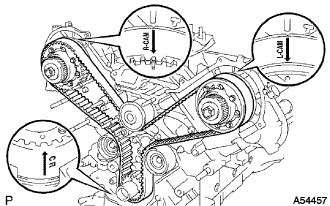 |
If reusing the timing belt, check the installation marks on the timing belt.
Check that there are 3 installation marks on the timing belt by turning the crankshaft as shown in the illustration.
If the installation marks have disappeared, put a new installation mark on the timing belt before removing each part.
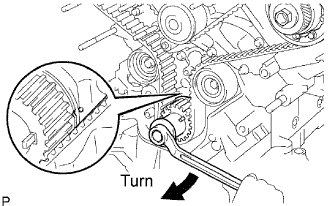 |
Using the crankshaft damper bolt, turn the crankshaft to align the timing marks of the crankshaft timing pulley and oil pump body.
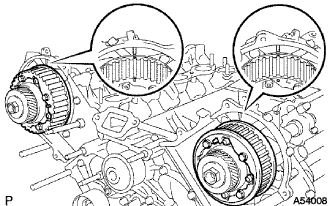 |
Check that the timing marks of the camshaft timing pulleys and timing belt plates are aligned.
If not, turn the crankshaft 1 complete revolution (360°).
| 17. REMOVE TIMING BELT |
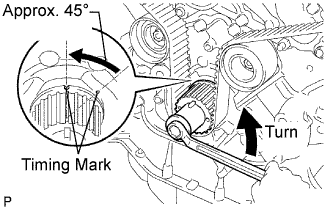 |
Set the No. 1 cylinder to approx. 45° BTDC/compression.
Using the crankshaft damper bolt, turn the crankshaft counterclockwise by approx. 45°.
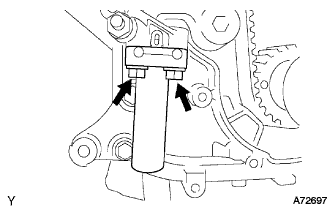 |
Alternately loosen the 2 bolts, then remove the bolts, chain tensioner and dust boot.
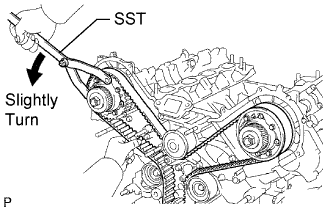 |
Using SST, loosen the tension between the camshaft timing pulley (RH bank) and crankshaft timing pulley by slightly turning the camshaft timing pulley (RH bank) counterclockwise.
Disconnect the timing belt from the No. 1 timing belt idler and remove the timing belt.
| 18. REMOVE CAMSHAFT TIMING PULLEYS |
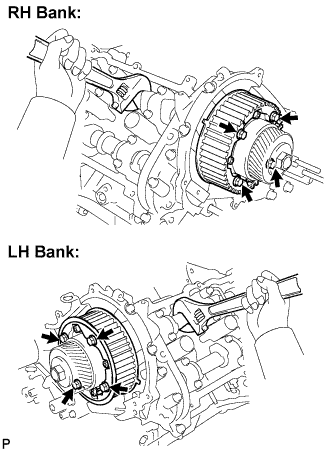 |
Hold the crankshaft with a wrench, and remove the 8 bolts and 2 timing pulleys.
| 19. REMOVE NO. 1 TIMING BELT IDLER SUB-ASSEMBLY |
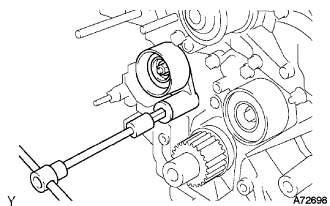 |
Using a 10 mm hexagon wrench, remove the bolt, idler and plate washer.
| 20. REMOVE NO. 2 TIMING BELT IDLER SUB-ASSEMBLY |
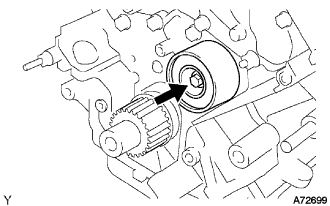 |
Remove the bolt and idler.
| 21. REMOVE CRANKSHAFT TIMING PULLEY |
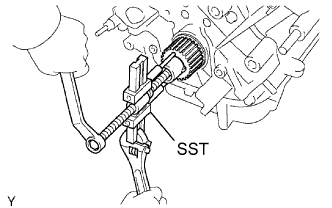 |
Using SST, remove the timing pulley.
| 22. REMOVE NO. 2 REAR TIMING BELT PLATE RH |
Remove the 2 bolts and No. 2 rear timing belt plate RH.
| 23. REMOVE REAR TIMING BELT PLATE RH |
Remove the bolt, stud bolt and rear timing belt plate RH.
| 24. REMOVE NO. 2 REAR TIMING BELT PLATE LH |
Remove the 2 bolts and No. 2 rear timing belt plate LH.
| 25. REMOVE REAR TIMING BELT PLATE LH |
Remove the bolt and rear timing belt plate LH.
| 26. REMOVE CAMSHAFTS |
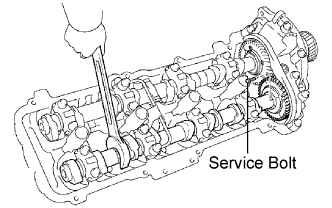 |
Remove the camshafts of the RH bank.
In order to install a service bolt to the sub and main gears, turn the camshaft with a wrench. The hexagonal portion of the camshaft is used for turning the camshaft with the wrench.
Secure the sub-gear to the main gear with a service bolt.
| Thread diameter | 6 mm |
| Thread pitch | 1.0 mm |
| Bolt length | 16 to 20 mm (0.63 to 0.79 in.) |
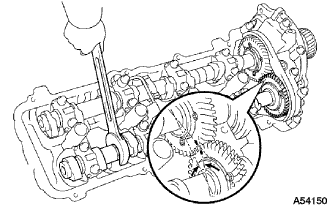 |
Set the timing mark (1-dot mark) of the camshaft main gear at approx. 10° angle by turning the hexagonal portion of the exhaust camshaft with a wrench.
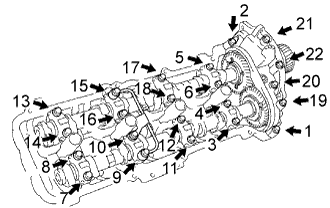 |
Uniformly loosen the 22 bearing cap bolts in the order shown in the illustration, then remove all the bolts.
Remove the oil feed pipe, 9 bearing caps, oil control valve filter, camshaft housing plug and 2 camshafts.
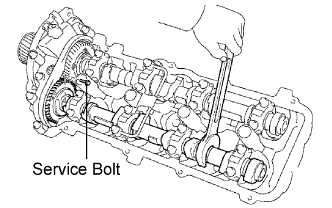 |
Remove the camshafts on the LH bank.
In order to install a service bolt to the sub and main gears, turn the camshaft with a wrench. The hexagonal portion of the camshaft is used for turning the camshaft with the wrench.
Secure the sub-gear to the main gear with a service bolt.
| Thread diameter | 6 mm |
| Thread pitch | 1.0 mm |
| Bolt length | 16 to 20 mm (0.63 to 0.79 in.) |
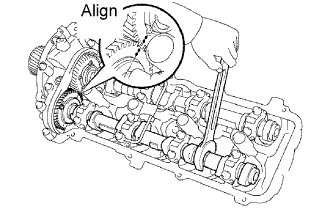 |
Align the timing marks (2-dot marks) of the camshaft drive and driven gears by turning the hexagonal portion of the exhaust camshaft with a wrench.
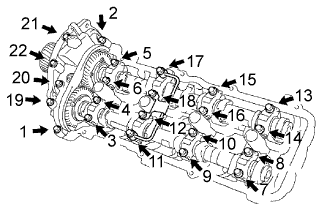 |
Uniformly loosen the 22 bearing cap bolts in the order shown in the illustration, then remove all the bolts.
Remove the oil feed pipe, 9 bearing caps, oil control valve filter, camshaft housing plug and 2 camshafts.
| 27. REMOVE SEMICIRCULAR PLUG |
| 28. REMOVE CYLINDER HEAD SUB-ASSEMBLY |
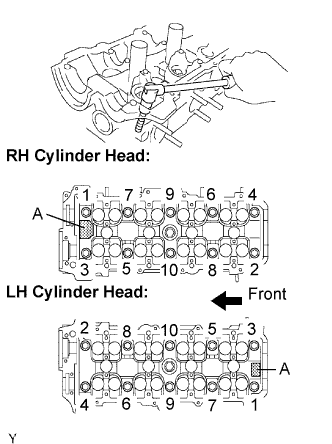 |
Uniformly loosen the 10 cylinder head bolts on one side of each cylinder head in several steps, in the order shown in the illustration. Likewise, loosen the 10 bolts on the other side. Remove the 20 cylinder head bolts and plate washers.
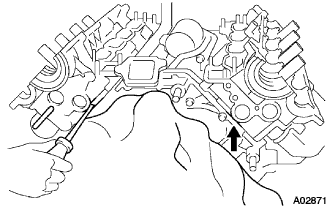 |
Lift the cylinder head from the dowels on the cylinder block, and place the 2 cylinder heads on wooden blocks on a bench.
| 29. REMOVE WATER PUMP ASSEMBLY |
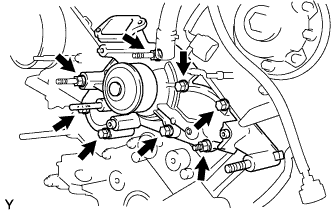 |
Remove the 5 bolts, 2 stud bolts, nut, water pump and gasket.
| 30. REMOVE NO. 2 OIL PAN SUB-ASSEMBLY |
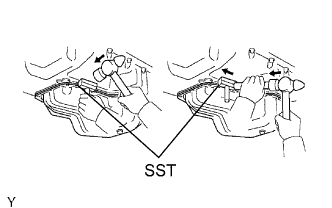 |
Remove the 17 bolts and 2 nuts.
Insert the blade of SST between the oil pan and No. 2 oil pan, and cut off applied sealer. Remove the No. 2 oil pan.
| 31. REMOVE OIL PAN BAFFLE PLATE |
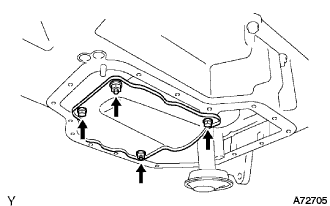 |
Remove the 2 bolts, 2 nuts and baffle plate.
| 32. REMOVE OIL PAN SUB-ASSEMBLY |
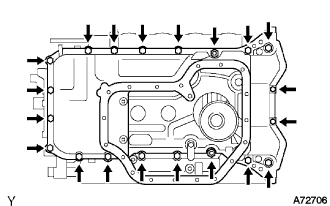 |
Remove the 18 bolts and 2 nuts.
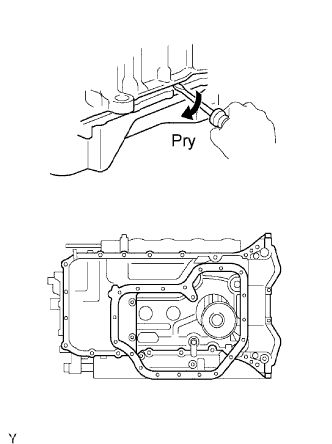 |
Using a screwdriver, remove the oil pan by prying between the oil pan and cylinder block in the order shown in the illustration.
| 33. REMOVE OIL STRAINER SUB-ASSEMBLY |
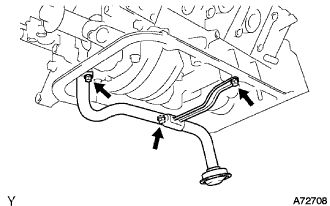 |
Remove the 2 bolts, 2 nuts, oil strainer and gasket.
| 34. REMOVE OIL PUMP ASSEMBLY |
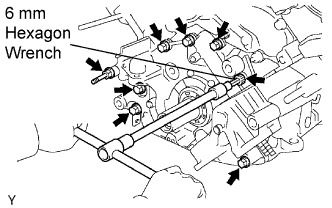 |
Remove the 7 bolts and stud bolt.
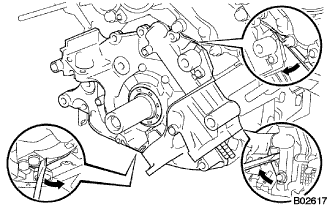 |
Using a screwdriver, remove the oil pump by prying the portions between the oil pump and cylinder block.
Remove the O-ring from the cylinder block.
| 35. REMOVE ENGINE REAR OIL SEAL RETAINER |
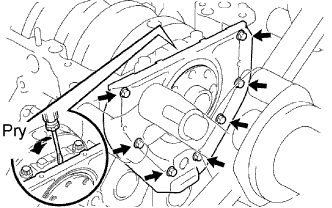 |
Remove the 7 bolts.
Using a screwdriver, remove the oil seal retainer by prying the portions between the oil seal retainer and crankshaft bearing cap.
Remove the O-ring.
| 36. REMOVE SPARK PLUG TUBE GASKET |
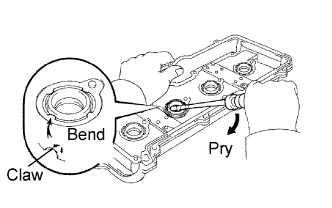 |
Bend the 4 ventilation case claws installed on the cylinder head cover to an angle of 90° or more.
Using a screwdriver, pry out the gasket.
| 37. REMOVE CAMSHAFT TIMING TUBE ASSEMBLY |
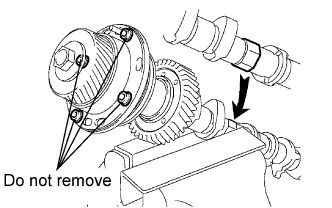 |
Mount the hexagonal portion of the camshaft in a vise.
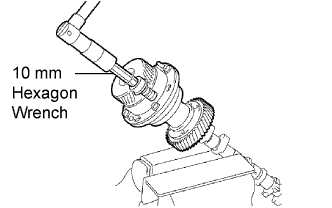 |
Remove the screw plug and seal washer.
Using a 10 mm hexagon wrench, and remove the bolt.
Pull out the timing tube and drive gear assembly from the camshaft.
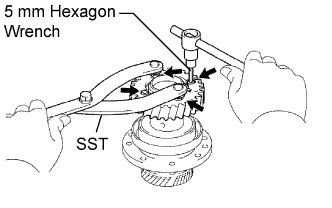 |
Using SST and a 5 mm hexagon wrench, remove the 4 bolts, drive gear and oil seal.
| 38. REMOVE CAMSHAFT SUB GEAR |
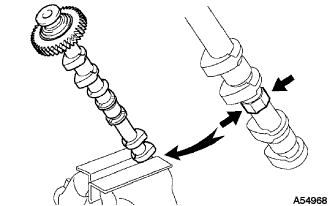 |
Mount the hexagonal portion of the camshaft in a vise.
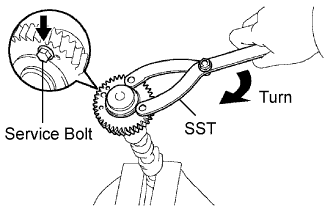 |
Using SST, turn the sub gear clockwise, and remove the service bolt.
| Thread diameter | 6 mm |
| Thread pitch | 1.0 mm |
| Bolt length | 16 to 20 mm (0.63 to 0.79 in.) |
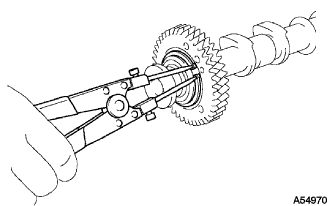 |
Using snap ring pliers, remove the snap ring.
Remove the wave washer, sub gear and gear spring.
| 39. REMOVE OIL PUMP SEAL |
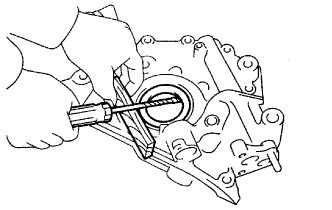 |
Using a screwdriver, pry out the oil seal.
| 40. REMOVE ENGINE REAR OIL SEAL |
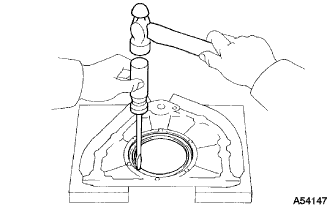 |
Using a screwdriver and hammer, tap out the oil seal.
| 41. REMOVE VALVE LIFTER |
Remove the valve lifter and adjusting shim.
| 42. REMOVE INTAKE VALVE |
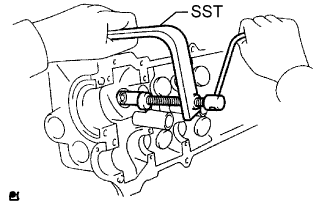 |
Using SST, compress the valve spring and remove the 2 valve spring retainer locks.
Remove the spring retainer, valve spring, valve and spring seat.
| 43. REMOVE EXHAUST VALVE |
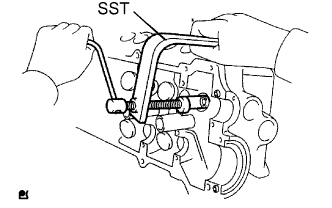 |
Using SST, compress the valve spring and remove the 2 valve spring retainer locks.
Remove the spring retainer, valve spring, valve and spring seat.
| 44. REMOVE VALVE STEM OIL SEAL |
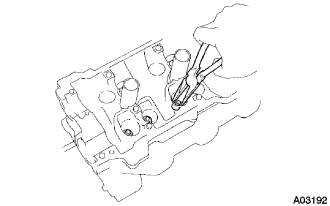 |
Using needle-nose pliers, remove the oil seal.
| 45. INSPECT CONNECTING ROD THRUST CLEARANCE |
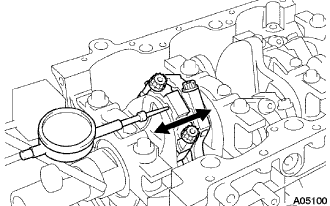 |
Using a dial indicator, measure the thrust clearance while moving the connecting rod back and forth.
| 46. INSPECT CONNECTING ROD OIL CLEARANCE |
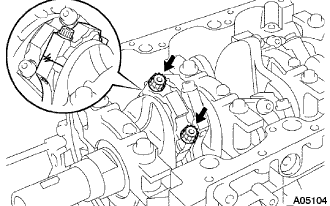 |
Check the matchmarks on the connecting rod and cap to ensure correct reassembly.
Remove the 2 connecting rod cap bolts.
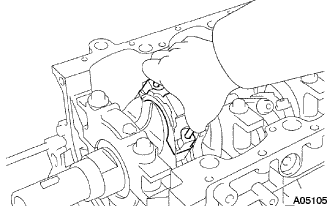 |
Using the removed connecting rod cap bolts, remove the connecting rod cap and lower bearing by wiggling the connecting rod cap right and left.
Clean the crank pin and bearing.
Check the crank pin and bearing for pitting and scratches.
If the crank pin or bearing is damaged, replace the bearings. If necessary, replace the crankshaft.
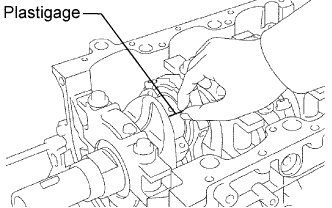 |
Lay a strip of Plastigage across the crank pin.
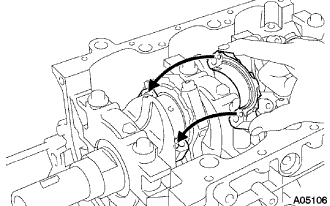 |
Match the numbered connecting rod cap with the connecting rod.
Align the pin groove of the connecting rod cap with the pins of the connecting rod, and install the connecting rod cap.
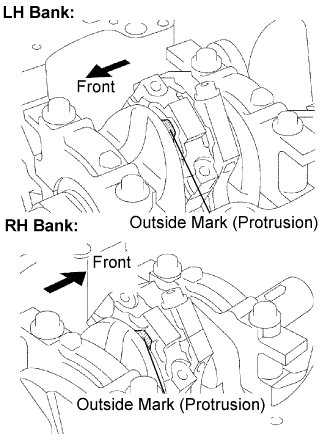 |
Check that the outside mark of the connecting rod cap is facing in the correct direction.
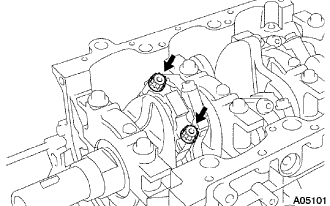 |
Apply a light coat of engine oil to the threads and under the heads of the connecting rod cap bolts.
Install and alternately tighten the 2 connecting rod cap bolts in several steps.
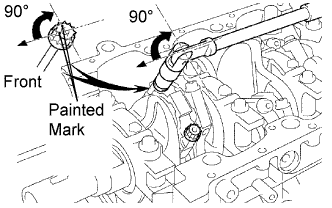 |
Mark the front of the connecting cap bolts with paint.
Retighten the cap bolts 90° as shown in the illustration.
Check that the painted mark is now at a 90° angle to the front.
|
Remove the 2 bolts, connecting rod cap and lower bearing.
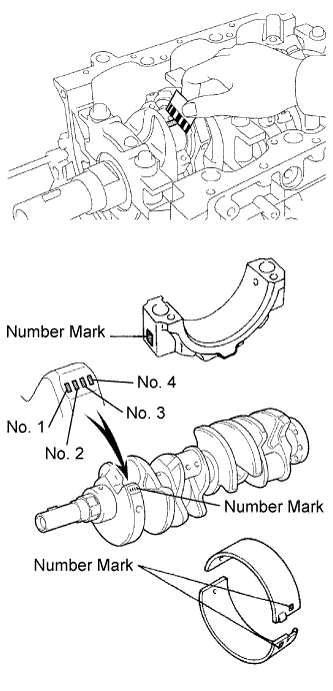 |
Measure the Plastigage at its widest point.
| Item | Number Mark | |||||||||||
| Connecting rod cap | 1 | 1 | 2 | 1 | 2 | 3 | 2 | 3 | 4 | 3 | 4 | 4 |
| Crankshaft | 1 | 2 | 1 | 3 | 2 | 1 | 3 | 2 | 1 | 3 | 2 | 3 |
| Use bearing | 2 | 3 | 4 | 5 | 6 | 7 | ||||||
| Mark "1" | 55.000 to 55.006 mm (2.1654 to 2.1656 in.) |
| Mark "2" | 55.006 to 55.012 mm (2.1656 to 2.1658 in.) |
| Mark "3" | 55.012 to 55.018 mm (2.1658 to 2.1661 in.) |
| Mark "4" | 55.018 to 55.024 mm (2.1661 to 2.1663 in.) |
| Mark "1" | 51.994 to 52.000 mm (2.0470 to 2.0472 in.) |
| Mark "2" | 51.988 to 51.994 mm (2.0468 to 2.0470 in.) |
| Mark "3" | 51.982 to 51.988 mm (2.0465 to 2.0468 in.) |
| Mark "2" | 1.487 to 1.490 mm (0.0585 to 0.0587 in.) |
| Mark "3" | 1.490 to 1.493 mm (0.0587 to 0.0588 in.) |
| Mark "4" | 1.493 to 1.496 mm (0.0588 to 0.0589 in.) |
| Mark "5" | 1.496 to 1.499 mm (0.0589 to 0.0590 in.) |
| Mark "6" | 1.499 to 1.502 mm (0.0590 to 0.0591 in.) |
| Mark "7" | 1.502 to 1.505 mm (0.0591 to 0.0593 in.) |
Completely remove the Plastigage.
| 47. REMOVE PISTON AND CONNECTING ROD |
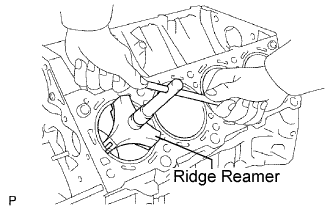 |
Using a ridge reamer, remove all the carbon from the top of the cylinder.
Push the piston, connecting rod assembly and upper bearing through the top of the cylinder block.
| 48. REMOVE PISTON |
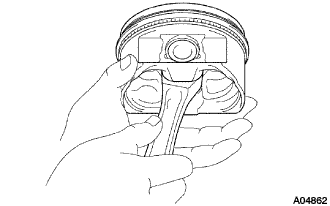 |
Check the fitting condition between the piston and piston pin.
Try to move the piston back and forth on the piston pin.
If any movement is felt, replace the piston and pin as a set.
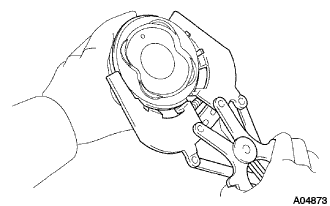 |
Using a piston ring expander, remove the 2 piston rings.
Remove the oil ring (2 side rails and expander) by hand.
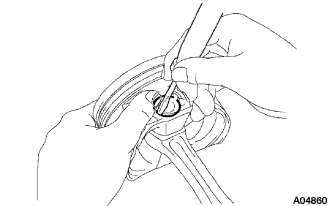 |
Using a screwdriver, pry out the 2 snap rings.
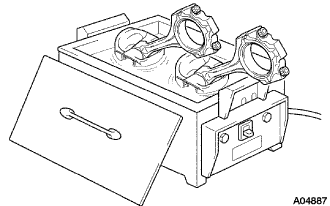 |
Gradually heat the piston to approx. 60°C (140°F).
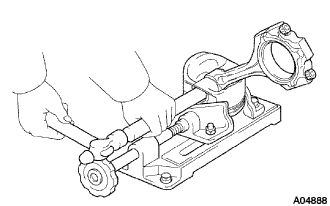 |
Using a plastic hammer and brass bar, lightly tap out the piston pin and remove the connecting rod.
| 49. INSPECT CRANKSHAFT THRUST CLEARANCE |
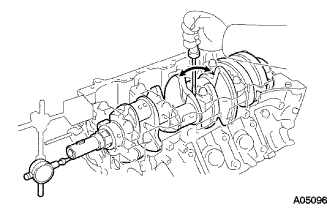 |
Using a dial indicator, measure the thrust clearance while prying the crankshaft back and forth with a screwdriver.
| STD | 2.440 to 2.490 mm (0.0961 to 0.0980 in.) |
| O/S 0.125 | 2.503 to 2.553 mm (0.0985 to 0.1005 in.) |
| 50. INSPECT CRANKSHAFT OIL CLEARANCE |
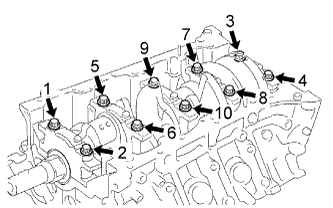 |
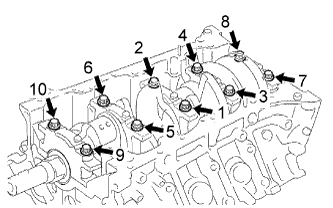
Uniformly loosen and remove the 10 crankshaft bearing cap bolts in several steps, in the order shown in the illustration.
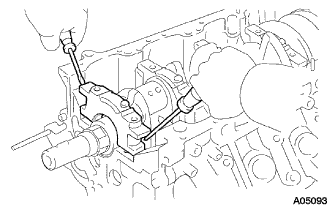 |
Using 2 screwdrivers, pry out the crankshaft bearing cap, and remove the 5 crankshaft bearing caps, 5 lower bearings and 2 lower thrust washers (No. 3 crankshaft bearing cap only).
Lift out the crankshaft.
Remove the 2 upper thrust washers.
Clean each crankshaft journal and bearing.
Check each crankshaft journal and bearing for pitting and scratches.
If the journal or bearing is damaged, replace the bearings. If necessary, replace the crankshaft.
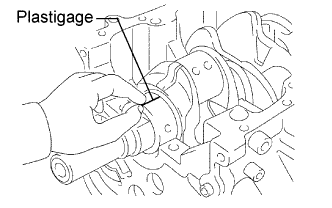 |
Place the crankshaft on the cylinder block.
Lay a strip of Plastigage across each journal.
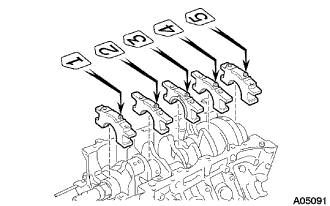 |
Install the 5 crankshaft bearing caps in their proper locations.
 |
Apply a light coat of engine oil to the threads and under the heads of the crankshaft bearing cap bolts.
Install and uniformly tighten the 10 crankshaft bearing cap bolts in several steps, in the order shown in the illustration (Procedure "A").
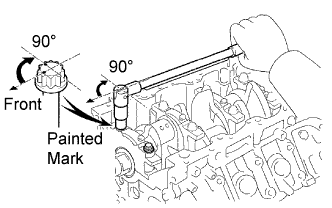 |
Mark the front of the crankshaft bearing cap bolts with paint.
Retighten the crankshaft bearing cap bolts by 90° in the order shown (Procedure "B").
Check that the painted mark is now at a 90° angle to the front.
Remove the crankshaft bearing caps.
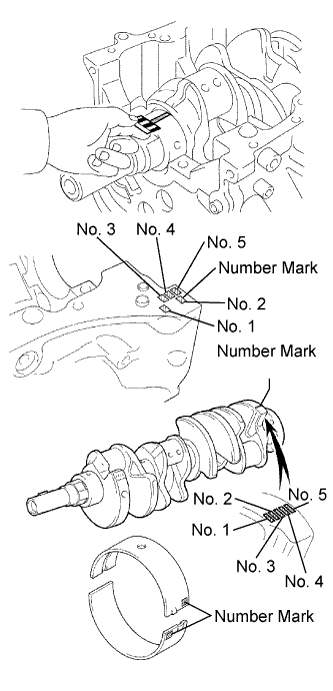 |
Measure the Plastigage at its widest point.
| No. 1 and No. 5 | Others |
| 0.028 to 0.046 mm (0.0011 to 0.0018 in.) | 0.040 to 0.058 mm (0.0016 to 0.0023 in.) |
| No. 1 and No. 5 | Others |
| 0.065 mm (0.0026 in.) | 0.065 mm (0.0026 in.) |
| - | Use bearing | |
| Cylinder block (A) + Crankshaft (B) | 0 to 5 | 3 |
| 6 to 11 | 4 | |
| 12 to 17 | 5 | |
| 18 to 23 | 6 | |
| 24 to 28 | 7 |
| - | Use bearing | |
| Cylinder block (A) + Crankshaft (B) | 0 to 5 | 1 |
| 6 to 11 | 2 | |
| 12 to 17 | 3 | |
| 18 to 23 | 4 | |
| 24 to 28 | 5 |
| Mark "00" | 72.000 mm (2.8347 in.) |
| Mark "01" | 72.001 mm (2.8347 in.) |
| Mark "02" | 72.002 mm (2.8347 in.) |
| Mark "03" | 72.003 mm (2.8348 in.) |
| Mark "04" | 72.004 mm (2.8348 in.) |
| Mark "05" | 72.005 mm (2.8348 in.) |
| Mark "06" | 72.006 mm (2.8349 in.) |
| Mark "07" | 72.007 mm (2.8349 in.) |
| Mark "08" | 72.008 mm (2.8350 in.) |
| Mark "09" | 72.009 mm (2.8350 in.) |
| Mark "10" | 72.010 mm (2.8350 in.) |
| Mark "11" | 72.011 mm (2.8351 in.) |
| Mark "12" | 72.012 mm (2.8351 in.) |
| Mark "13" | 72.013 mm (2.8352 in.) |
| Mark "14" | 72.014 mm (2.8352 in.) |
| Mark "15" | 72.015 mm (2.8352 in.) |
| Mark "16" | 72.016 mm (2.8353 in.) |
| Mark "00" | 67.000 mm (2.6378 in.) |
| Mark "01" | 66.999 mm (2.6378 in.) |
| Mark "02" | 66.998 mm (2.6377 in.) |
| Mark "03" | 66.997 mm (2.6377 in.) |
| Mark "04" | 66.996 mm (2.6376 in.) |
| Mark "05" | 66.995 mm (2.6376 in.) |
| Mark "06" | 66.994 mm (2.6376 in.) |
| Mark "07" | 66.993 mm (2.6375 in.) |
| Mark "08" | 66.992 mm (2.6375 in.) |
| Mark "09" | 66.991 mm (2.6374 in.) |
| Mark "10" | 66.990 mm (2.6374 in.) |
| Mark "11" | 66.989 mm (2.6374 in.) |
| Mark "12" | 66.988 mm (2.6373 in.) |
| Mark "3" | 2.487 to 2.490 mm (0.0979 to 0.0980 in.) |
| Mark "4" | 2.490 to 2.493 mm (0.0980 to 0.0982 in.) |
| Mark "5" | 2.493 to 2.496 mm (0.0982 to 0.0983 in.) |
| Mark "6" | 2.496 to 2.499 mm (0.0983 to 0.0984 in.) |
| Mark "7" | 2.499 to 2.502 mm (0.0984 to 0.0985 in.) |
| Mark "1" | 2.481 to 2.484 mm (0.0977 to 0.0978 in.) |
| Mark "2" | 2.484 to 2.487 mm (0.0978 to 0.0979 in.) |
| Mark "3" | 2.487 to 2.490 mm (0.0979 to 0.0980 in.) |
| Mark "4" | 2.490 to 2.493 mm (0.0980 to 0.0982 in.) |
| Mark "5" | 2.493 to 2.496 mm (0.0982 to 0.0983 in.) |
Completely remove the Plastigage.
| 51. REMOVE CRANKSHAFT |
Lift up the crankshaft.
Remove the 5 upper crankshaft bearings and 2 upper thrust washers from the cylinder block.
| 52. REMOVE CRANKSHAFT PULLEY SET CRANKSHAFT KEY |