Home › Vehicle Exterior › DOOR / HATCH › HOOD

HOOD > ADJUSTMENT

for Preparation Click here


B246460E02

HINT:
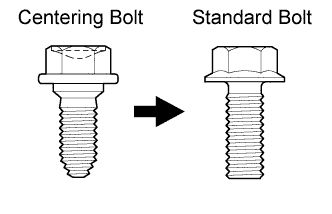
  1. Centering bolts are used to mount the hood hinge and hood lock. The hood and hood lock cannot be adjusted with the centering bolts installed. Substitute the centering bolts with standard bolts when making adjustments.
  2. The specified torque for standard bolts is shown in the standard bolt chart (Click here).


1. INSPECT HOOD SUB-ASSEMBLY


  1. Check that the clearance measurements of areas A through E are within each standard range.
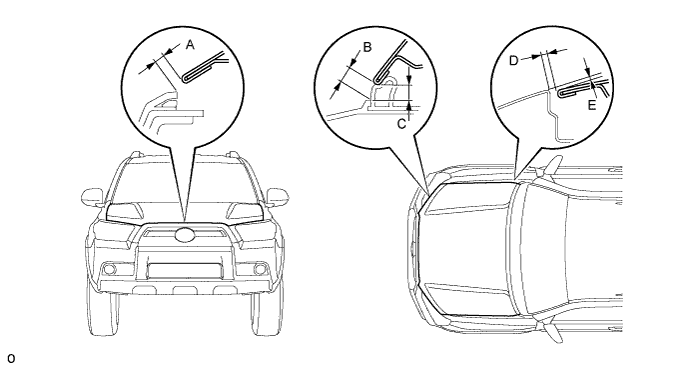

    B237120E01


    Standard:

    Area
    Measurement
    Area
    Measurement
    A
    3.65 to 7.65 mm (0.144 to 0.301 in.)
    B
    5.15 to 9.15 mm (0.203 to 0.360 in.)
    C
    4.05 to 8.05 mm (0.165 to 0.323 in.)
    D
    2.0 to 5.0 mm (0.0787 to 0.197 in.)
    E
    -1.5 to 1.5 mm (-0.0591 to 0.0591 in.)
    -
    -


2. REMOVE UPPER RADIATOR SUPPORT SEAL
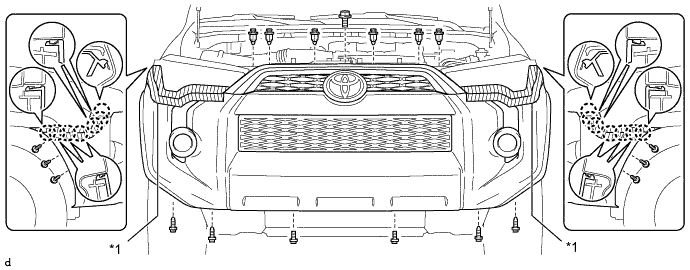
  1. Remove the 13 clips and upper radiator support seal.


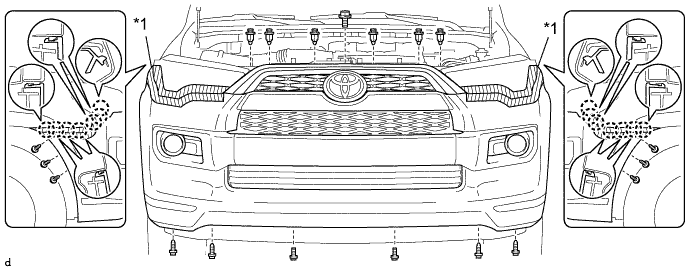
3. REMOVE FRONT BUMPER COVER (w/o Intuitive Parking Assist System)
  1. Put protective tape around the front bumper cover.

  1. Remove the 3 bolts, 10 screws and 6 clips.


  1. Detach the 14 claws to remove the front bumper cover with radiator grille.


    B353220E01


    Text in Illustration 
    *1
    Protective Tape
    -
    -

  1. Disconnect the 2 connectors.


4. REMOVE FRONT BUMPER COVER (w/ Intuitive Parking Assist System)
  1. Put protective tape around the front bumper cover.

  1. Remove the 3 bolts, 10 screws and 6 clips.


  1. Detach the 14 claws to remove the front bumper cover with radiator grille.


    B353221E01


    Text in Illustration 
    *1
    Protective Tape
    -
    -

  1. Disconnect 3 connectors.


5. ADJUST HOOD SUB-ASSEMBLY


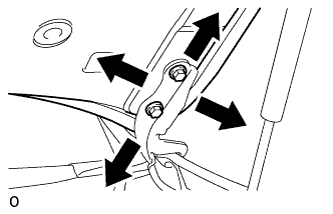
  1. Adjust the hood position.


      B237105
    1. Loosen the 4 hinge bolts on the hood sub-assembly.

    2. Move the hood sub-assembly and adjust the clearance between the hood sub-assembly and front fender.

    3. Tighten the 4 hinge bolts on the hood sub-assembly after the adjustment.

      Torque:
      13 N*m{ 133 kgf*cm , 10 ft.*lbf }


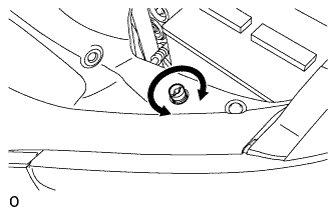
  1. Adjust the height of the front end of the hood sub-assembly using the cushion rubbers.


      B237106
    1. Adjust the cushion rubbers so that the hood sub-assembly and front fender are aligned.

      HINT:
      Raise or lower the front end of the hood sub-assembly by turning the 2 cushion rubbers.


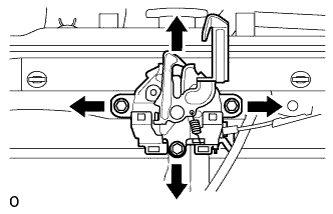
  1. Adjust the hood lock.


      B237107
    1. Loosen the 3 bolts.

    2. Adjust the hood lock assembly and tighten the 3 bolts.

      Torque:
      7.5 N*m{ 76 kgf*cm , 66 in.*lbf }

    3. Check that the striker can engage with the hood lock assembly smoothly.


6. INSTALL FRONT BUMPER COVER (w/ Intuitive Parking Assist System)
  1. Connect the 3 connectors.

  1. Attach the 14 claws to install the front bumper cover with radiator grille.

  1. Install the 3 bolts, 10 screws and 6 clips.


7. INSTALL FRONT BUMPER COVER (w/o Intuitive Parking Assist System)
  1. Connect the 2 connectors.

  1. Attach the 14 claws to install the front bumper cover with radiator grille.

  1. Install the 3 bolts, 10 screws and 6 clips.


8. INSTALL UPPER RADIATOR SUPPORT SEAL
  1. Install the upper radiator support seal with the 13 clips.