FRONT DIFFERENTIAL CARRIER ASSEMBLY (for 4WD) > REASSEMBLY |
| 1. INSTALL FRONT DIFFERENTIAL SIDE GEAR SHAFT BEARING RH |
|
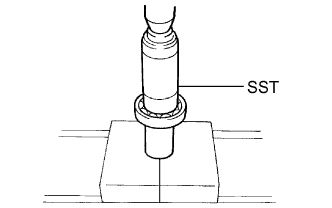
Using SST and a press, press in the shaft bearing.
Using a snap ring expander, install the snap ring.
| 2. INSTALL DIFFERENTIAL SIDE GEAR SHAFT SUB-ASSEMBLY RH |
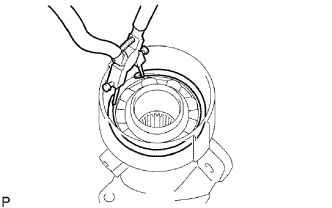 |
Install the shaft to the differential tube.
Using snap ring expander, install the snap ring.
| 3. INSTALL DIFFERENTIAL SIDE GEAR SHAFT OIL SEAL |
Coat the lip of a new oil seal with MP grease.
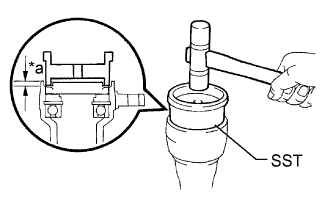 |
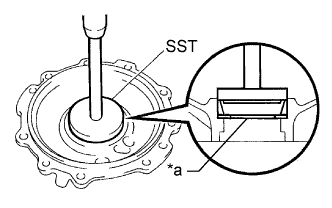
Using SST and a plastic-faced hammer, tap in the oil seal.
| *a | Oil Seal Depth |
| 4. INSTALL DIFFERENTIAL CLUTCH HUB (w/ A.D.D.) |
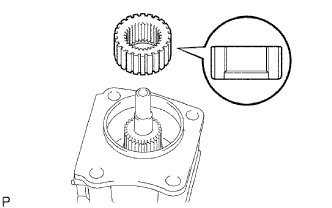 |
Install the clutch hub to the side gear inter shaft.
Using snap ring pliers, install the snap ring.
| 5. INSTALL FRONT DIFFERENTIAL SIDE GEAR NEEDLE ROLLER BEARING (w/ A.D.D.) |
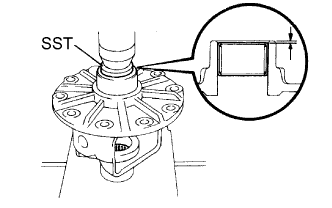 |
Using SST and a press, press in 2 new bearings.
| 6. INSTALL DIFFERENTIAL CASE ASSEMBLY |
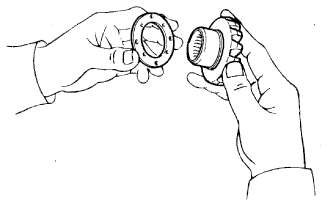 |
Install the 2 thrust washers to the 2 side gears.
| Specified Condition | Specified Condition |
| 1.48 to 1.52 mm (0.0583 to 0.0598 in.) | 1.73 to 1.77 mm (0.0681 to 0.0697 in.) |
| 1.53 to 1.57 mm (0.0602 to 0.0618 in.) | 1.78 to 1.82 mm (0.0701 to 0.0717 in.) |
| 1.58 to 1.62 mm (0.0622 to 0.0638 in.) | 1.83 to 1.87 mm (0.0720 to 0.0736 in.) |
| 1.63 to 1.67 mm (0.0642 to 0.0657 in.) | 1.88 to 1.92 mm (0.0740 to 0.0756 in.) |
| 1.68 to 1.72 mm (0.0661 to 0.0677 in.) | - |
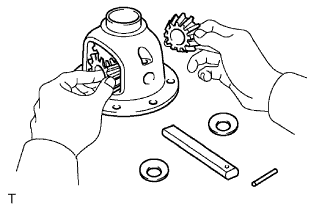 |
Install the 2 side gears, 2 pinion gears, 2 side gear thrust washers, 2 pinion thrust washers and pinion shaft to the differential case.
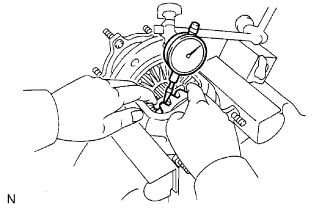 |
Measure the side gear backlash.
Using a dial indicator, measure the side gear backlash while holding one pinion gear toward the differential case.
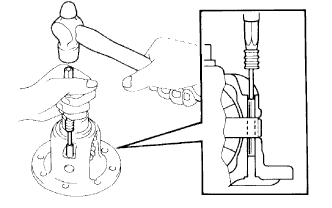 |
Using a 5 mm pin punch and hammer, tap in the straight pin through the differential case and hole of the pinion shaft.
Stake the differential case.
| 7. INSTALL DIFFERENTIAL RING GEAR |
Clean the contact surfaces of the differential case and ring gear.
Heat the ring gear in water that is approximately 100°C (212°F).
Carefully remove the ring gear from the boiling water.
After the moisture on the ring gear has completely evaporated, quickly install the ring gear to the differential case.
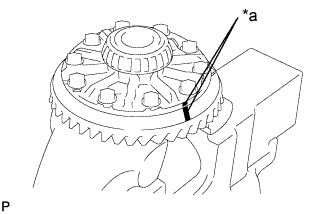 |
Align the matchmarks on the ring gear with those of the differential case.
| *a | Matchmark |
After the ring gear cools down, apply thread lock adhesive to the 10 set bolts and install them.
| 8. INSTALL FRONT DIFFERENTIAL CASE BEARING |
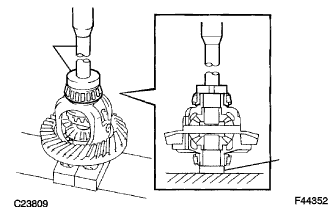 |
Using SST and a press, press the 2 bearings (inner) into the differential case.
| 9. INSTALL FRONT DIFFERENTIAL CASE BEARING |
 |
Using SST and a press, press the case bearing (outer race) into the differential case bearing retainer.
| *a | Case Washer |
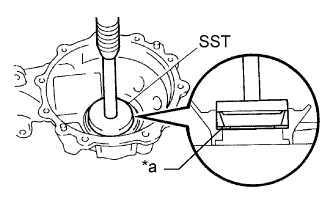 |
Using SST and a press, press the case bearing (outer) into the differential carrier.
| *a | Case Washer |
| 10. INSTALL FRONT DRIVE PINION REAR TAPERED ROLLER BEARING (OUTER) |
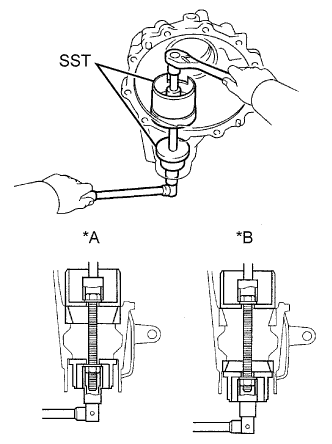 |
Using SST, install the front drive pinion rear tapered roller bearing (outer race).
| *A | for Rear |
| *B | for Front |
| 11. INSTALL FRONT DRIVE PINION FRONT TAPERED ROLLER BEARING |
Using a brass bar and hammer, tap in the oil storage ring.
Using SST, install the front drive pinion front tapered roller bearing (outer race).
| 12. INSTALL FRONT DRIVE PINION FRONT TAPERED ROLLER BEARING |
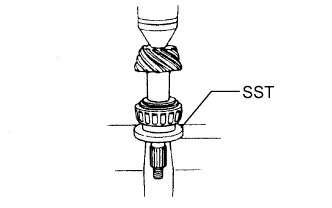 |
Install the washer to the drive pinion.
Using SST and a press, press the front bearing onto the drive pinion.
| 13. INSPECT DIFFERENTIAL DRIVE PINION PRELOAD |
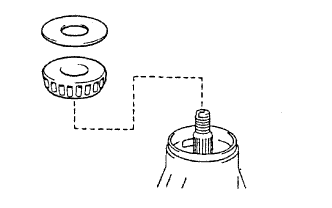 |
Install the drive pinion, roller bearing and oil slinger to the differential case.
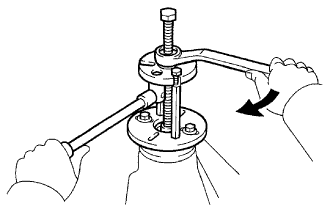 |
Using SST, install the companion flange.
Adjust the drive pinion preload by tightening the companion flange nut.
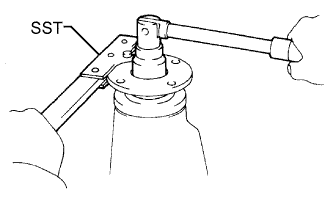 |
Using SST to hold the flange in place, tighten the nut.
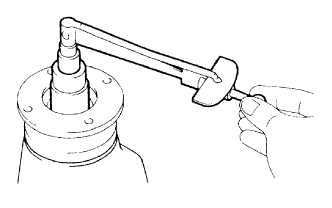 |
Using a torque wrench, measure the preload.
| Item | Specified Condition |
| New bearing | 0.98 to 1.57 N*m (10 to 16 kgf*cm, 8.7 to 14 in.*lbf) |
| Used bearing | 0.49 to 0.78 N*m (5 to 8 kgf*cm, 4.3 to 6.9 in.*lbf) |
| 14. INSTALL DIFFERENTIAL CASE ASSEMBLY |
| 15. ADJUST DIFFERENTIAL RING GEAR BACKLASH |
Install the side bearing retainer with the 10 bolts.
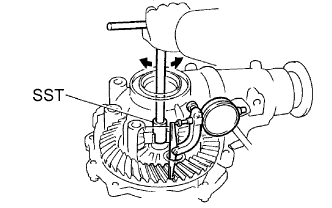 |
Using SST and a dial indicator, measure the ring gear backlash.
| Specified Condition | Specified Condition | Specified Condition |
| 1.57 to 1.59 mm (0.0618 to 0.0626 in.) | 1.79 to 1.81 mm (0.0705 to 0.0713 in.) | 1.99 to 2.01 mm (0.0783 to 0.0791 in.) |
| 1.59 to 1.61 mm (0.0626 to 0.0634 in.) | 1.81 to 1.83 mm (0.0713 to 0.0720 in.) | 2.01 to 2.03 mm (0.0791 to 0.0799 in.) |
| 1.61 to 1.63 mm (0.0634 to 0.0642 in.) | 1.83 to 1.85 mm (0.0720 to 0.0728 in.) | 2.03 to 2.05 mm (0.0799 to 0.0807 in.) |
| 1.63 to 1.65 mm (0.0642 to 0.0650 in.) | 1.85 to 1.87 mm (0.0728 to 0.0736 in.) | 2.05 to 2.07 mm (0.0807 to 0.0815 in.) |
| 1.65 to 1.67 mm (0.0650 to 0.0657 in.) | 1.87 to 1.89 mm (0.0736 to 0.0744 in.) | 2.07 to 2.09 mm (0.0815 to 0.0822 in.) |
| 1.67 to 1.69 mm (0.0657 to 0.0665 in.) | 1.89 to 2.01 mm (0.0744 to 0.0791 in.) | 2.09 to 2.11 mm (0.0822 to 0.0830 in.) |
| 1.69 to 1.71 mm (0.0665 to 0.0673 in.) | 1.89 to 1.91 mm (0.0744 to 0.0752 in.) | 2.11 to 2.13 mm (0.0830 to 0.0839 in.) |
| 1.71 to 1.73 mm (0.0673 to 0.0681 in.) | 1.91 to 1.93 mm (0.0752 to 0.0760 in.) | 2.13 to 2.15 mm (0.0839 to 0.0846 in.) |
| 1.73 to 1.75 mm (0.0681 to 0.0689 in.) | 1.93 to 1.95 mm (0.0760 to 0.0768 in.) | 2.15 to 2.17 mm (0.0846 to 0.0854 in.) |
| 1.75 to 1.77 mm (0.0689 to 0.0697 in.) | 1.95 to 1.97 mm (0.0768 to 0.0776 in.) | - |
| 1.77 to 1.79 mm (0.0697 to 0.0705 in.) | 1.97 to 1.99 mm (0.0776 to 0.0783 in.) | - |
| 16. INSPECT TOTAL PRELOAD |
Using a torque wrench, measure the preload with the teeth of the drive pinion and ring gear in contact.
| Item | Specified Condition |
| New bearing | 1.2 to 2.45N*m (12 to 25 kgf*cm, 10.6 to 21.7 in.*lbf) |
| Used bearing | 0.71 to 1.66 N*m (7.2 to 17 kgf*cm, 6.3 to 14.7 in.*lbf) |
| 17. ADJUST TOOTH CONTACT BETWEEN RING GEAR AND DRIVE PINION |
Remove the differential case bearing retainer and differential case.
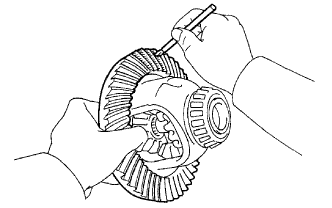 |
Coat 3 or 4 teeth at 3 different positions on the ring gear with Prussian blue.
Install the differential case and differential case bearing retainer.
Hold the companion flange firmly in place and rotate the ring gear in both directions.
Remove the differential case bearing retainer and differential case.
Inspect the tooth contact pattern.
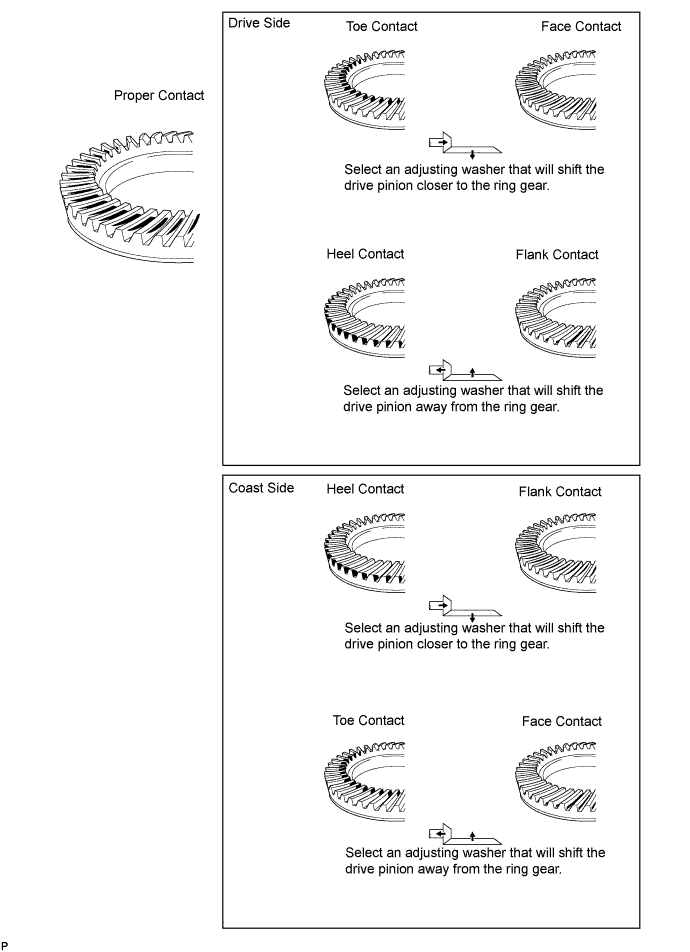
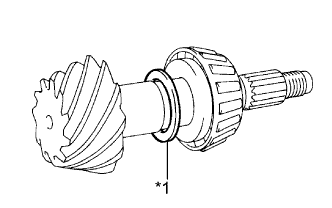 |
If the teeth are not contacting properly, use the following chart to select an appropriate washer.
| *1 | Drive Pinion Washer |
| Specified Condition | Specified Condition | Specified Condition |
| 1.69 to 1.71 mm (0.0665 to 0.0673 in.) | 1.93 to 1.95 mm (0.0760 to 0.0768 in.) | 2.17 to 2.19 mm (0.0854 to 0.0862 in.) |
| 1.72 to 1.74 mm (0.0677 to 0.0685 in.) | 1.96 to 1.98 mm (0.0772 to 0.0780 in.) | 2.20 to 2.22 mm (0.0866 to 0.0874 in.) |
| 1.75 to 1.77 mm (0.0689 to 0.0697 in.) | 1.99 to 2.01 mm (0.0783 to 0.0791 in.) | 2.23 to 2.25 mm (0.0878 to 0.0886 in.) |
| 1.78 to 1.80 mm (0.0700 to 0.0709 in.) | 2.02 to 2.04 mm (0.0795 to 0.0803 in.) | 2.26 to 2.28 mm (0.0890 to 0.0898 in.) |
| 1.81 to 1.83 mm (0.0713 to 0.0720 in.) | 2.05 to 2.07 mm (0.0807 to 0.0815 in.) | 2.29 to 2.31 mm (0.0902 to 0.0909 in.) |
| 1.84 to 1.86 mm (0.0724 to 0.0732 in.) | 2.08 to 2.10 mm (0.0819 to 0.0827 in.) | 2.32 to 2.34 mm (0.0913 to 0.0921 in.) |
| 1.87 to 1.89 mm (0.0736 to 0.0744 in.) | 2.11 to 2.13 mm (0.0831 to 0.0839 in.) | - |
| 1.90 to 1.92 mm (0.0748 to 0.0756 in.) | 2.14 to 2.16 mm (0.0843 to 0.0850 in.) | - |
| 18. REMOVE FRONT DRIVE PINION COMPANION FLANGE NUT |
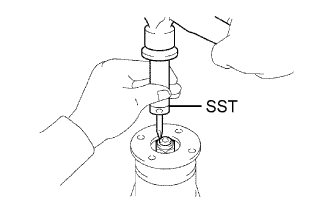 |
Using SST and a hammer, unstake the nut.
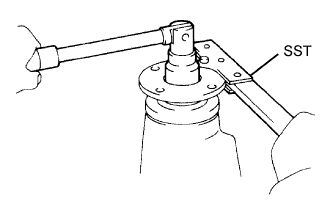 |
Using SST to hold the companion flange, remove the nut.
| 19. REMOVE FRONT DRIVE PINION COMPANION FLANGE SUB-ASSEMBLY |
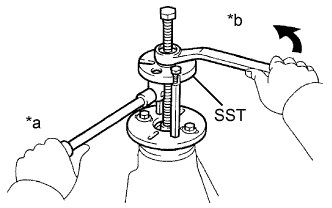 |
Using SST, remove the companion flange.
| *a | Hold |
| *b | Turn |
| 20. REMOVE FRONT DIFFERENTIAL DRIVE PINION OIL SLINGER |
| 21. REMOVE FRONT DRIVE PINION REAR TAPERED ROLLER BEARING (INNER) |
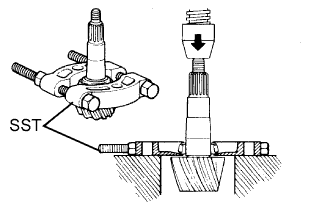 |
Using SST and a press, remove the rear tapered roller bearing (inner) and washer from the drive pinion.
| 22. REMOVE FRONT DRIVE PINION REAR TAPERED ROLLER BEARING (OUTER) |
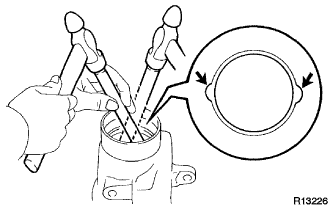 |
Using a brass bar and hammer, remove the rear tapered roller bearing (outer).
| 23. REMOVE FRONT DIFFERENTIAL DRIVE PINION BEARING SPACER |
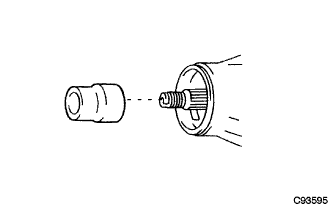 |
Remove the front differential drive pinion bearing spacer.
| 24. INSTALL FRONT DIFFERENTIAL OIL STORAGE RING |
Using a brass bar and hammer, tap in a new oil storage ring.
| 25. INSTALL FRONT DRIVE PINION REAR TAPERED ROLLER BEARING (OUTER) |
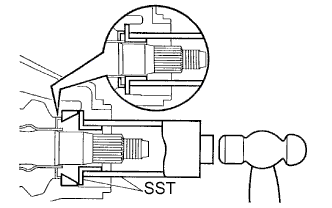 |
Using SST and a hammer, install the roller bearing (outer).
| 26. INSTALL FRONT DRIVE PINION REAR TAPERED ROLLER BEARING (INNER) |
Install the roller bearing (inner).
| 27. INSTALL FRONT DIFFERENTIAL DRIVE PINION OIL SLINGER |
| 28. INSTALL FRONT DIFFERENTIAL CARRIER OIL SEAL |
Apply MP grease to the lip of a new oil seal.
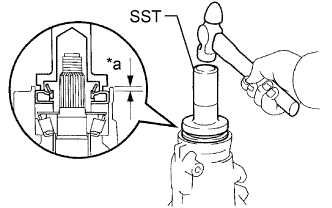 |
Using SST and a hammer, tap in the oil seal.
| 29. INSTALL FRONT DIFFERENTIAL DUST DEFLECTOR |
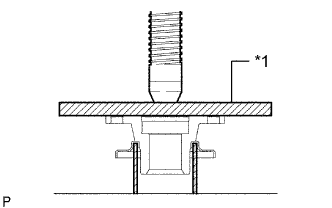 |
Using a steel plate and press, press in a new dust deflector.
| *1 | Plate |
| 30. INSTALL FRONT DRIVE PINION COMPANION FLANGE SUB-ASSEMBLY |
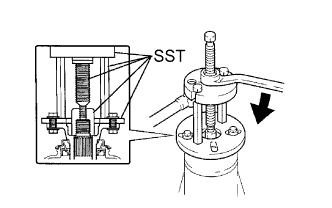 |
Place the companion flange on the drive pinion.
Coat the threads of a new nut with hypoid gear oil.
Using SST, install the companion flange.
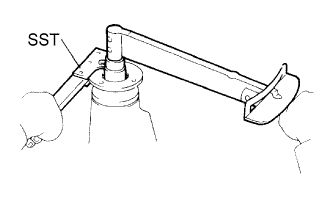 |
Using SST to hold the companion flange in place, tighten the nut to the correct torque.
| 31. INSTALL DIFFERENTIAL SIDE BEARING RETAINER |
Remove any old FIPG material from the side bearing retainer.
Wipe off any residual FIPG material on the contact surface using gasoline or alcohol.
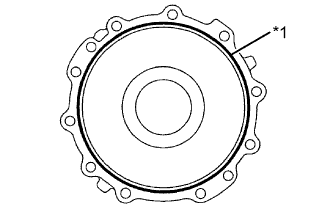 |
Apply seal packing to the side bearing retainer as shown in the illustration.
| *1 | Seal Packing |
Install the side bearing retainer with the 10 bolts.
| 32. INSPECT DRIVE PINION PRELOAD |
|
Using a torque wrench, measure the preload of the backlash between the drive pinion and ring gear.
| Item | Specified Condition |
| New bearing | 0.98 to 1.57 N*m (10 to 16 kgf*cm, 8.7 to 14 in.*lbf) |
| Used bearing | 0.49 to 0.78 N*m (5 to 8 kgf*cm, 4.3 to 6.9 in.*lbf) |
| 33. INSPECT TOTAL PRELOAD |
Using a torque wrench, measure the preload with the teeth of the drive pinion and ring gear in contact.
| Item | Specified Condition |
| New bearing | 1.2 to 2.45 N*m (12 to 25 kgf*cm, 10.6 to 21.7 in.*lbf) |
| Used bearing | 0.71 to 1.66 N*m (7.2 to 17 kgf*cm, 6.3 to 14.7 in.*lbf) |
| 34. INSPECT DIFFERENTIAL RING GEAR BACKLASH |
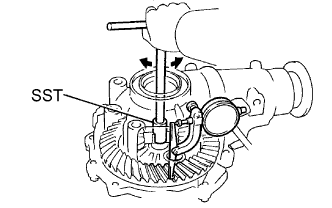 |
Using SST and a dial indicator, measure the ring gear backlash.
| 35. INSPECT FRONT DRIVE PINION COMPANION FLANGE SUB-ASSEMBLY |
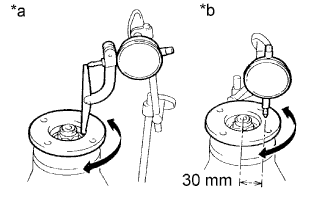 |
Using a dial indicator, measure the runout of the companion flange vertically and laterally.
| Item | Specified Condition |
| Vertical runout | 0.15 mm (0.00591 in.) |
| Lateral runout | 0.15 mm (0.00591 in.) |
| *a | Vertical runout |
| *b | Lateral runout |
| 36. STAKE FRONT DRIVE PINION COMPANION FLANGE NUT |
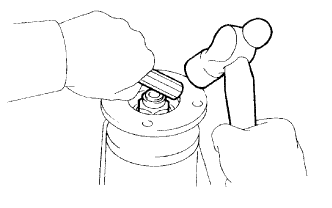 |
Using a chisel and hammer, stake the drive pinion nut.
| 37. INSTALL DIFFERENTIAL SIDE GEAR SHAFT OIL SEAL |
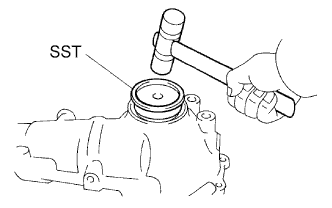 |
Coat the lip of a new oil seal with MP grease.
Using SST and a plastic-faced hammer, tap in the oil seal until its surface is flush with the differential carrier end.
| 38. INSTALL FRONT DIFFERENTIAL SIDE BEARING RETAINER DEFLECTOR |
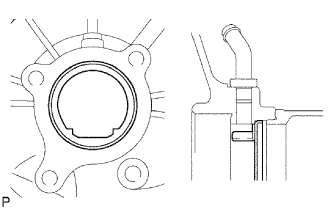 |
Using a brass bar and hammer, tap in the side bearing retainer deflector.
| 39. INSTALL DIFFERENTIAL SIDE GEAR INTER SHAFT SUB-ASSEMBLY (w/ A.D.D.) |
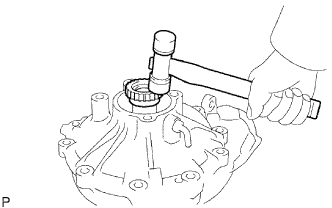 |
Install a new snap ring to the side gear inter shaft.
Using a plastic-faced hammer, tap the side gear inter shaft into the differential case.
Check that there is 2 to 3 mm (0.0787 to 0.118 in.) of axial play.
Check that the side gear inter shaft cannot be completely pulled out by hand.
| 40. INSTALL FRONT DIFFERENTIAL TUBE ASSEMBLY |
Remove any old FIPG material from the contact surfaces of the differential and clutch case.
Wipe off any residual FIPG material on the contact surface using gasoline or alcohol.
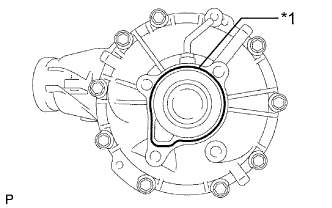 |
Apply seal packing to the differential as shown in the illustration.
| *1 | Seal Packing |
Install the differential tube to the differential.
Clean the threads of the 4 bolts and retainer bolt holes with toluene or trichloroethylene.
Apply adhesive to 2 or 3 threads at the tip of each bolt.
Using an E14 "TORX" socket wrench, install the 4 bolts.
| 41. INSTALL AUTOMATIC DISCONNECTING DIFFERENTIAL ACTUATOR (w/ A.D.D.) |
Remove any FIPG material from the contact surfaces of the differential and clutch case. Also, do not drop oil on the contact surfaces.
Wipe off residual FIPG material on the contact surfaces using gasoline or alcohol.
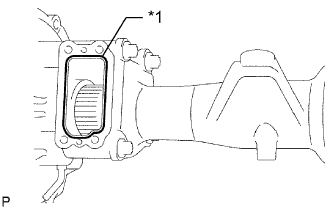 |
Apply seal packing to the differential tube as shown in the illustration.
| *1 | Seal Packing |
Clean the threads of the 4 bolts and retainer bolt holes with toluene or trichloroethylene.
Install the actuator to the differential tube.
Apply adhesive to 2 or 3 threads at the tip of each bolt.
Install the 4 bolts.