Home › Vehicle Exterior › WINDOW / GLASS › QUARTER WINDOW GLASS

QUARTER WINDOW GLASS > INSTALLATION

for Preparation Click here


HINT:
  1. Use the same procedure for both the RH and LH sides.
  2. The procedure listed below is for the LH side.


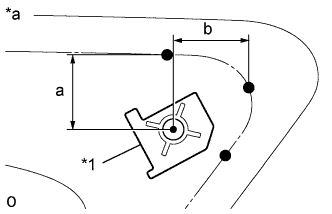
1. INSTALL QUARTER WINDOW GLASS SPACER LH


    B241748E01
  1. Apply Primer G to the rear quarter window assembly LH where the quarter window glass spacer LH will be installed.

    Standard:
    Area
    Specified Condition
    a
    32.1 mm (1.26 in.)
    b
    24.8 mm (0.976 in.)

    Text in Illustration 
    *1
    Quarter Window Glass Spacer LH
    *a
    Backside

    NOTICE:
    1. Allow the primer to dry for 3 minutes or more.
    2. Throw away any leftover primer.
    3. Do not apply too much primer.

    HINT:
    If the primer is applied to an area that is not specified, apply non-residue solvent to a clean cloth and wipe off the excess primer before it dries.

  1. Remove the peeling paper from a new quarter window glass spacer LH. Install the quarter window glass spacer LH to the rear quarter window assembly LH at the location shown in the illustration.


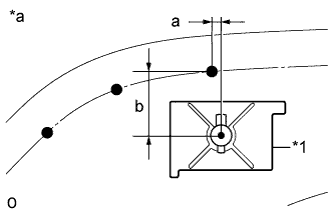
2. INSTALL UPPER QUARTER WINDOW GLASS RETAINER


    B241749E01
  1. Apply Primer G to the rear quarter window assembly where the upper quarter window glass retainer will be installed.

    Standard:
    Area
    Specified Condition
    a
    3.8 mm (0.150 in.)
    b
    27.9 mm (1.10 in.)

    Text in Illustration 
    *1
    Upper Quarter Window Glass Retainer
    *a
    Backside

    NOTICE:
    1. Allow the primer to dry for 3 minutes or more.
    2. Throw away any leftover primer.
    3. Do not apply too much primer.

    HINT:
    If the primer is applied to an area that is not specified, apply non-residue solvent to a clean cloth and wipe off the excess primer before it dries.

  1. Remove the peeling paper from a new upper quarter window glass retainer. Install the upper quarter window glass retainer to the rear quarter window assembly LH at the location shown in the illustration.


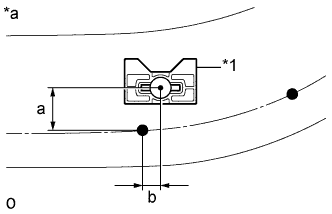
3. INSTALL FRONT QUARTER WINDOW GLASS RETAINER LH


    B241750E01
  1. Apply Primer G to the rear quarter window assembly LH where the front quarter window glass retainer LH will be installed.

    Standard:
    Area
    Specified Condition
    a
    18.9 mm (0.744 in.)
    b
    7.0 mm (0.276 in.)

    Text in Illustration 
    *1
    Front Quarter Window Glass Retainer LH
    *a
    Backside

    NOTICE:
    1. Allow the primer to dry for 3 minutes or more.
    2. Throw away any leftover primer.
    3. Do not apply too much primer.

    HINT:
    If the primer is applied to an area that is not specified, apply non-residue solvent to a clean cloth and wipe off the excess primer before it dries.

  1. Remove the peeling paper from a new front quarter window glass retainer LH . Install the front quarter window glass retainer LH to the rear quarter window assembly LH at the location shown in the illustration.


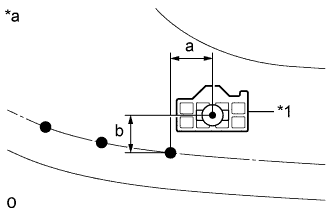
4. INSTALL LOWER QUARTER WINDOW GLASS RETAINER LH


    B241751E01
  1. Apply Primer G to the rear quarter window assembly LH where the lower quarter window glass retainer LH will be installed.

    Standard:
    Area
    Specified Condition
    a
    15.1 mm (0.594 in.)
    b
    17.1 mm (0.673 in.)

    Text in Illustration 
    *1
    Lower Quarter Window Glass Retainer LH
    *a
    Backside

    NOTICE:
    1. Allow the primer to dry for 3 minutes or more.
    2. Throw away any leftover primer.
    3. Do not apply too much primer.

    HINT:
    If the primer is applied to an area that is not specified, apply non-residue solvent to a clean cloth and wipe off the excess primer before it dries.

  1. Remove the peeling paper from a new lower quarter window glass retainer LH. Install the lower quarter window glass retainer LH to the rear quarter window assembly LH at the location shown in the illustration.


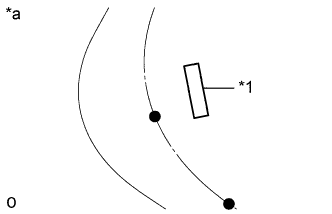
5. INSTALL QUARTER WINDOW GLASS SPACER


    B241752E01
  1. Apply Primer G to the rear quarter window assembly LH where the quarter window glass spacer will be installed.
    Text in Illustration 
    *1
    Quarter Window Glass Spacer
    *a
    Backside

    NOTICE:
    1. Allow the primer to dry for 3 minutes or more.
    2. Throw away any leftover primer.
    3. Do not apply too much primer.

    HINT:
    If the primer is applied to an area that is not specified, apply non-residue solvent to a clean cloth and wipe off the excess primer before it dries.

  1. Remove the peeling paper from a new quarter window glass spacer. Install the quarter window glass spacer to the rear quarter window assembly LH at the location shown in the illustration.


6. INSTALL REAR QUARTER WINDOW ASSEMBLY LH


    B354354E01
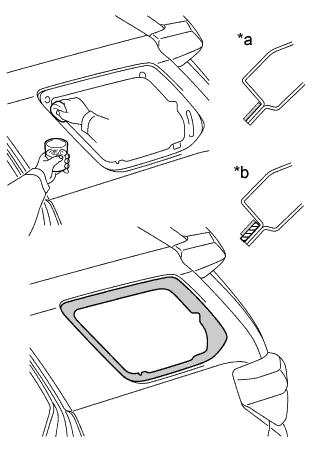
  1. Using a brush or sponge, apply Primer M to the exposed part of the vehicle body.
    Text in Illustration 
    *a
    CORRECT
    *b
    INCORRECT
    V100145
    Primer M
    V100155
    Adhesive

    NOTICE:
    1. Allow the primer coating to dry for 3 minutes or more.
    2. Throw away any leftover primer.
    3. Do not apply too much primer.


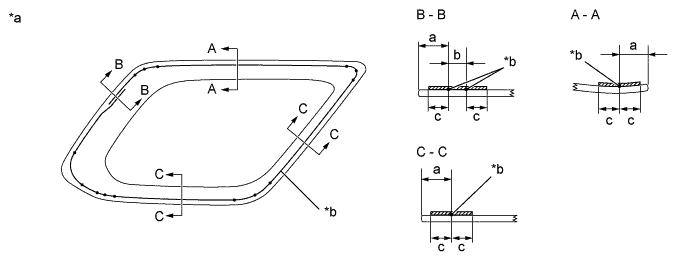
  1. Using a brush or sponge, apply Primer G to the contact surface of the rear quarter window assembly LH.


    B354355E01


    Text in Illustration 
    *a
    Backside
    *b
    Adhesive Center Line
    V100155
    Primer G
    -
    -

    Standard:
    Area
    Specified Condition
    a
    13.5 mm (0.531 in.)
    b
    8.0 mm (0.315 in.)
    c
    10.0 mm (0.394 in.)

    NOTICE:
    1. Allow the primer to dry for 3 minutes or more.
    2. Throw away any leftover primer.
    3. Do not apply too much primer.

    HINT:
    If primer is applied to an area that is not specified, wipe off the primer with non-residue solvent before it dries.


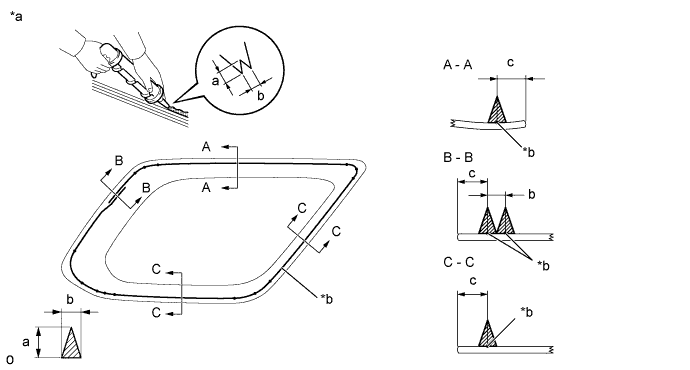
  1. Apply adhesive to the rear quarter window assembly LH.

    Adhesive:
    Toyota Genuine Windshield Glass Adhesive or equivalent


    1. Cut off the tip of a cartridge nozzle as shown in the illustration.


      B241746E02


      Text in Illustration 
      *a
      Backside
      *b
      Adhesive Center Line
      V100155
      Adhesive
      -
      -

      Standard:
      Area
      Specified Condition
      a
      12.0 mm (0.472 in.)
      b
      8.0 mm (0.315 in.)
      c
      13.5 mm (0.531 in.)

      HINT:
      After cutting off the tip, use all adhesive within the time written in the table below.

      Usage Time Frame:
      Temperature
      Usage Time Frame
      35°C (95°F)
      15 minutes
      20°C (68°F)
      1 hour 40 minutes
      5°C (41°F)
      8 hours

    2. Load a sealer gun with the cartridge.

    3. Apply adhesive to the rear quarter window assembly LH as shown in the illustration.


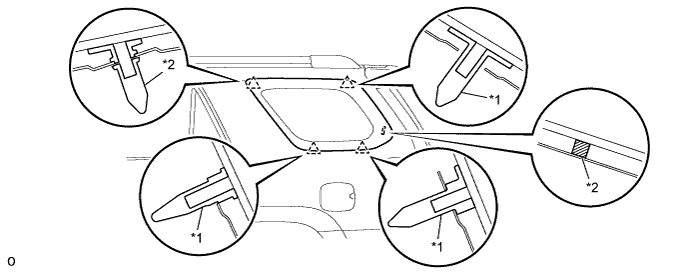
  1. Install the rear quarter window assembly LH to the vehicle body.


    1. Attach the 3 retainers and 2 spacers to install the rear quarter window assembly LH.


      B241747E01


      Text in Illustration 
      *1
      Retainer
      *2
      Spacer

      NOTICE:
      Allow the primer to dry for 3 minutes or more.

    2. Hold the rear quarter window assembly LH in place securely with protective tape or equivalent until the adhesive hardens.

      NOTICE:
      1. Allow the primer coating to dry for 3 minutes or more.
      2. Check the clearance between the body and glass.

    3. Lightly press the front surface of the glass to ensure a close fit.


    4. BO03986E07
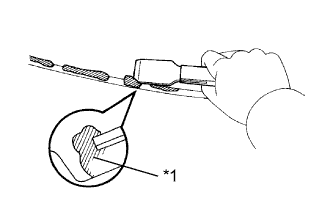
    5. Using a scraper, remove any excess or protruding adhesive.
      Text in Illustration 
      *1
      Adhesive

      NOTICE:
      Do not drive the vehicle within the time written in the table below.

      Minimum Time:
      Temperature
      Minimum Time Prior to Driving Vehicle
      35°C (95°F)
      1 hour 30 minutes
      20°C (68°F)
      5 hours
      5°C (41°F)
      24 hours


7. CONNECT WINDOW GLASS ANTENNA WIRE
  1. Connect the window glass antenna connector (for LH side).

  1. Connect the window glass antenna connector (for RH side).


8. CHECK FOR LEAK AND REPAIR
  1. Conduct a leak test after the adhesive has completely hardened.

  1. Seal any leaks with auto glass sealer.


9. INSTALL ROOF SIDE RAIL GARNISH ASSEMBLY LH


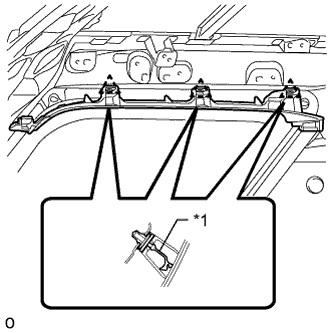
    B242802E01
  1. Install a new 3 clips to the roof side rail garnish assembly LH.
    Text in Illustration 
    *1
    Clip

  1. Attach the 3 clips to install the roof side rail garnish assembly LH.


10. INSTALL ROOF HEADLINING ASSEMBLY
(Click here)