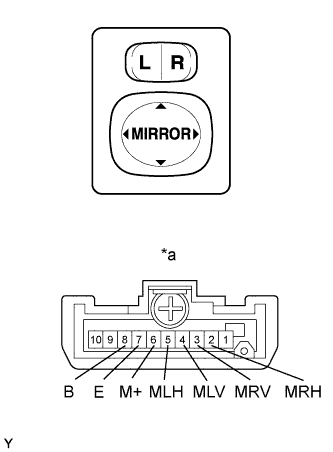
OUTER MIRROR SWITCH > INSPECTION |
| 1. INSPECT OUTER MIRROR SWITCH ASSEMBLY |
|
Inspect the outer mirror switch assembly.
Select "L" on the left/right adjustment switch.
Measure the resistance according to the value(s) in the table below.
| Tester Connection | Switch Condition | Specified Condition | |
| 4 (MLV) - 8 (B) 6 (M+) - 7 (E) | UP | Pressed | Below 1 Ω |
| Not pressed | 10 kΩ or higher | ||
| 4 (MLV) - 7 (E) 6 (M+) - 8 (B) | DOWN | Pressed | Below 1 Ω |
| Not pressed | 10 kΩ or higher | ||
| 5 (MLH) - 8 (B) 6 (M+) - 7 (E) | LEFT | Pressed | Below 1 Ω |
| Not pressed | 10 kΩ or higher | ||
| 5 (MLH) - 7 (E) 6 (M+) - 8 (B) | RIGHT | Pressed | Below 1 Ω |
| Not pressed | 10 kΩ or higher | ||
Select "R" on the left/right adjustment switch.
Measure the resistance according to the value(s) in the table below.
| Tester Connection | Switch Condition | Specified Condition | |
| 3 (MRV) - 8 (B) 6 (M+) - 7 (E) | UP | Pressed | Below 1 Ω |
| Not pressed | 10 kΩ or higher | ||
| 3 (MRV) - 7 (E) 6 (M+) - 8 (B) | DOWN | Pressed | Below 1 Ω |
| Not pressed | 10 kΩ or higher | ||
| 2 (MRH) - 8 (B) 6 (M+) - 7 (E) | LEFT | Pressed | Below 1 Ω |
| Not pressed | 10 kΩ or higher | ||
| 2 (MRH) - 7 (E) 6 (M+) - 8 (B) | RIGHT | Pressed | Below 1 Ω |
| Not pressed | 10 kΩ or higher | ||
| *a | Component without harness connected (Outer Mirror Switch Assembly) |