 |
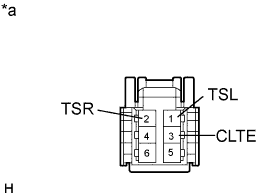
Connect the positive (+) lead of the battery to terminal 6 and the negative (-) lead to terminal 3, and then measure the voltage according to the value(s) in the table below.
- Standard Voltage:
Tester Connection Condition Specified Condition 1 (TSL) - 3 (CLTE) Sensor subjected to electric light 0.5 to 3.0 V 1 (TSL) - 3 (CLTE) Sensor covered with cloth 0.5 V or less 2 (TSR) - 3 (CLTE) Sensor subjected to electric light 0.5 to 3.0 V 2 (TSR) - 3 (CLTE) Sensor covered with cloth 0.8 V or less
- HINT:
- As the inspection light is moved away from the sensor, the voltage increases.
- Use an incandescent light for inspection. Bring it within 30 cm (11.8 in.) of the automatic light control sensor.
- NOTICE:
- The connection procedure for using a digital tester, such as a TOYOTA electrical tester, is shown above.
| *a | Component without harness connected (Automatic Light Control Sensor (Solar Sensor)) |