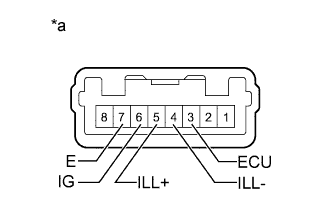
CLEARANCE SONAR MAIN SWITCH > INSPECTION |
| 1. INSPECT BACK SONAR OR CLEARANCE SONAR SWITCH ASSEMBLY |
|
Check the resistance.
Measure the resistance according to the value(s) in the table below.
| Tester Connection | Switch Condition | Specified Condition |
| 3 (ECU) - 6 (IG) | Sonar switch off | 10 kΩ or higher |
| Sonar switch on | Below 1 Ω |
Apply battery voltage to the connector and check the LED illumination condition.
| Measurement Condition | Specified Condition |
| Battery positive (+) → Terminal 3 (ECU) Battery negative (-) → Terminal 7 (E) | LED illuminates |
| Battery positive (+) → Terminal 5 (ILL+) Battery negative (-) → Terminal 4 (ILL-) | LED illuminates |
| *a | Component without harness connected (Back Sonar or Clearance Sonar Switch Assembly) |