 |
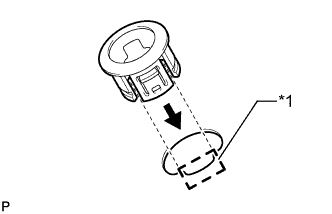
Align the keyhole and protrusion as shown in the illustration.
| *1 | Keyhole |
REAR BUMPER (w/ Intuitive Parking Assist System) > REASSEMBLY |
| 1. INSTALL NO. 1 ULTRASONIC SENSOR RETAINER |
|
Align the keyhole and protrusion as shown in the illustration.
| *1 | Keyhole |
Attach the 4 claws to install the No. 1 ultrasonic sensor retainer to the rear bumper cover.
| 2. INSTALL NO. 2 ULTRASONIC SENSOR RETAINER |
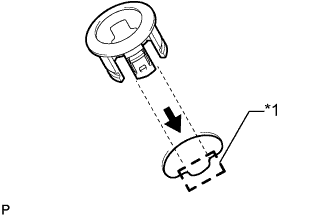 |
Align the keyhole and protrusion as shown in the illustration.
| *1 | Keyhole |
Attach the 3 claws to install the No. 2 ultrasonic sensor retainer to the rear bumper cover.
| 3. INSTALL ULTRASONIC SENSOR CLIP |
Attach the claw to install the ultrasonic sensor clip to the No. 1 ultrasonic sensor.
| 4. INSTALL NO. 1 ULTRASONIC SENSOR |
Attach the 2 claws to install the No. 1 ultrasonic sensor to the ultrasonic sensor retainer.
| 5. INSTALL REAR BUMPER CENTER MOULDING |
Attach the 4 claws to install the rear bumper center moulding.
Install the 6 outside moulding retainers.
| 6. INSTALL NO. 1 REAR BUMPER PLATE |
Attach the claw to install the No. 1 rear bumper plate.
Install the outside moulding retainer.
| 7. INSTALL REAR BUMPER PLATE RH |
Attach the claw to install the rear bumper plate RH.
Install the outside moulding retainer.
| 8. INSTALL REAR BUMPER PLATE LH |
Attach the claw to install the rear bumper plate LH.
Install the 2 outside moulding retainers.
| 9. INSTALL REAR BUMPER SIDE BRACKET LH |
Install the rear bumper side bracket LH with the 2 screws and clip.
| 10. INSTALL REAR BUMPER SIDE BRACKET RH |
| 11. INSTALL NO. 3 FLOOR WIRE |
Clean the rear bumper surface.
Using a heat light, heat the rear bumper surface.
Remove the double-sided tape from the rear bumper surface.
Wipe off any tape adhesive residue with cleaner.
Attach the 4 clamps to connect the 4 connectors.
Install the No. 3 floor wire with the new 3 pieces of tape as shown in the illustration.
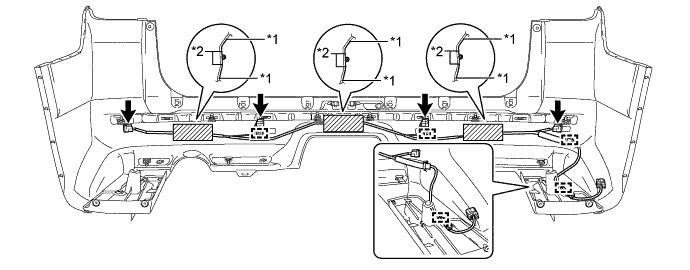
| *1 | Guideline A | *2 | Guideline B |