 |
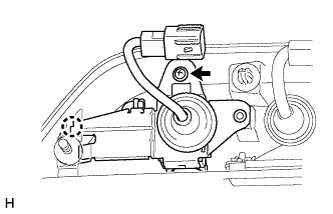
Attach the claw to install the back door control switch.
BACK DOOR OUTSIDE GARNISH > REASSEMBLY |
| Item | Temperature |
| Back Door Outside Garnish | 20 to 30°C (68 to 86°F) |
| 1. INSTALL BACK DOOR CONTROL SWITCH (w/ Smart Key System) |
|
Attach the claw to install the back door control switch.
Install the screw.
| 2. INSTALL NO. 1 BACK DOOR GARNISH RETAINER (w/o Smart Key System) |
Install the No. 1 back door garnish retainer with the screw.
| 3. INSTALL BACK DOOR OUTSIDE GARNISH SEAL |
Clean the back door outside garnish surface.
Using a heat light, heat the back door outside garnish surface.
Remove the double-sided tape from the back door outside garnish surface.
Wipe off any tape adhesive residue with cleaner.
Install a new back door outside garnish seal.
Remove the peeling paper from the face of a new back door outside garnish seal.
Install the back door outside garnish seal.
| 4. INSTALL LICENSE PLATE LIGHT ASSEMBLY |
Install the light with the 4 screws.
| 5. INSTALL NO. 2 BACK DOOR OUTSIDE GARNISH |
Attach the 2 clips to install the No. 2 back door outside garnish.
| 6. INSTALL BACK DOOR OPENER SWITCH ASSEMBLY |
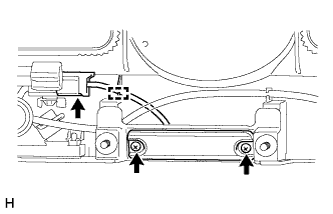 |
Install the back door opener switch assembly with the 2 screws.
Attach the guide.
Connect the connector.