 |
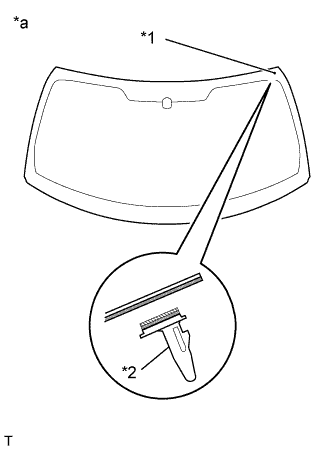
Install the No. 1 windshield glass stopper to the attachment holes.
| *1 | Attachment Holes |
| *2 | No. 1 Windshield Glass Stopper |
| *a | Back Side |
 | Primer |
 | Adhesive |
WINDSHIELD GLASS > INSTALLATION |
| 1. INSTALL NO. 1 WINDSHIELD GLASS STOPPER |
Apply primer (Sunstar #435-70) to the glass attachment surface of the No. 1 windshield glass stopper.
Apply primer (Sunstar #435-40) to the new No. 1 windshield glass stopper attachment surface of the windshield glass.
After drying the primer, apply adhesive (Sunstar # 560) to the No. 1 windshield glass stopper attachment surface.
|
Install the No. 1 windshield glass stopper to the attachment holes.
| *1 | Attachment Holes |
| *2 | No. 1 Windshield Glass Stopper |
| *a | Back Side |
| Primer |
| Adhesive |
| 2. INSTALL NO. 2 WINDSHIELD GLASS STOPPER |
| 3. INSTALL WINDSHIELD OUTSIDE MOULDING |
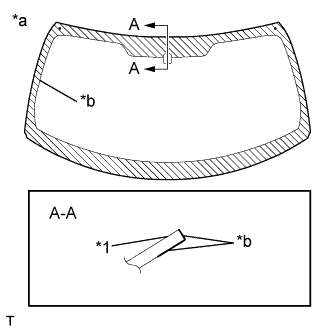 |
Using a brush, apply primer (Sunstar GP402) to the windshield outside moulding attachment surface of the windshield glass and the windshield glass outer ends.
| *a | Back Side |
| *b | Application Area |
After drying the primer, match the new windshield outside moulding to both edges of the windshield glass.
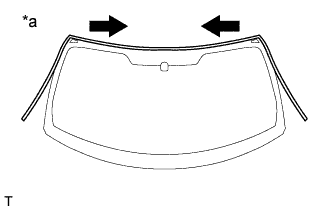 |
Using a roller, crimp the windshield outside moulding in the direction of the arrows, as shown in the illustration.
| *a | Back Side |
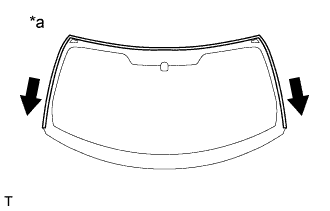 |
Using a roller, crimp the windshield outside moulding in the direction of the arrows, as shown in the illustration.
| *a | Back Side |
| 4. INSTALL UPPER WINDSHIELD GLASS SEAL |
Remove the release paper from the upper windshield glass seal.
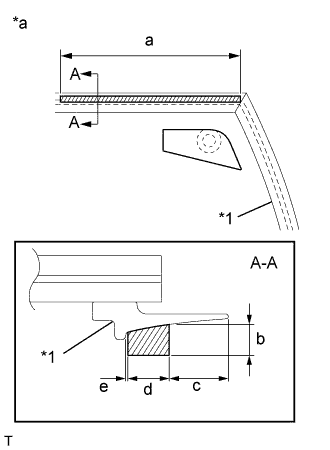 |
Install the upper windshield glass seal to the windshield outside moulding, as shown in the illustration.
| Area | Dimension |
| a | 165 mm (6.4961 in.) |
| b | 3.0 mm (0.1181 in.) |
| c | 5.7mm (0.2244 in.) |
| d | 5.0 mm (0.1969 in.) |
| e | 0 to 0.5 mm (0 to 0.0197 in.) |
| *1 | Windshield Outside Moulding |
| *a | Back Side |
| Upper Windshield Glass Seal |
| 5. INSTALL WINDOW GLASS ADHESIVE DAM |
Install the new window glass adhesive dam onto the windshield glass, as shown in the illustration.
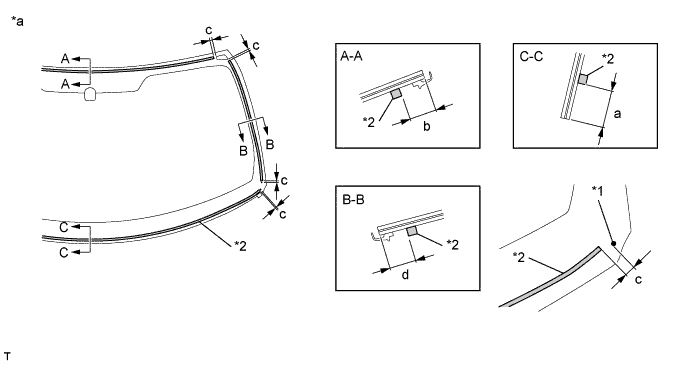
| Area | Dimension |
| a | 13.0 mm (0.5118 in.) |
| b | 15.3 mm (0.6024 in.) |
| c | 0 to 3.0mm (0 to 0.1181 in.) |
| d | 14.8 mm (0.5827 in.) |
| *1 | Ceramic Notch | *2 | Window Glass Adhesive Dam |
| *a | Back Side | - | - |
| 6. INSTALL LOWER WINDSHIELD GLASS SEAL |
Install the new lower windshield glass seal onto the windshield glass, as shown in the illustration.
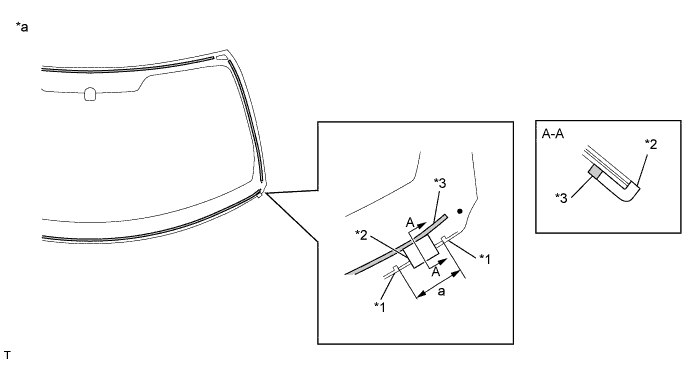
| Area | Dimension |
| a | 28.0 mm (1.1024 in.) |
| *1 | Ceramic Notch | *2 | Lower Windshield Glass Seal |
| *3 | Window Glass Adhesive Dam | - | - |
| *a | Back Side | - | - |
| 7. INSTALL WINDSHIELD GLASS |
Position the windshield glass.
Using suction cups, place the windshield glass in the correct position.
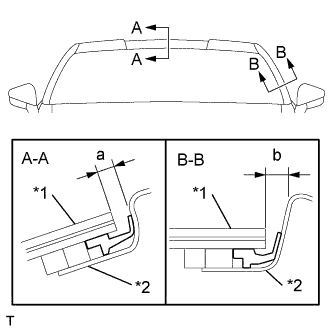 |
Check that the whole contact surface of the windshield rim is perfectly even.
| Area | Dimension |
| a | 4.0 mm (0.1575 in.) |
| b | 5.0 mm (0.1969 in.) |
| *1 | Windshield Glass |
| *2 | Body |
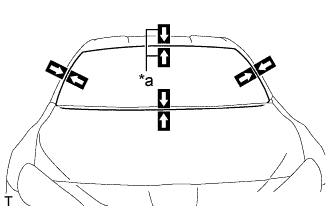 |
Align the matchmarks on the windshield glass and vehicle body.
| *a | Matchmark |
Remove the windshield glass .
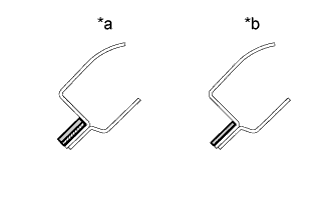 |
Using a brush, coat the installation surface on the vehicle body with Primer.
| *a | NG |
| *b | OK |
| Primer |
| Adhesive |
Using a brush or sponge, coat the application area of adhesive with Primer.
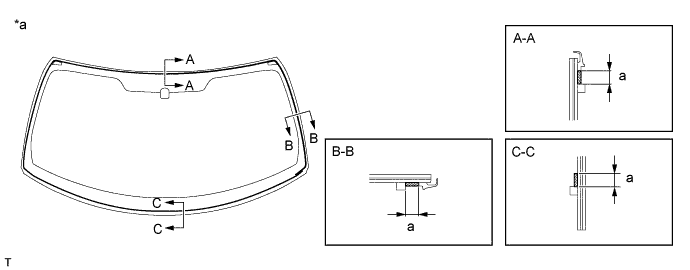
| Area | Dimension |
| a | 8.0 mm (0.315 in.) |
| *a | Back Side | - | - |
| Primer | - | - |
Apply adhesive to the glass.
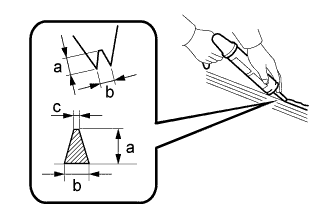 |
Cut off the tip of the cartridge nozzle, as shown in the illustration.
| Area | Dimension |
| a | 9.0 mm (0.354 in.) |
| b | 8.0 mm (0.315 in.) |
Load the sealer gun with cartridge.
Apply adhesive to the windshield glass, as shown in the illustration.
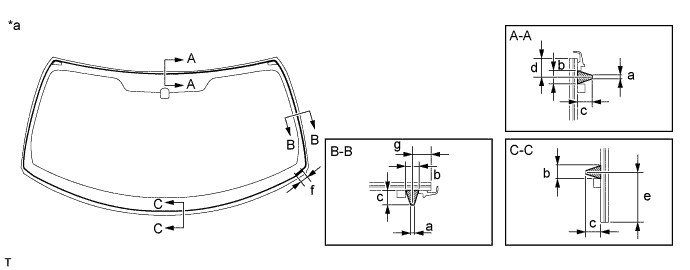
| Area | Dimension |
| a | 2.0 mm (0.0787 in.) |
| b | 8.0 mm (0.3150 in.) |
| c | 9.0 mm (0.3543 in.) |
| d | 11.3 mm (0.4449 in.) |
| e | 22.0 mm (0.8661 in.) |
| f | 30.0 mm (1.1811 in.) |
| g | 10.8 mm (0.4252 in.) |
| *a | Back Side | - | - |
| Adhesive | - | - |
|
Apply adhesive tape, etc. to the windshield glass and the body panel section, and use a pen to apply matching marks for use when installing (when using the new windshield glass).
| *a | Matchmark |
Using suction cups, position the windshield glass so that the matchmarks are aligned, and press it in gently along the rim.
Lightly press the front surface of the windshield glass to ensure that the windshield glass is securely fit to the vehicle body.
Using a scraper, remove any excess or protruding adhesive.
Hold the windshield glass using protective tape until the applied adhesive becomes hard.
| 8. INSPECT WATER LEAK |
After the adhesive has hardened, apply water from the outside of the vehicle. Check that no water leaks into the cabin.
If water leaks into the cabin, allow the water to dry and add adhesive.
Remove the protective tape.
| 9. INSTALL ROOF HEADLINING ASSEMBLY |
| 10. INSTALL COWL VENTILATOR LOUVER |
Engage the 15 guides to install the cowl ventilator louver, as shown in the illustration.
Install the 4 cowl top ventilator louver clips.
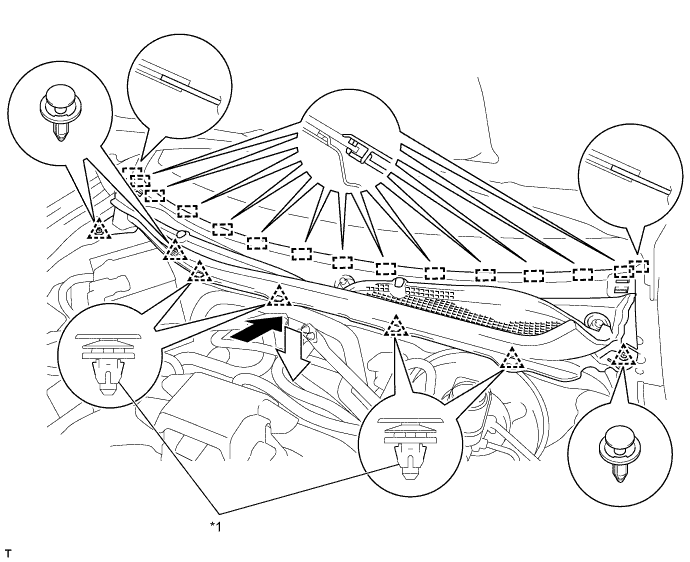
| *1 | Cowl Top Ventilator Louver Clips | - | - |
Install the 3 clips.
| 11. INSTALL FRONT FENDER TO COWL SIDE SEAL RH |
Engage the 4claws to install the clip and front fender to cowl side seal RH.
| 12. INSTALL FRONT FENDER TO COWL SIDE SEAL LH |
| 13. INSTALL WINDSHIELD WIPER ARM AND BLADE ASSEMBLY LH |
Operate the wiper and stop the windshield wiper motor at the automatic stop position.
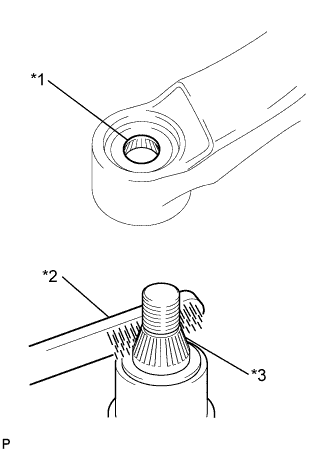 |
When reusing the windshield wiper arm and blade assembly LH:
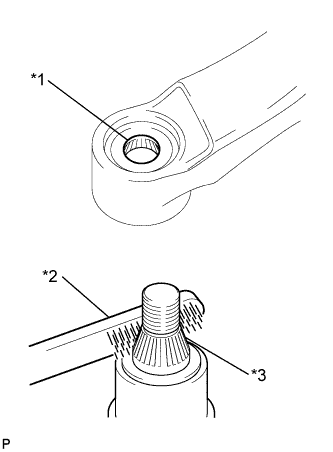
Clean the wiper arm serrations.
| *1 | Wiper Arm Serration |
| *2 | Wire Brush |
| *3 | Wiper Pivot Serration |
When reusing the windshield wiper link assembly:
Clean the wiper pivot serrations with a wire brush.
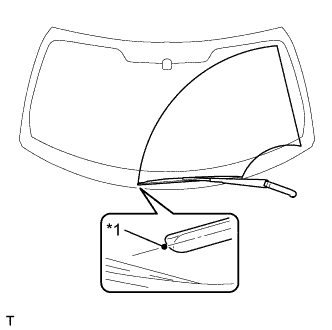 |
Install the windshield wiper arm and blade assembly LH with the nut to the position shown in the illustration.
| *1 | Ceramic Dot |
Operate the front wipers while spraying washer fluid on the windshield glass. Make sure that the front wipers function properly and there is no interference with the vehicle body.
| 14. INSTALL WINDSHIELD WIPER ARM AND BLADE ASSEMBLY RH |
Operate the wiper and stop the windshield wiper motor at the automatic stop position.
 |
When reusing the windshield wiper arm and blade assembly RH:
Clean the wiper arm serrations.
| *1 | Wiper Arm Serration |
| *2 | Wire Brush |
| *3 | Wiper Pivot Serration |
When reusing the windshield wiper link assembly:
Clean the wiper pivot serrations with a wire brush.
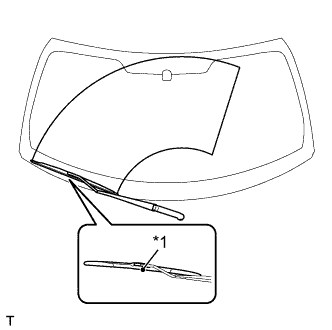 |
Install the windshield wiper arm and blade assembly RH with the nut to the position shown in the illustration.
| *1 | Ceramic Dot |
| 15. INSTALL WINDSHIELD WIPER ARM COVER |
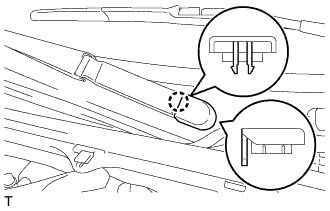 |
Engage the claw to install the windshield wiper arm cover.