 |
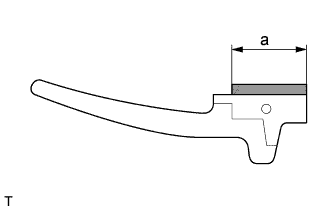
Using a brush or sponge, coat the application area of a new No. 1 back window moulding with Primer (3M N-200), as shown in the illustration.
- Standard Dimension:
Area Measurement a 4.0 mm (0.1575 in.)
 | Primer (3M N-200) |
BACK WINDOW GLASS > INSTALLATION |
| 1. INSTALL NO. 1 BACK WINDOW MOULDING |
|
Using a brush or sponge, coat the application area of a new No. 1 back window moulding with Primer (3M N-200), as shown in the illustration.
| Area | Measurement |
| a | 4.0 mm (0.1575 in.) |
| Primer (3M N-200) |
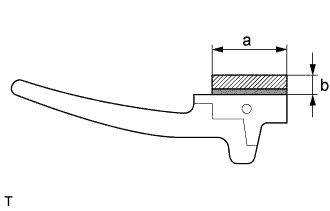 |
Install the new double sided tape onto the No. 1 back window moulding, as shown in the illustration.
| Area | Measurement |
| a | 4.0 mm (0.1575 in.) |
| b | 1.0 mm (0.0394 in.) |
 | Double Sided Tape |
| Primer (3M N-200) |
Using a brush or sponge, coat the application area of a new No. 1 back window moulding with Primer (3M N-200).
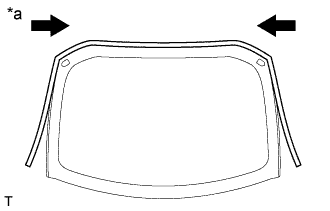 |
Using a roller, install the new No. 1 back window moulding onto the back window glass, as shown in the illustration.
| *a | Back Side |
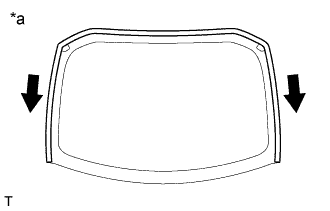 |
Using a roller, install the No. 1 back window moulding onto the back window glass, as shown in the illustration.
| *a | Back Side |
| 2. INSTALL BACK WINDOW GLASS ADHESIVE DAM |
Using a brush or sponge, coat the application area of a new back window glass adhesive dams with Primer (3M-N200).
Install the new back window glass adhesive dams onto the back window glass, as shown in the illustration.
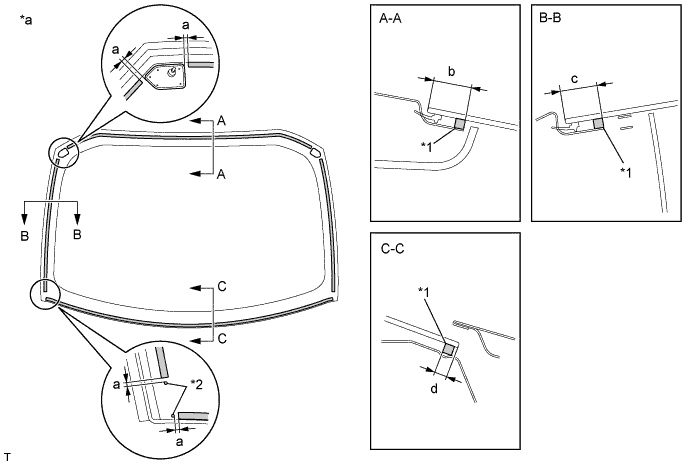
| Area | Dimension |
| a | 0.0 to 3.0 mm (0 to 0.1181 in.) |
| b | 19.9 to 21.9 mm (0.7835 to 0.8622 in.) |
| c | 18.9 to 20.9 mm (0.7441 to 0.8228 in.) |
| d | 6.0 to 8.0 mm (0.2362 to 0.3150 in.) |
| *1 | Back Window Glass Adhesive Dam | *2 | Ceramic Notch |
| *a | Back Side | - | - |
| 3. INSTALL BACK WINDOW GLASS |
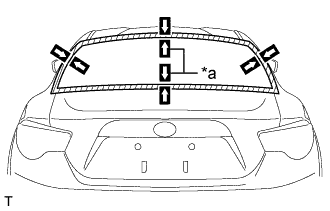 |
Position the back window glass.
| *a | Matchmark |
Using suction cups, place the back window glass in the correct position.
Check that the whole contact surface of the back window glass rim is perfectly even.
Align the matchmarks on the back window glass and vehicle body.
Remove the back window glass.
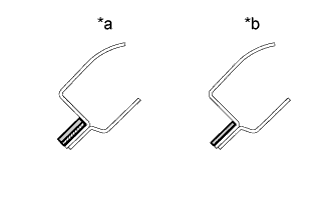 |
Using a brush, coat the installation surface on the vehicle body with Primer (sunstar #435-40).
| *a | NG |
| *b | OK |
| Primer (sunstar #435-40) |
| Adhesive |
Using a brush or sponge, coat the adhesive application area with Primer (3M N-200).
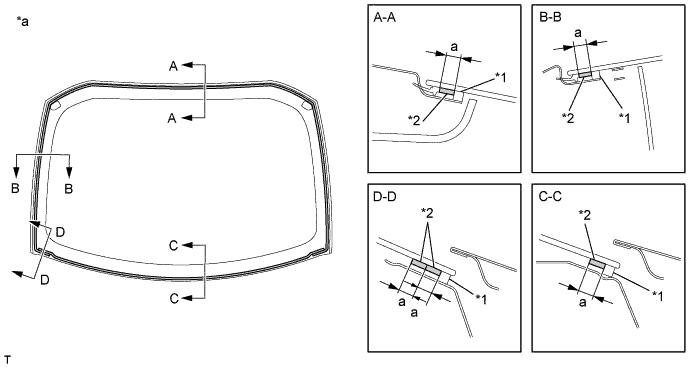
| Area | Dimension |
| a | 8.0 mm (0.315 in.) |
| *1 | Back Window Glass Adhesive Dam | *2 | Primer (3M N-200) |
| *a | Back Side | - | - |
Apply adhesive to the glass.
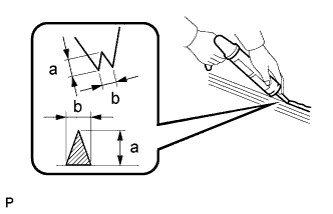 |
Cut off the tip of the cartridge nozzle, as shown in the illustration.
| Area | Dimension |
| a | 12.0 mm (0.472 in.) |
| b | 8.0 mm (0.315 in.) |
Load the sealer gun with the cartridge.
Apply adhesive to the back window glass, as shown in the illustration.
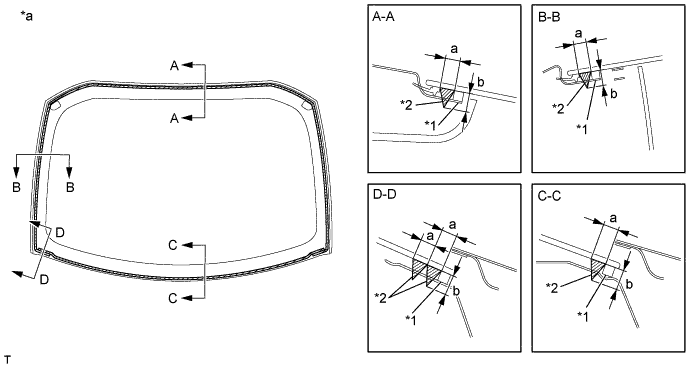
| Area | Dimension |
| a | 8.0 mm (0.315 in.) |
| b | 12.0 mm (0.472 in.) |
| *1 | Back Window Glass Adhesive Dam | *2 | Adhesive |
| *a | Back Side | - | - |
|
Apply adhesive tape, etc. to the back window glass and the body panel section, and use a pen to apply matching marks for use when installing (when using the new back window glass).
| *1 | Matchmark |
Using suction cups, position the back window glass so that the matchmarks are aligned, and press it in gently along the rim.
Lightly press the front surface of the back window glass to ensure that the back window glass is securely fit to the vehicle body.
Using a scraper, remove any excess or protruding adhesive.
Hold the back window glass using protective tape until the applied adhesive becomes hard.
Connect each connector.
| 4. INSPECT WATER LEAK |
After the adhesive has hardened, apply water from the outside of the vehicle. Check that no water leaks into the cabin.
If water leaks into the cabin, allow the water to dry and add adhesive.
Remove the protective tape.
| 5. INSTALL PACKAGE TRAY TRIM PANEL ASSEMBLY |
Engage the 4 clips and install the package tray trim panel assembly with the center stop light assembly.
Install the 4 clips.
Connect the connector.
| 6. INSTALL REAR WINDOW SIDE GARNISH LH |
Engage the guide and 2 clips.
Install the rear window side garnish LH with the bolt.
| 7. INSTALL REAR WINDOW SIDE GARNISH RH |
| 8. INSTALL QUARTER TRIM LID SUB-ASSEMBLY LH |
Install the 2 lid cover clips from the quarter trim lid sub-assembly LH.
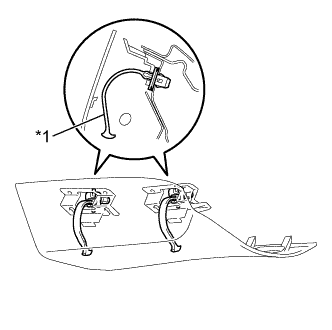 |
Engage the 2 guides and 6 claws and install the quarter trim lid sub-assembly LH.
| *1 | Lid Cover Clip |
| 9. INSTALL QUARTER TRIM LID SUB-ASSEMBLY RH |
| 10. INSTALL LUGGAGE COMPARTMENT TRIM COVER LH |
Engage the 8 clips install the quarter trim panel assembly LH.
Install the clip.
| 11. INSTALL LUGGAGE COMPARTMENT TRIM COVER RH |
| 12. INSTALL LUGGAGE COMPARTMENT INNER TRIM COVER LH |
Fold down the rear seatback assembly.
Engage the 2 clips install the luggage compartment inner trim cover LH.
| 13. INSTALL LUGGAGE COMPARTMENT INNER TRIM COVER RH |
| 14. INSTALL FRONT DOOR OPENING TRIM WEATHERSTRIP LH |
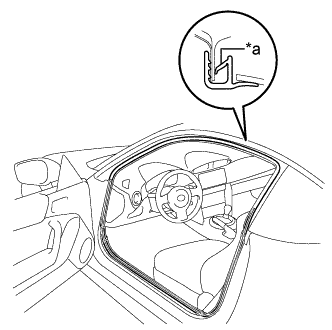 |
Align the alignment mark on the weatherstrip with the protruding portion on the body indicated by the arrow in the illustration, and install the front door opening trim weatherstrip LH.
| *a | Alignment Mark |
| 15. INSTALL FRONT DOOR OPENING TRIM WEATHERSTRIP RH |
| 16. INSTALL FRONT DOOR SCUFF PLATE LH |
Engage the 6 claws install the front door scuff plate LH.
| 17. INSTALL FRONT DOOR SCUFF PLATE RH |
| 18. INSTALL SEPARATE TYPE REAR SEAT CUSHION ASSEMBLY LH |
Install the 2 bolts and rear seatback lock striker sub-assembly LH.
| 19. INSTALL SEPARATE TYPE REAR SEAT CUSHION ASSEMBLY RH |