AUTOMATIC TRANSMISSION UNIT > REASSEMBLY |
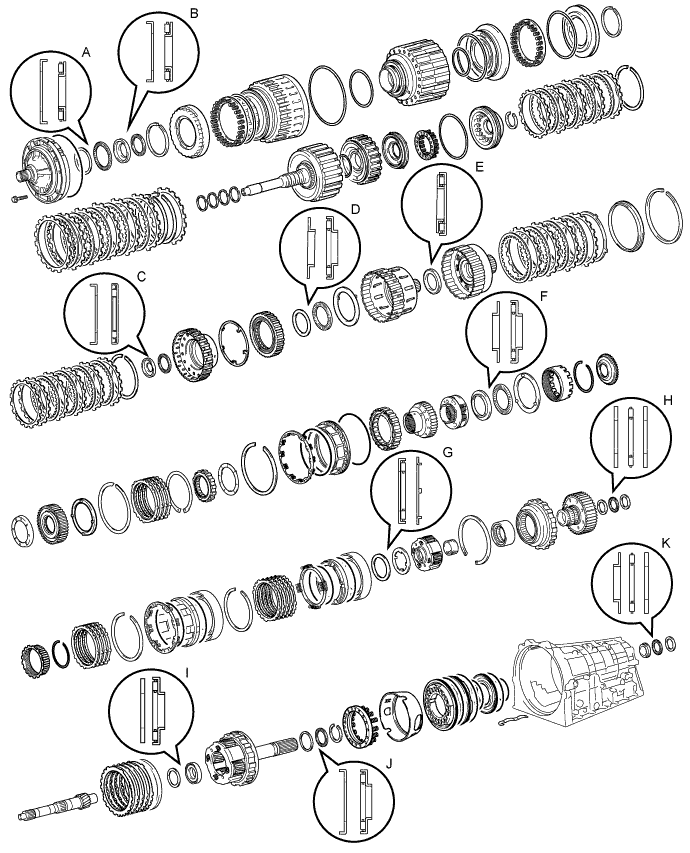
| 1. BEARING POSITION |
| Mark | Front Race Diameter Inside / Outside | Thrust Bearing Diameter Inside / Outside | Rear Race Diameter Inside / Outside |
| A | 74.2 mm (2.921 in.) / 87.7 mm (3.453 in.) | 71.9 mm (2.831 in.) / 85.6 mm (3.370 in.) | - |
| B | 37.0 mm (1.457 in.) / 51.2 mm (2.016 in.) | 33.5 mm (1.319 in.) / 48.0 mm (1.890 in.) | - |
| C | 20.0 mm (0.787 in.) / 35.6 mm (1.402 in.) | 20.0 mm (0.787 in.) / 41.0 mm (1.614 in.) | - |
| D | 31.0 mm (1.220 in.) / 48.0 mm (1.890 in.) | 33.3 mm (1.311 in.) / 51.2 mm (2.016 in.) | - |
| E | - | 42.5 mm (1.673 in.) / 61.2 mm (2.409 in.) | - |
| F | 34.9 mm (1.374 in.) / 50.8 mm (1.999 in.) | 38.6 mm (1.520 in.) / 53.1 mm (2.091 in.) | - |
| G | - | 58.5 mm (2.303 in.) / 73.5 mm (2.894 in.) | 55.2 mm (2.173 in.) / 71.2 mm (2.803 in.) |
| H | 29.6 mm (1.165 in.) / 44.9 mm (1.768 in.) | 27.8 mm (1.095 in.) / 43.8 mm (1.726 in.) | 27.8 mm (1.095 in.) / 43.7 mm (1.721 in.) |
| I | 19.0 mm (0.748 in.) / 35.0 mm (1.378 in.) | 20.8 mm (0.819 in.) / 38.5 mm (1.516 in.) | - |
| J | 43.3 mm (1.705 in.) / 56.7 mm (2.232 in.) | 40.6 mm (1.598 in.) / 58.0 mm (2.284 in.) | - |
| K | 37.0 mm (1.457 in.) / 51.2 mm (2.016 in.) | 36.1 mm (1.421 in.) / 52.5 mm (2.067 in.) | 36.1 mm (1.421 in.) / 51.0 mm (2.007 in.) |
| 2. INSTALL NO. 4 BRAKE PISTON |
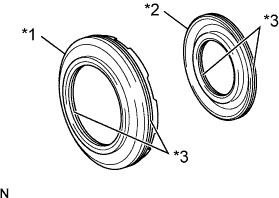 |
Coat 2 new O-ring with ATF, and install them to the brake reaction sleeve.
| *1 | Brake Reaction Sleeve |
| *2 | No. 4 Brake Piston |
| *3 | O-ring |
Coat 2 new O-rings with ATF, and install them to the No. 4 brake piston.
Install the No. 4 brake piston to the brake reaction sleeve.
| 3. INSTALL BRAKE REACTION SLEEVE |
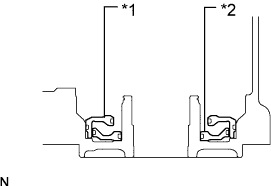 |
With the No. 4 brake piston underneath (the rear side), install the brake reaction sleeve and the No. 4 brake piston to the automatic transmission case sub-assembly.
| *1 | Brake Reaction Sleeve |
| *2 | No. 4 Brake Piston |
| 4. INSTALL 1ST AND REVERSE BRAKE PISTON |
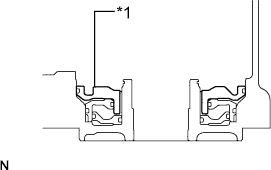 |
Coat a new O-rings with ATF, and install it to the 1st and reverse brake piston.
| *1 | 1st and Reverse Brake Piston |
With the spring seat of the 1st and reverse brake piston facing upwards (the front side), place the 1st and reverse brake piston in the automatic transmission case sub-assembly.
| 5. INSTALL 1ST AND REVERSE BRAKE RETURN SPRING SUB-ASSEMBLY |
Place the 1st and reverse brake return spring sub-assembly onto the 1st and reverse brake piston.
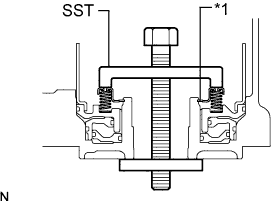 |
Place SST on the 1st and reverse brake return spring sub-assembly, and compress the 1st and reverse brake return spring sub-assembly.
| *1 | Snap Ring |
Using SST, install the snap ring.
| 6. INSTALL BRAKE APPLY TUBE |
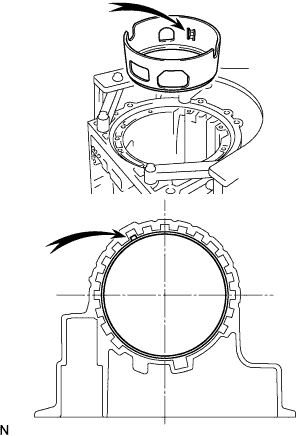 |
Install the brake apply tube with its protruding part fitting into the groove of the automatic transmission case sub-assembly as shown in the illustration.
| 7. INSTALL REAR PLANETARY GEAR ASSEMBLY |
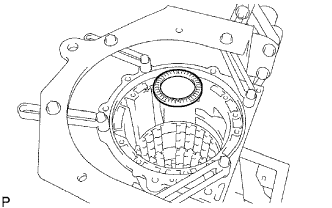 |
Install the thrust needle roller bearing to the automatic transmission case sub-assembly.
| Item | Inside | Outside |
| Thrust needle roller bearing | 40.6 mm (1.598 in.) | 58.0 mm (2.284 in.) |
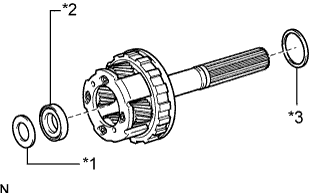 |
Install the thrust needle roller bearing to the rear planetary gear assembly.
| *1 | Thrust Bearing Race |
| *2 | Thrust Needle Roller Bearing |
| *3 | No. 9 Thrust Bearing Race |
| Item | Inside | Outside |
| Thrust needle roller bearing | 20.8 mm (0.819 in.) | 38.5 mm (1.516 in.) |
| Thrust bearing race | 19.0 mm (0.748 in.) | 35.0 mm (1.378 in.) |
| No. 9 thrust bearing race | 43.3 mm (1.705 in.) | 56.7 mm (2.232 in.) |
Coat the No. 9 thrust bearing race and the thrust bearing race with petroleum jelly, and install them onto the rear planetary gear assembly.
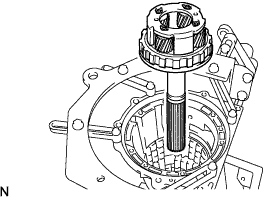 |
Install the rear planetary gear assembly to the automatic transmission case sub-assembly.
| 8. INSPECT PACK CLEARANCE OF NO. 4 BRAKE |
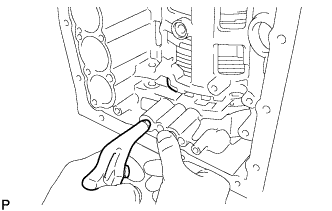 |
Make sure that the 1st and reverse brake piston moves smoothly when applying and releasing compressed air (392 kPa, 4.0 kgf/cm2, 57 psi).
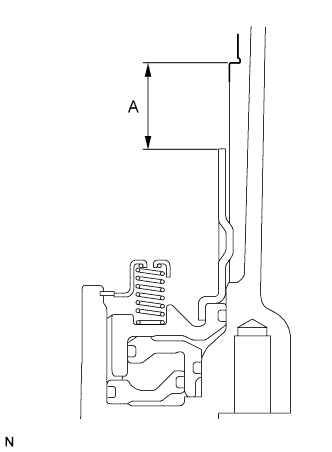 |
Using a vernier caliper, measure the level difference (dimension A) between the upper surface of the brake apply tube and the contact surface of the No. 4 brake flange at both ends across the 1st and reverse brake piston diameter, and calculate the average.
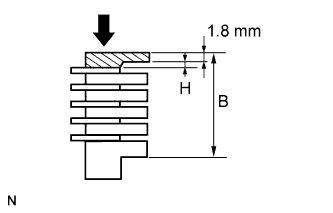 |
Using a vernier caliper, and while applying compression of 4.9 N (0.5 kgf, 1.1 lbf) or less, measure the thickness (dimension B) of the 2 No. 4 brake flanges, 4 No. 4 brake plates and the 5 No. 4 brake discs altogether at both ends across a diameter, and calculate the average.
If the pack clearance is outside the standard range, select and install a No. 4 brake flange that brings the pack clearance to be within the standard range.
| Part No. | Mark | Thickness H |
| SU003-05642 | 0 | 0 mm (0 in.) |
| SU003-05643 | 1 | 0.17 mm (0.00669 in.) |
| SU003-05644 | 3 | 0.31 mm (0.0122 in.) |
| SU003-05645 | 4 | 0.45 mm (0.0177 in.) |
| SU003-05646 | 5 | 0.59 mm (0.0232 in.) |
| SU003-05647 | 7 | 0.73 mm (0.0287 in.) |
| SU003-05648 | 8 | 0.87 mm (0.0343 in.) |
| SU003-05649 | 10 | 1.01 mm (0.0398 in.) |
| SU003-05650 | 11 | 1.15 mm (0.0453 in.) |
| SU003-05651 | 12 | 1.29 mm (0.0508 in.) |
| 9. INSTALL NO. 4 BRAKE DISC |
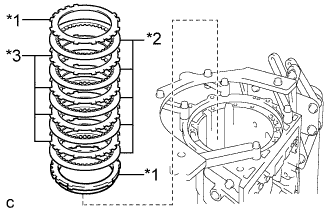 |
Install the 2 No. 4 brake flanges, 5 No. 4 brake discs and the 4 No. 4 brake plates to the automatic transmission case sub-assembly.
| *1 | No. 4 Brake Flange |
| *2 | No. 4 Brake Disc |
| *3 | No. 4 Brake Plate |
| 10. INSTALL BRAKE PLATE STOPPER SPRING |
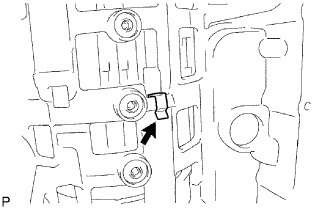 |
Install the brake plate stopper spring to the automatic transmission case sub-assembly.
| 11. INSTALL REAR PLANETARY RING GEAR FLANGE SUB-ASSEMBLY |
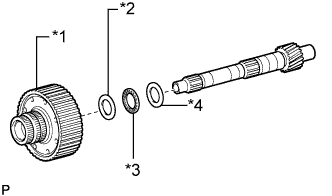 |
Install the No. 8 thrust bearing race, thrust needle roller bearing, No. 7 thrust bearing race and the rear planetary ring gear flange sub-assembly to the intermediate shaft.
| *1 | Rear Planetary Ring Gear Flange Sub-assembly |
| *2 | No. 7 Thrust Bearing Race |
| *3 | Thrust Needle Roller Bearing |
| *4 | No. 8 Thrust Bearing Race |
| Item | Inside | Outside |
| No. 7 thrust bearing race | 29.6 mm (1.165 in.) | 44.9 mm (1.768 in.) |
| Thrust needle roller bearing | 27.8 mm (1.095 in.) | 43.8 mm (1.726 in.) |
| No. 8 thrust bearing race | 27.8 mm (1.095 in.) | 43.7 mm (1.721 in.) |
| 12. INSTALL NO. 3 ONE-WAY CLUTCH ASSEMBLY |
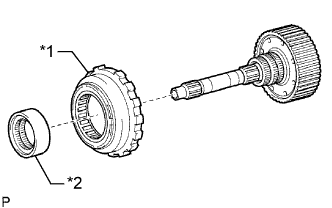 |
Install the No. 3 one-way clutch assembly and the one-way clutch inner race to the intermediate shaft.
| *1 | No. 3 One-way Clutch Assembly |
| *2 | One-way Clutch Inner Race |
| 13. INSTALL INTERMEDIATE SHAFT |
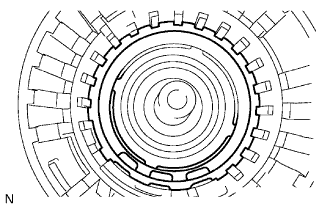 |
Install the intermediate shaft together with the No. 3 one-way clutch assembly to the automatic transmission case sub-assembly.
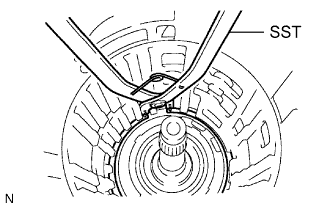 |
Using SST, install the snap ring to the automatic transmission case sub-assembly.
| 14. INSTALL CENTER PLANETARY GEAR ASSEMBLY |
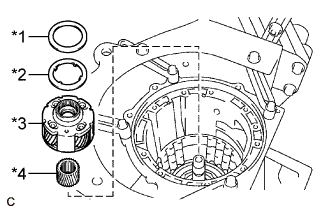 |
Install the center planetary gear assembly and the planetary sun gear to the automatic transmission case sub-assembly.
| *1 | Thrust Needle Roller Bearing |
| *2 | No. 4 Thrust Bearing Race |
| *3 | Center Planetary Gear Assembly |
| *4 | Planetary Sun Gear |
| Item | Inside | Outside |
| Thrust needle roller bearing | 58.5 mm (2.303 in.) | 73.5 mm (2.894 in.) |
| No. 4 thrust bearing race | 55.2 mm (2.173 in.) | 71.2 mm (2.803 in.) |
Coat the No. 4 thrust bearing race with petroleum jelly, and install it onto the center planetary gear assembly.
Install the thrust needle roller bearing to the center planetary gear assembly.
| 15. INSTALL NO. 2 BRAKE PISTON |
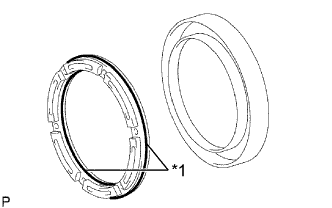 |
Coat 2 new O-rings with ATF, and install them to the No. 2 brake piston.
| *1 | O-ring |
Press the No. 2 brake piston into the No. 2 brake cylinder.
Install the No. 2 brake piston to the automatic transmission case sub-assembly.
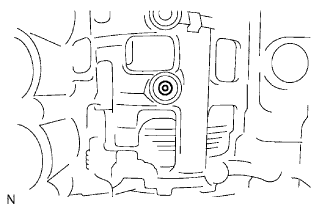 |
Check that the oil pressure apply hole of the No. 2 brake cylinder aligns with the oil pressure apply hole of the automatic transmission case sub-assembly.
| 16. INSTALL NO. 2 BRAKE DISC |
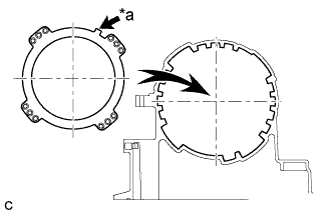 |
Install the No. 2 brake piston return spring sub-assembly to the automatic transmission case sub-assembly as shown in the illustration.
| *a | Identification shape |
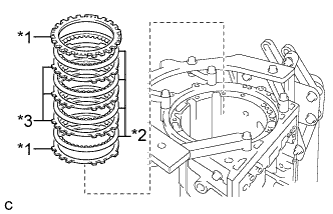 |
Install the 2 No. 2 brake flanges, 4 No. 2 brake discs and the 3 No. 2 brake plates to the automatic transmission case sub-assembly.
| *1 | No. 2 Brake Flange |
| *2 | No. 2 Brake Disc |
| *3 | No. 2 Brake Plate |
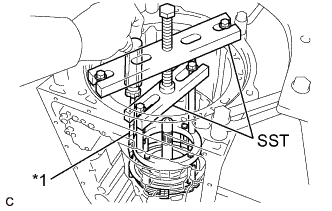 |
Using SST and a screwdriver, compress the No. 2 brake piston return spring sub-assembly and install the snap ring to the automatic transmission case sub-assembly.
| *1 | Protective Tape |
| 17. INSPECT PISTON STROKE OF NO. 2 BRAKE PISTON |
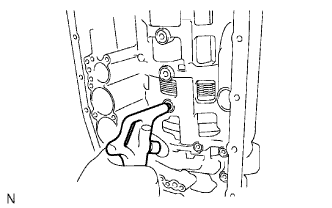 |
Make sure that the No. 2 brake piston moves smoothly when applying and releasing compressed air (392 kPa, 4.0 kgf/cm2, 57 psi).
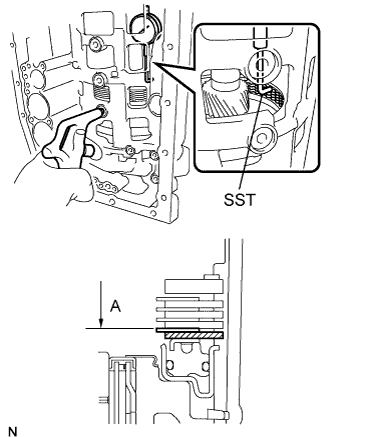 |
Using SST and a dial indicator, measure the moving distance (distance A) of the No. 2 brake disc at both ends across a diameter while blowing air (392 kPa, 4.0 kgf/cm2, 57 psi) into the oil hole as shown in the illustration, and calculate the average.
If the piston stroke is outside the standard range, select and install a No. 2 brake flange that brings the piston stroke within the standard range.
| Part No. | Mark | Thickness |
| SU003-03771 | 0 | 2.0 mm (0.0787 in.) |
| SU003-03772 | 1 | 2.1 mm (0.0827 in.) |
| SU003-03773 | 2 | 2.2 mm (0.0866 in.) |
| SU003-03774 | 3 | 2.3 mm (0.0906 in.) |
| SU003-03775 | 4 | 2.4 mm (0.0945 in.) |
| SU003-03776 | 5 | 2.5 mm (0.0984 in.) |
| SU003-03777 | 6 | 2.6 mm (0.102 in.) |
| SU003-03778 | 7 | 2.7 mm (0.106 in.) |
| 18. INSTALL NO. 1 BRAKE PISTON |
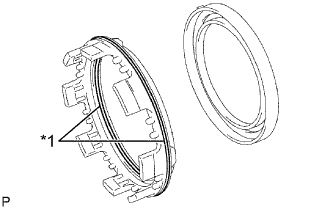 |
Coat 2 new O-rings with ATF, and install them to the No. 1 brake piston.
| *1 | O-ring |
Press the No. 1 brake piston into the No. 1 brake cylinder.
| 19. INSTALL BRAKE PISTON RETURN SPRING SUB-ASSEMBLY |
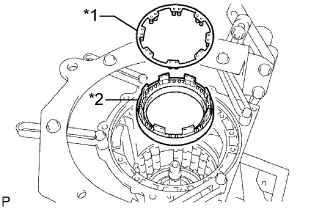 |
Install the brake piston return spring sub-assembly and the No. 1 brake cylinder to the automatic transmission case sub-assembly.
| *1 | Brake Piston Return Spring Sub-assembly |
| *2 | No. 1 Brake Cylinder |
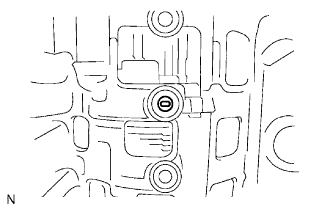 |
Check that the oil pressure apply hole of the No. 1 brake cylinder aligns with the oil pressure apply hole of the automatic transmission case sub-assembly.
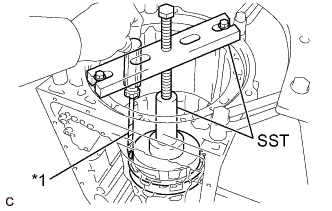 |
Using SST and a screwdriver, compress the brake piston return spring sub-assembly and install the snap ring to the automatic transmission case sub-assembly.
| *1 | Protective Tape |
| 20. INSTALL CENTER PLANETARY RING GEAR |
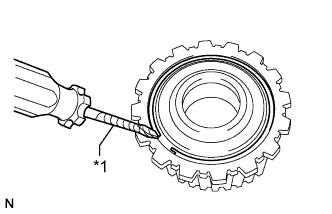 |
Install the front planetary ring gear flange sub-assembly to the center planetary ring gear.
| *1 | Protective Tape |
Using a screwdriver, install the snap ring.
Install the center planetary ring gear to the front planetary ring gear.
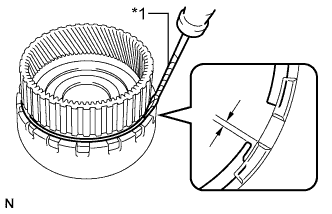 |
Using a screwdriver, install the snap ring.
| *1 | Protective Tape |
| 21. INSTALL FRONT PLANETARY RING GEAR |
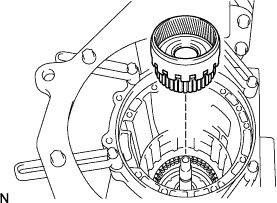 |
Install the front planetary ring gear to the automatic transmission case sub-assembly.
| 22. INSTALL FRONT PLANETARY GEAR ASSEMBLY |
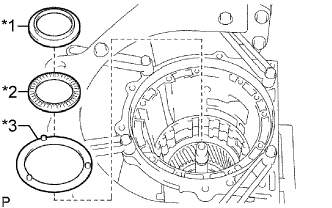 |
Install the No. 2 planetary carrier thrust washer and the front planetary flange thrust needle roller bearing.
| *1 | Front Planetary Flange Rear Thrust Bearing Race |
| *2 | Front Planetary Flange Thrust Needle Roller Bearing |
| *3 | No. 2 Planetary Carrier Thrust Washer |
| Item | Inside | Outside |
| Front planetary flange thrust needle roller bearing | 38.6 mm (1.520 in.) | 53.1 mm (2.091 in.) |
| Front planetary flange rear thrust bearing race | 34.9 mm (1.374 in.) | 50.8 mm (1.999 in.) |
Coat the front planetary flange rear thrust bearing race with petroleum jelly, and install it onto the front planetary ring gear.
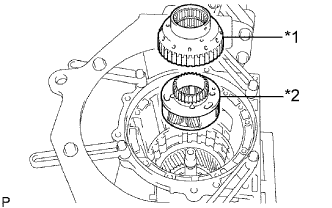 |
Install the front planetary gear assembly and the one-way clutch inner race sub-assembly to the automatic transmission case sub-assembly.
| *1 | One-way Clutch Inner Race Sub-assembly |
| *2 | Front Planetary Gear Assembly |
| 23. INSPECT PISTON STROKE OF NO. 1 BRAKE PISTON |
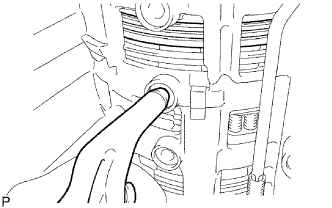 |
Make sure that the No. 1 brake piston moves smoothly when applying and releasing compressed air (392 kPa, 4.0 kgf/cm2, 57 psi).
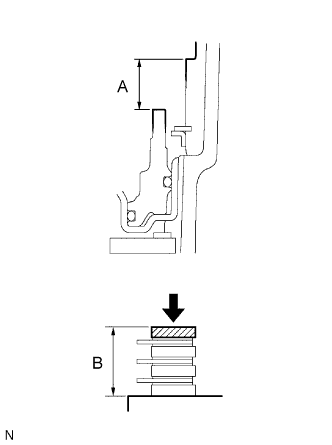 |
Using a vernier caliper, and while applying compression of 4.9 N (0.5 kgf, 1.1 lbf) or less, measure the level difference (dimension A) between the upper surface of the No. 1 brake piston and the contact surface of the No. 1 brake flange at both ends across the No. 1 brake piston diameter.
Using a vernier caliper, measure the thickness (dimension B) of the No. 1 brake flange, 3 No. 1 brake plates and the 3 No. 1 brake discs altogether at both ends across a diameter, and calculate the average.
If the piston stroke is outside the standard range, parts may have been assembled incorrectly, so check and reassemble them again.
If the piston stroke is still outside the standard range, select another No. 1 brake flange that brings the piston stroke within the standard range.
| Part No. | Mark | Thickness |
| SU003-03765 | 0 | 2.0 mm (0.0787 in.) |
| SU003-03766 | 1 | 2.2 mm (0.0866 in.) |
| SU003-03767 | 2 | 2.4 mm (0.0945 in.) |
| SU003-03768 | 3 | 2.6 mm (0.102 in.) |
| 24. INSTALL NO. 1 BRAKE DISC |
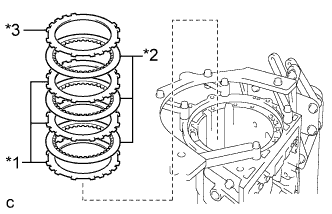 |
Install the No. 1 brake flange, 3 No. 1 brake discs and the 3 No. 1 brake plates to the automatic transmission case sub-assembly.
| *1 | No. 1 Brake Plate |
| *2 | No. 1 Brake Disc |
| *3 | No. 1 Brake Flange |
| 25. INSTALL ONE-WAY CLUTCH ASSEMBLY |
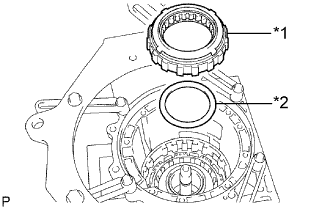 |
Install the No. 1 planetary carrier thrust washer and the one-way clutch assembly to the automatic transmission case sub-assembly.
| *1 | One-way Clutch Assembly |
| *2 | No. 1 Planetary Carrier Thrust Washer |
| 26. INSTALL 2ND BRAKE PISTON |
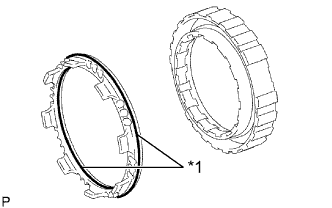 |
Coat 2 new O-rings with ATF, and install them to the 2nd brake piston.
| *1 | O-ring |
Press the 2nd brake piston into the 2nd brake cylinder.
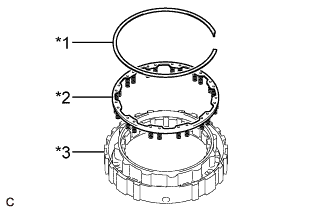 |
Using a screwdriver, install the No. 3 brake piston return spring sub-assembly to the 2nd brake cylinder with the snap ring.
| *1 | Snap Ring |
| *2 | No. 3 Brake Piston Return Spring Sub-assembly |
| *3 | 2nd Brake Cylinder |
| 27. INSTALL 2ND BRAKE CYLINDER |
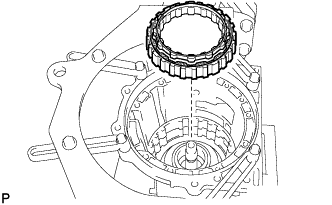 |
Install the 2nd brake cylinder to the automatic transmission case sub-assembly.
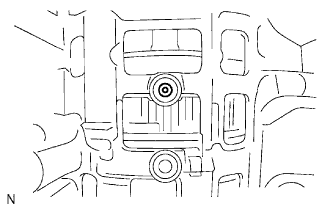 |
Check that the oil pressure apply hole of the 2nd brake cylinder aligns with the oil pressure apply hole of the automatic transmission case sub-assembly.
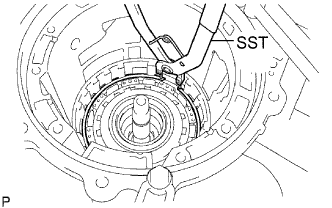 |
Using SST, install the snap ring to the automatic transmission case sub-assembly.
| 28. INSTALL NO. 3 BRAKE DISC (2ND BRAKE DISC SET) |
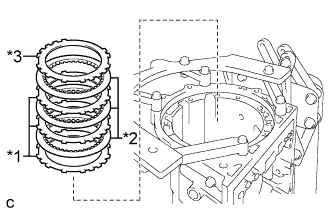 |
Install the No. 3 brake flange, 3 No. 3 brake discs and the 3 No. 3 brake plates to the automatic transmission case sub-assembly.
| *1 | No. 3 Brake Plate |
| *2 | No. 3 Brake Disc |
| *3 | No. 3 Brake Flange |
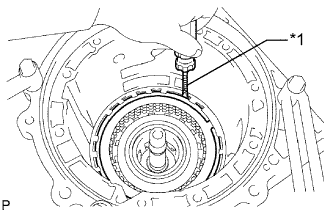 |
Using a screwdriver, install the snap ring to the automatic transmission case sub-assembly.
| *1 | Protective Tape |
| 29. INSTALL DIRECT CLUTCH PISTON SUB-ASSEMBLY |
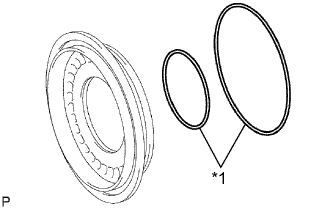 |
Coat 2 new O-rings with ATF, and install them to the direct clutch piston sub-assembly.
| *1 | O-ring |
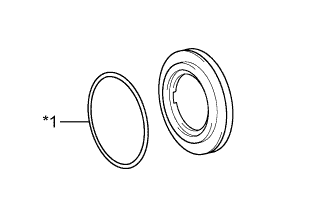 |
Coat a new O-ring with ATF, and install it to the No. 2 clutch balancer.
| *1 | O-ring |
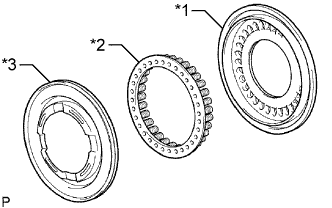 |
Install the No. 2 clutch balancer and the direct clutch return spring sub-assembly to the direct clutch piston sub-assembly.
| *1 | Direct Clutch Piston Sub-assembly |
| *2 | Direct Clutch Return Spring Sub-assembly |
| *3 | No. 2 Clutch Balancer |
Press the direct clutch piston sub-assembly into the reverse clutch drum sub-assembly by hands.
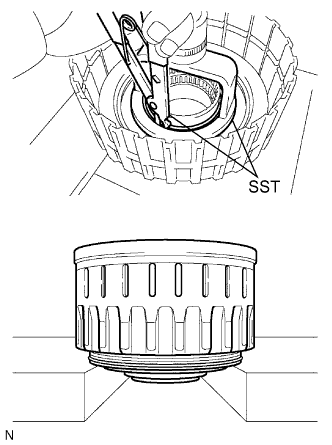 |
Place SST on the No. 2 clutch balancer, and compress the direct clutch return spring sub-assembly with a press.
Using SST, install the snap ring.
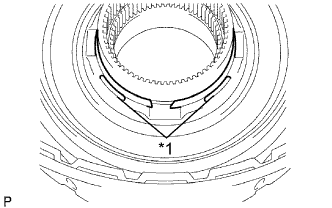 |
Set the end gap of the snap ring in the No. 2 clutch balancer as shown in the illustration.
| *1 | Stopper |
| 30. INSTALL REVERSE CLUTCH PISTON SUB-ASSEMBLY |
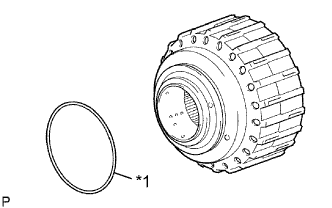 |
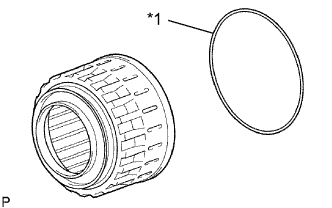
Coat a new O-ring with ATF, and install it to the reverse clutch drum sub-assembly.
| *1 | O-ring |
 |
Coat a new O-ring with ATF, and install it to the reverse clutch piston sub-assembly.
| *1 | O-ring |
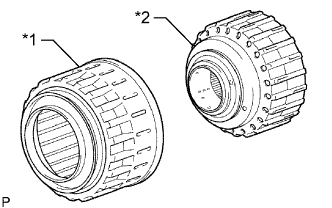 |
Press the reverse clutch drum sub-assembly into the reverse clutch piston sub-assembly with both hands.
| *1 | Reverse Clutch Piston Sub-assembly |
| *2 | Reverse Clutch Drum Sub-assembly |
| 31. INSTALL REVERSE CLUTCH RETURN SPRING SUB-ASSEMBLY |
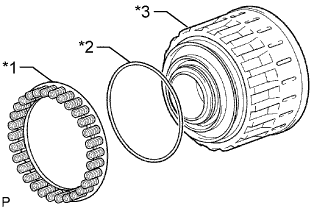 |
Coat a new O-ring with ATF, and install it to the reverse clutch piston sub-assembly.
| *1 | Reverse Clutch Return Spring Sub-assembly |
| *2 | O-ring |
| *3 | Reverse Clutch Piston Sub-assembly |
Install the reverse clutch return spring sub-assembly to the reverse clutch piston sub-assembly.
| 32. INSTALL NO. 3 CLUTCH BALANCER |
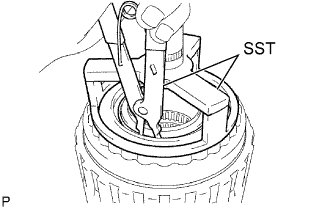 |
Install the No. 3 clutch balancer to the reverse clutch return spring sub-assembly.
Place SST on the No. 3 clutch balancer, and compress the reverse clutch return spring sub-assembly with a press.
Using SST, install the snap ring.
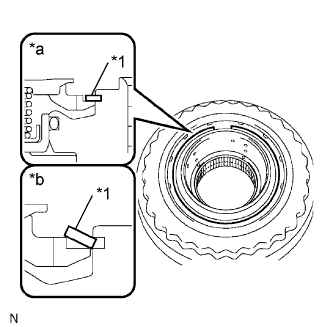 |
Set the end gap of the snap ring in the No. 3 clutch balancer as shown in the illustration.
| *1 | Snap Ring |
| *a | Correct |
| *b | Incorrect |
| 33. INSTALL NO. 2 CLUTCH DISC (DIRECT CLUTCH DISC) |
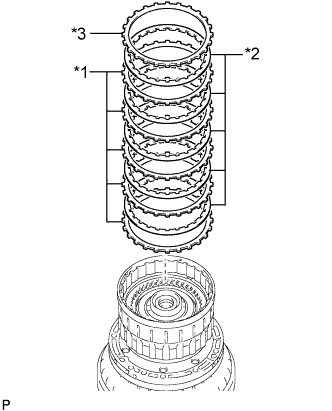 |
Install the direct clutch flange, 5 No. 2 clutch discs and the 5 No. 2 clutch plates to the reverse clutch drum sub-assembly.
| *1 | No. 2 Clutch Plate |
| *2 | No. 2 Clutch Disc |
| *3 | Direct Clutch Flange |
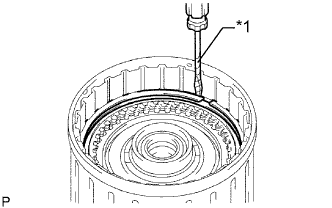 |
Using a screwdriver, install the 2 snap rings to the reverse clutch drum sub-assembly.
| *1 | Protective Tape |
| 34. INSPECT PACK CLEARANCE OF NO. 2 CLUTCH |
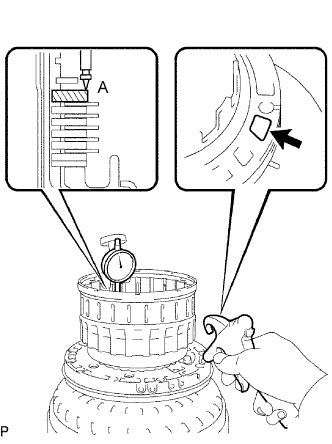 |
Using a dial indicator, measure the moving distance (distance A) of the direct clutch flange at both ends across a diameter while blowing air (392 kPa, 4.0 kgf/cm2, 57 psi) into the oil hole as shown in the illustration, and calculate the average.
If the pack clearance is outside the standard range, select and install a direct clutch flange that brings the pack clearance within the standard range.
| Part No. | Mark | Thickness |
| SU003-03756 | 0 | 3.0 mm (0.118 in.) |
| SU003-03757 | 1 | 3.1 mm (0.122 in.) |
| SU003-03758 | 2 | 3.2 mm (0.126 in.) |
| SU003-03759 | 3 | 3.3 mm (0.130 in.) |
| SU003-03760 | 4 | 3.4 mm (0.134 in.) |
| SU003-03761 | 5 | 3.5 mm (0.138 in.) |
| SU003-03762 | 6 | 3.6 mm (0.142 in.) |
| SU003-03763 | 7 | 3.7 mm (0.146 in.) |
| SU003-03764 | 8 | 3.8 mm (0.150 in.) |
| 35. INSTALL REVERSE CLUTCH FLANGE |
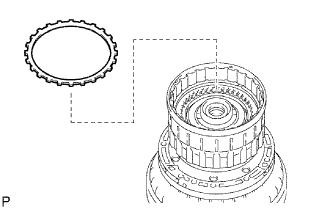 |
Install the reverse clutch flange to the reverse clutch drum sub-assembly.
| 36. INSTALL REVERSE CLUTCH REACTION SLEEVE |
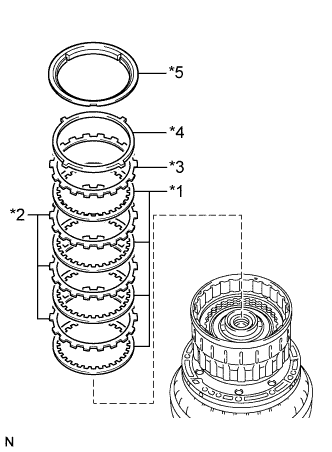 |
Install the clutch cushion plate, reverse clutch flange, 4 No. 3 clutch discs, 3 No. 3 clutch plates and the reverse clutch reaction sleeve to the reverse clutch drum sub-assembly.
| *1 | No. 3 Clutch Disc |
| *2 | No. 3 Clutch Plate |
| *3 | Reverse Clutch Flange |
| *4 | Clutch Cushion Plate |
| *5 | Reverse Clutch Reaction Sleeve |
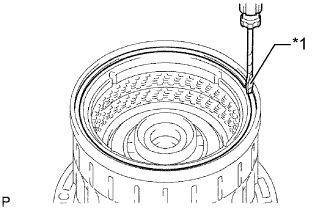 |
Using a screwdriver, install the snap ring to the reverse clutch piston sub-assembly.
| *1 | Protective Tape |
| 37. INSPECT PACK CLEARANCE OF NO. 3 CLUTCH |
Using a dial indicator, measure the reverse clutch piston stroke (distance A) and the moving distance (distance B) of the reverse clutch flange at both ends across a diameter while blowing air (392 kPa, 4.0 kgf/cm2, 57 psi) into the oil hole as shown in the illustration, and calculate the average.
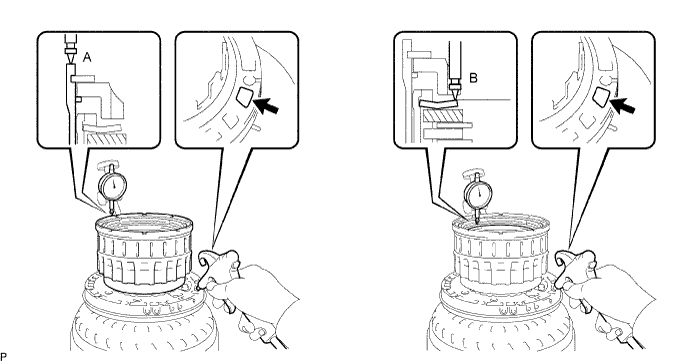
If the pack clearance is outside the standard range, select and install a reverse clutch flange that brings the pack clearance within the standard range.
| Part No. | Mark | Thickness |
| SU003-03725 | 0 | 2.4 mm (0.0945 in.) |
| SU003-03726 | 1 | 2.5 mm (0.0984 in.) |
| SU003-03727 | 2 | 2.6 mm (0.102 in.) |
| SU003-03728 | 3 | 2.7 mm (0.106 in.) |
| SU003-03729 | 4 | 2.8 mm (0.110 in.) |
| SU003-03730 | 5 | 2.9 mm (0.114 in.) |
| SU003-03731 | 6 | 3.0 mm (0.118 in.) |
| SU003-03732 | 7 | 3.1 mm (0.122 in.) |
| SU003-03733 | 8 | 3.2 mm (0.126 in.) |
| SU003-03734 | 9 | 3.3 mm (0.130 in.) |
| SU003-03735 | A | 3.4 mm (0.134 in.) |
| SU003-03736 | B | 3.5 mm (0.138 in.) |
| 38. REMOVE REVERSE CLUTCH REACTION SLEEVE |
|
Using a screwdriver, remove the snap ring from the reverse clutch piston sub-assembly.
| *1 | Protective Tape |
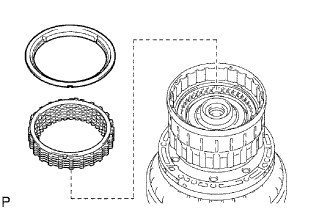 |
Remove the reverse clutch reaction sleeve, clutch cushion plate, reverse clutch flange, 4 No. 3 clutch discs and the 3 No. 3 clutch plates from the reverse clutch drum sub-assembly.
| 39. INSTALL FORWARD CLUTCH PISTON SUB-ASSEMBLY |
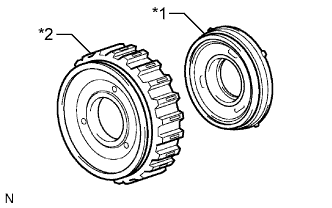 |
Install the coast clutch piston to the forward clutch piston sub-assembly.
| *1 | Coast Clutch Piston |
| *2 | Forward Clutch Piston Sub-assembly |
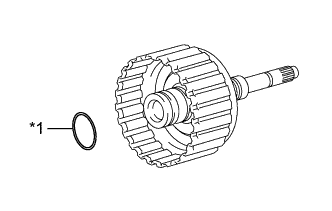 |
Coat a new O-ring with ATF, and install it to the input shaft.
| *1 | O-ring |
Install the forward clutch piston sub-assembly to the input shaft.
| 40. INSTALL NO. 1 CLUTCH BALANCER |
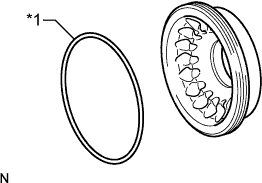 |
Coat a new D-ring with ATF, and install it to the No. 1 clutch balancer.
| *2 | D-ring |
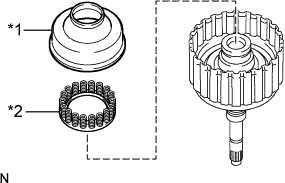 |
Install the No. 1 clutch balancer and the forward clutch return spring sub-assembly to the input shaft.
| *1 | No. 1 Clutch Balancer |
| *2 | Forward Clutch Return Spring Sub-assembly |
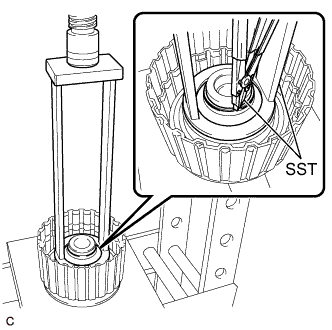 |
Place SST on the No. 1 clutch balancer, and compress the forward clutch return spring sub-assembly with a press.
Using SST, Install the snap ring.
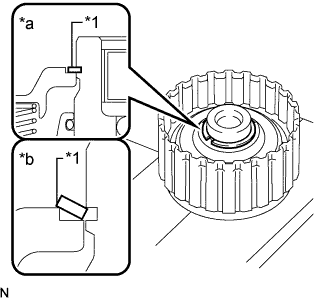 |
Set the end gap of the snap ring in the No. 1 clutch balancer as shown in the illustration.
| *1 | Snap Ring |
| *a | Correct |
| *b | Incorrect |
| 41. INSTALL NO. 4 CLUTCH DISC (COAST CLUTCH DISC) |
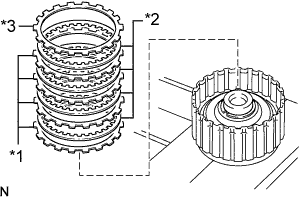 |
Install the coast clutch flange, 4 No. 4 clutch discs and the 4 No. 4 clutch plates to the forward clutch piston sub-assembly.
| *1 | No. 4 Clutch Plate |
| *2 | No. 4 Clutch Disc |
| *3 | Coast Clutch Flange |
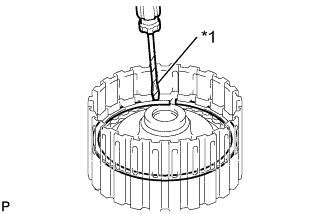 |
Using a screwdriver, install the snap ring.
| *1 | Protective Tape |
| 42. INSPECT PACK CLEARANCE OF NO. 4 CLUTCH |
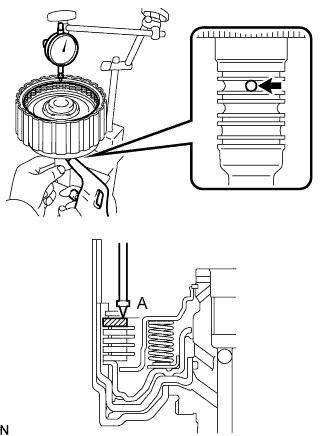 |
Using a dial indicator, measure the moving distance (distance A) of the coast clutch flange at both ends across a diameter while blowing air (196 kPa, 2.0 kgf/cm2, 28 psi) into the oil hole as shown in the illustration, and calculate the average.
If the pack clearance is outside the standard range, select and install a coast clutch flange that brings the pack clearance within the standard range.
| Part No. | Mark | Thickness |
| SU003-03746 | 0 | 3.0 mm (0.118 in.) |
| SU003-03747 | 1 | 3.1 mm (0.122 in.) |
| SU003-03748 | 2 | 3.2 mm (0.126 in.) |
| SU003-03749 | 3 | 3.3 mm (0.130 in.) |
| SU003-03750 | 4 | 3.4 mm (0.134 in.) |
| SU003-03751 | 5 | 3.5 mm (0.138 in.) |
| SU003-03752 | 6 | 3.6 mm (0.142 in.) |
| SU003-03753 | 7 | 3.7 mm (0.146 in.) |
| SU003-03754 | 8 | 3.8 mm (0.150 in.) |
| SU003-03755 | 9 | 3.9 mm (0.154 in.) |
| 43. INSTALL NO. 1 CLUTCH DISC (FORWARD CLUTCH DISC) |
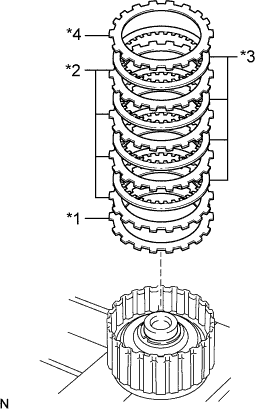 |
Install the forward clutch flange, 4 No. 1 clutch discs, 4 No. 1 clutch plates and the clutch cushion plate to the input shaft.
| *1 | Clutch Cushion Plate |
| *2 | No. 1 Clutch Plate |
| *3 | No. 1 Clutch Disc |
| *4 | Forward Clutch Flange |
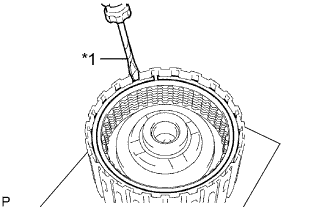 |
Using a screwdriver, install the snap ring.
| *1 | Protective Tape |
| 44. INSPECT PACK CLEARANCE OF NO. 1 CLUTCH |
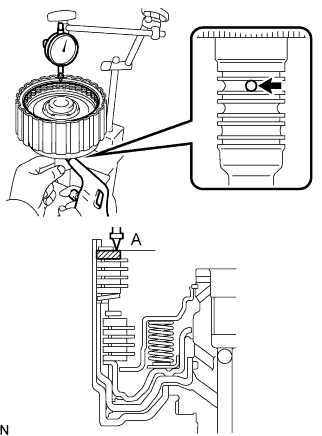 |
Using a dial indicator, measure the moving distance (distance A) of the forward clutch flange at both ends across a diameter while blowing air (196 kPa, 2.0 kgf/cm2, 28 psi) into the oil hole as shown in the illustration, and calculate the average.
If the pack clearance is outside the standard range, select and install a forward clutch flange that brings the pack clearance within the standard range.
| Part No. | Mark | Thickness |
| SU003-03712 | 0 | 3.0 mm (0.118 in.) |
| SU003-03713 | 1 | 3.1 mm (0.122 in.) |
| SU003-03714 | 2 | 3.2 mm (0.126 in.) |
| SU003-03715 | 3 | 3.3 mm (0.130 in.) |
| SU003-03716 | 4 | 3.4 mm (0.134 in.) |
| SU003-03717 | 5 | 3.5 mm (0.138 in.) |
| SU003-03718 | 6 | 3.6 mm (0.142 in.) |
| SU003-03719 | 7 | 3.7 mm (0.146 in.) |
| SU003-03720 | 8 | 3.8 mm (0.150 in.) |
| SU003-03721 | 9 | 3.9 mm (0.154 in.) |
| 45. INSTALL CLUTCH DRUM OIL SEAL RING |
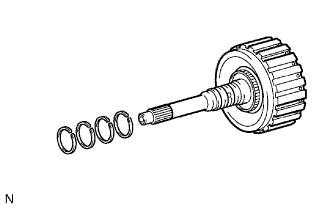 |
Coat 4 new clutch drum oil seal rings with ATF.
Squeeze the ends of the 4 clutch drum oil seal rings together, and install them to the input shaft groove.
| 46. INSTALL INPUT SHAFT |
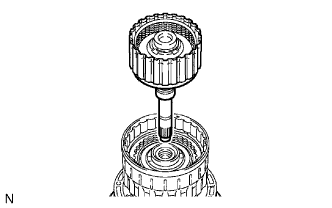 |
Install the input shaft to the reverse clutch drum sub-assembly.
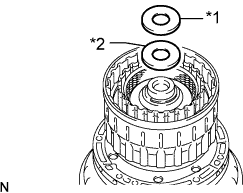 |
Install the input shaft rear thrust bearing race and the thrust needle roller bearing to the input shaft.
| *1 | Thrust Needle Roller Bearing |
| *2 | Input Shaft Rear Thrust Bearing Race |
| Item | Inside | Outside |
| Thrust needle roller bearing | 20.0 mm (0.787 in.) | 41.0 mm (1.614 in.) |
| Input shaft rear thrust bearing race | 20.0 mm (0.787 in.) | 35.6 mm (1.402 in.) |
| 47. INSTALL NO. 4 ONE-WAY CLUTCH ASSEMBLY |
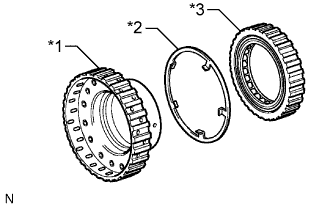 |
Install the No. 2 clutch hub thrust washer and the No. 4 one-way clutch assembly to the coast clutch hub sub-assembly.
| *1 | Coast Clutch Hub Sub-assembly |
| *2 | No. 2 Clutch Hub Thrust Washer |
| *3 | No. 4 One-way Clutch Assembly |
| 48. INSTALL COAST CLUTCH HUB SUB-ASSEMBLY |
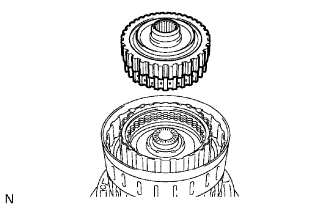 |
Install the coast clutch hub sub-assembly to the reverse clutch drum sub-assembly.
| 49. INSTALL FORWARD CLUTCH HUB SUB-ASSEMBLY |
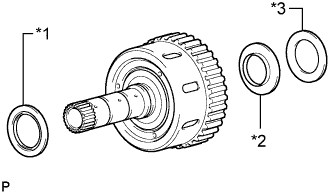 |
Install the 2 thrust needle roller bearings and the No. 2 thrust bearing race to the forward clutch hub sub-assembly.
| *1 | Thrust Needle Roller Bearing A |
| *2 | Thrust Needle Roller Bearing B |
| *3 | No. 2 Thrust Bearing Race |
| Item | Inside | Outside |
| Thrust needle roller bearing A | 42.5 mm (1.673 in.) | 61.2 mm (2.409 in.) |
| Thrust needle roller bearing B | 33.3 mm (1.311 in.) | 51.2 mm (2.016 in.) |
| No. 2 thrust bearing race | 31.0 mm (1.220 in.) | 48.0 mm (1.890 in.) |
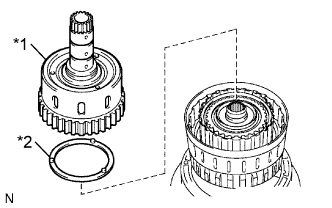 |
Install the No. 3 clutch hub thrust washer and the forward clutch hub sub-assembly to the reverse clutch drum sub-assembly.
| *1 | Forward Clutch Hub Sub-Assembly |
| *2 | No. 3 Clutch Hub Thrust Washer |
| 50. INSTALL NO. 3 CLUTCH DISC (REAR CLUTCH DISC) |
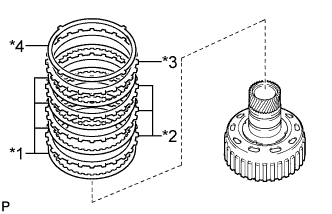 |
Install the clutch cushion plate, reverse clutch flange, 4 No. 3 clutch discs and the 3 No. 3 clutch plates to the reverse clutch hub sub-assembly.
| *1 | No. 3 Clutch Disc |
| *2 | No. 3 Clutch Plate |
| *3 | Reverse Clutch Flange |
| *4 | Clutch Cushion Plate |
| 51. INSTALL REVERSE CLUTCH REACTION SLEEVE |
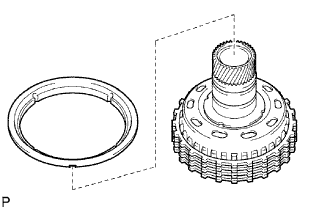 |
Install the reverse clutch reaction sleeve to the reverse clutch hub sub-assembly.
| 52. INSTALL REVERSE CLUTCH HUB SUB-ASSEMBLY |
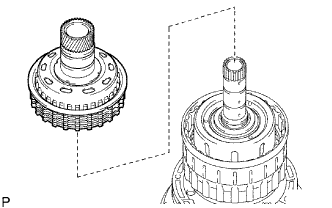 |
Install the reverse clutch hub sub-assembly to the reverse clutch drum sub-assembly.
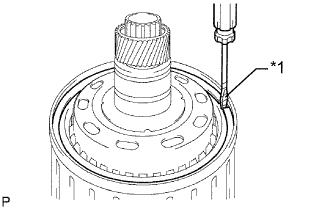 |
Using a screwdriver, install the snap ring to the reverse clutch piston sub-assembly.
| *1 | Protective Tape |
| 53. INSTALL NO. 2 ONE-WAY CLUTCH ASSEMBLY |
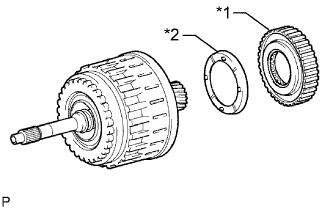 |
Install the input shaft clutch drum thrust washer and the No. 2 one-way clutch assembly to the clutch drum and input shaft assembly.
| *1 | No. 2 One-way Clutch Assembly |
| *2 | Input Shaft Clutch Drum Thrust Washer |
| 54. INSTALL CLUTCH DRUM AND INPUT SHAFT ASSEMBLY |
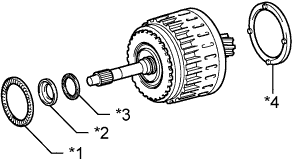 |
Install the input shaft front thrust needle roller bearing and the thrust needle roller bearing to the clutch drum and input shaft assembly.
| *1 | Thrust Needle Roller Bearing |
| *2 | Input Shaft Front Thrust Bearing Race |
| *3 | Input Shaft Front Thrust Needle Roller Bearing |
| *4 | Clutch Drum Thrust Washer |
| Item | Inside | Outside |
| Thrust needle roller bearing | 71.9 mm (2.831 in.) | 85.6 mm (3.370 in.) |
| Input shaft front thrust bearing race | 37.0 mm (1.457 in.) | 51.2 mm (2.016 in.) |
| Input shaft front thrust needle roller bearing | 33.5 mm (1.319 in.) | 48.0 mm (1.890 in.) |
Coat the input shaft front thrust bearing race and the clutch drum thrust washer with petroleum jelly, and install them onto the clutch drum and input shaft assembly.
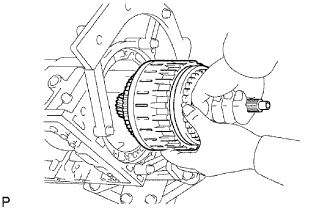 |
Install the clutch drum and input shaft assembly to the automatic transmission case sub-assembly.
| 55. INSTALL OIL PUMP ASSEMBLY |
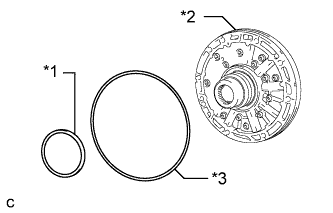 |
Install the No. 1 thrust bearing race to the oil pump assembly.
| *1 | No. 1 Thrust Bearing Race |
| *2 | Oil Pump Assembly |
| *3 | O-ring |
| Item | Inside | Outside |
| No. 1 thrust bearing race | 74.2 mm (2.921 in.) | 87.7 mm (3.453 in.) |
Coat a new O-ring with ATF, and install it to the oil pump assembly.
Place the oil pump assembly through the input shaft, and align the bolt holes of the oil pump assembly with the automatic transmission case sub-assembly.
Hold the input shaft, and lightly press the oil pump assembly to slide the clutch drum oil seal rings into the clutch drum and input shaft assembly.
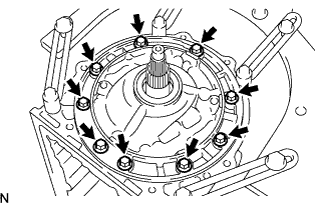 |
Install the 9 bolts.
| 56. INSPECT INDIVIDUAL PISTON OPERATION |
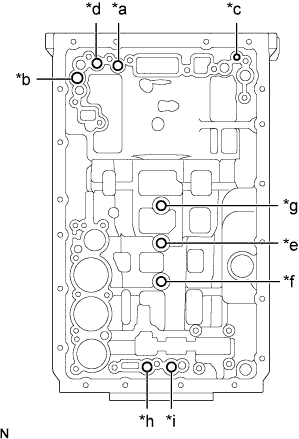 |
Check the operating sound while applying compressed air into the oil holes indicated in the illustration.
| *a | No. 1 Clutch |
| *b | No. 2 Clutch |
| *c | No. 3 Clutch |
| *d | No. 4 Clutch |
| *e | No. 1 Brake |
| *f | No. 2 Brake |
| *g | No. 3 Brake |
| *h | No. 4 Brake (In) |
| *i | No. 4 Brake (Out) |
| 57. INSTALL MANUAL VALVE LEVER SHAFT OIL SEAL |
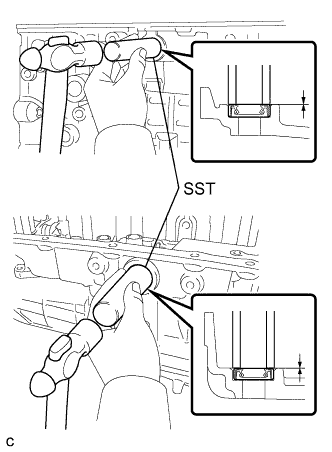 |
Using SST and a hammer, drive in 2 new manual valve lever shaft oil seals to the automatic transmission case sub-assembly.
Coat the manual valve lever shaft oil seal lips with MP grease.
| 58. INSTALL MANUAL VALVE LEVER SUB-ASSEMBLY |
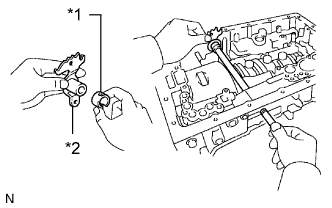 |
Install a new spacer to the manual valve lever sub-assembly.
| *1 | Spacer |
| *2 | Manual Valve Lever Sub-assembly |
Install the manual valve lever shaft to the automatic transmission case sub-assembly through the manual valve lever sub-assembly.
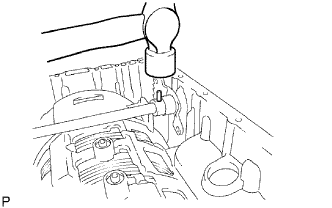 |
Using a hammer, drive in a new spring pin.
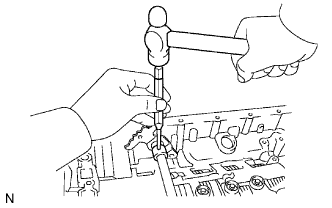 |
Align the manual valve lever indentation with the spacer hole, and stake them together with a punch.
Make sure that the shaft rotates smoothly.
| 59. INSTALL PARKING LOCK PAWL SHAFT |
Install a new E-ring to the parking lock pawl shaft.
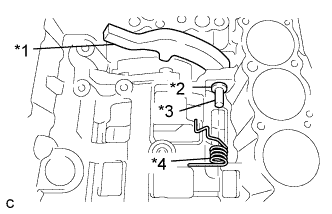 |
Install the parking lock pawl, parking lock pawl shaft and the torsion spring to the automatic transmission case sub-assembly.
| *1 | Parking Lock Pawl |
| *2 | E-ring |
| *3 | Parking Lock Pawl Shaft |
| *4 | Torsion Spring |
| 60. INSTALL PARKING LOCK ROD SUB-ASSEMBLY |
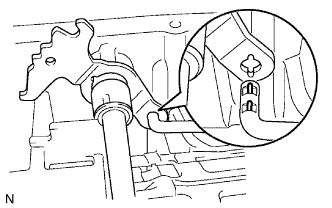 |
Install the parking lock rod sub-assembly to the manual valve lever sub-assembly.
| 61. INSTALL PARKING LOCK PAWL BRACKET |
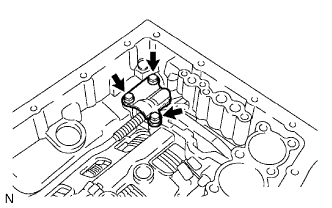 |
Install the parking lock pawl bracket to the automatic transmission case sub-assembly with the 3 bolts.
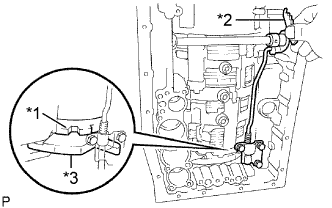 |
Shift the manual valve lever sub-assembly to the P position, and confirm that the rear planetary gear is correctly locked by the parking lock pawl.
| *1 | Rear Planetary Gear |
| *2 | Manual Valve Lever Sub-assembly |
| *3 | Parking Lock Pawl |
| 62. INSTALL B-1 ACCUMULATOR VALVE |
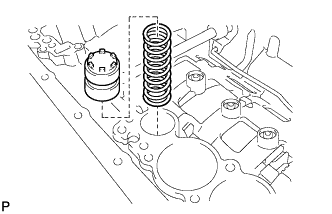 |
Install the spring and the B-1 accumulator valve to the hole.
| Free Length | Outer Diameter | Color |
| 46.36 mm (1.825 in.) | 17.1 mm (0.673 in.) | Natural |
| 63. INSTALL C-3 ACCUMULATOR PISTON |
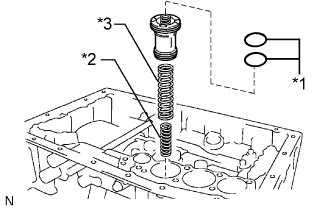 |
Coat 2 new O-rings with ATF, and install them to the C-3 accumulator piston.
| *1 | O-ring |
| *2 | Inner Spring |
| *3 | Outer Spring |
Install the 2 springs and the C-3 accumulator piston to the hole.
| Spring | Free Length | Outer Diameter | Color |
| Inner | 44.0 mm (1.732 in.) | 14.0 mm (0.551 in.) | Yellow |
| Outer | 76.65 mm (3.018 in.) | 20.1 mm (0.791 in.) | White |
| 64. INSTALL B-3 ACCUMULATOR PISTON |
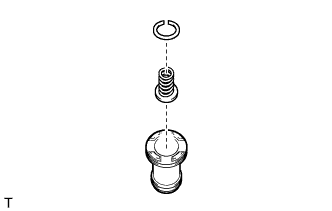 |
Using a screwdriver, install the spring sub-assembly to the B-3 accumulator piston with the snap ring.
| Free Length | Coil Outer Diameter | Color |
| 25.77 mm (1.015 in.) | 16.3 mm (0.642 in.) | Purple |
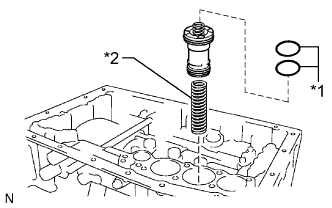 |
Coat 2 new O-rings with ATF, and install them to the B-3 accumulator piston.
| *1 | O-ring |
| *2 | Spring |
Install the spring and the B-3 accumulator piston to the hole.
| Free Length | Outer Diameter | Color |
| 70.5 mm (2.776 in.) | 19.7 mm (0.776 in.) | Purple |
| 65. INSTALL C-2 ACCUMULATOR PISTON |
|
Using a screwdriver, install the spring sub-assembly to the C-2 accumulator piston with the snap ring.
| Free Length | Coil Outer Diameter | Color |
| 15.16 mm (0.597 in.) | 11.3 mm (0.447 in.) | Natural |
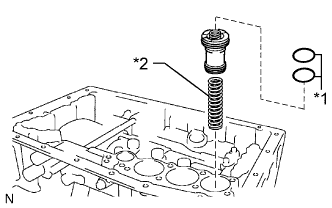 |
Coat 2 new O-rings with ATF, and install them to the C-2 accumulator piston.
| *1 | O-ring |
| *2 | Spring |
Install the spring and the C-2 accumulator piston to the hole.
| Free Length | Outer Diameter | Color |
| 65.07 mm (2.562 in.) | 16.2 mm (0.638 in.) | Pink |
| 66. INSTALL CHECK BALL BODY |
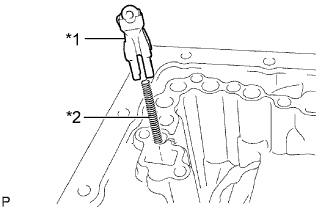 |
Install the check ball body and the compression spring to the automatic transmission case sub-assembly.
| *1 | Check Ball Body |
| *2 | Compression Spring |
| 67. INSTALL BRAKE DRUM GASKET |
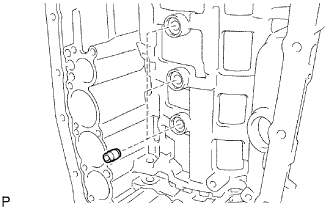 |
Install 3 new brake drum gaskets to the automatic transmission case sub-assembly.
| 68. INSTALL TRANSMISSION CASE GASKET |
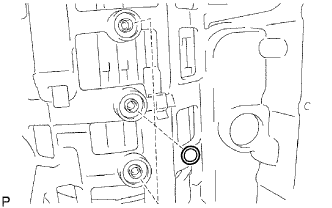 |
Install 3 new transmission case gaskets to the automatic transmission case sub-assembly.
| 69. INSTALL TRANSMISSION VALVE BODY ASSEMBLY |
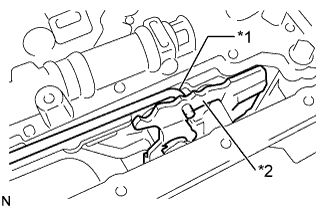 |
Connect the manual valve connecting rod sub-assembly to the manual valve lever sub-assembly.
| *1 | Manual Valve Connecting Rod Sub-assembly |
| *2 | Manual Valve Lever Sub-assembly |
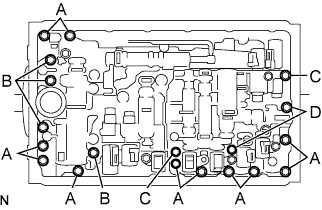 |
Install the transmission valve body assembly to the automatic transmission case sub-assembly with the 19 bolts.
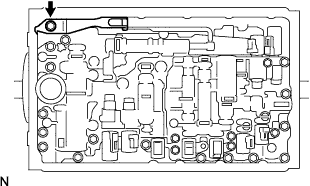 |
Install the detent spring and the detent spring cover to the transmission valve body assembly with the bolt.
| 70. INSTALL TRANSMISSION WIRE |
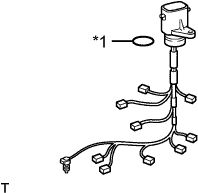 |
Coat a new O-ring with ATF, and install it to the transmission wire.
| *1 | O-ring |
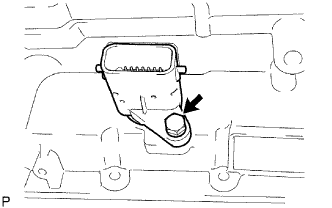 |
Install the transmission wire with the bolt.
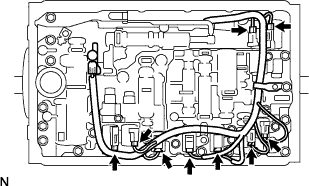 |
Connect the 9 solenoid valve connectors.
Coat the ATF temperature sensor O-ring with ATF.
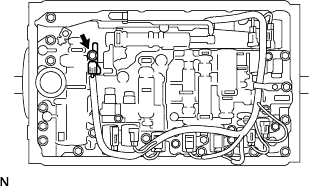 |
Install the ATF temperature sensor and the temperature sensor clamp with the bolt.
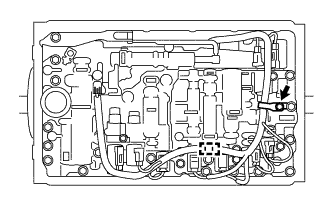 |
Install the valve body wire harness clamp with the 2 bolt.
Engage the wire harness clamp.
| 71. INSTALL VALVE BODY OIL STRAINER ASSEMBLY |
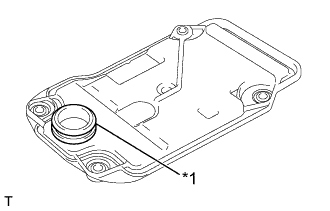 |
Coat a new O-ring with ATF, and install it to the valve body oil strainer assembly.
| *1 | O-ring |
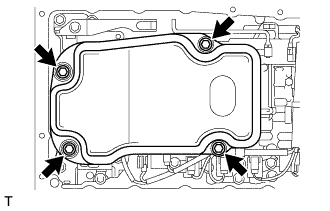 |
Install the valve body oil strainer assembly to the transmission valve body assembly with the 4 bolts.
| 72. INSTALL AUTOMATIC TRANSMISSION OIL PAN SUB-ASSEMBLY |
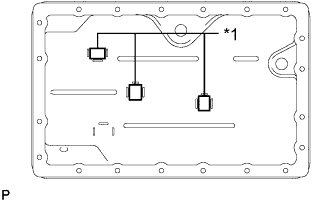 |
Install the 3 transmission oil cleaner magnets to the automatic transmission oil pan sub-assembly.
| *1 | Transmission Oil Cleaner Magnet |
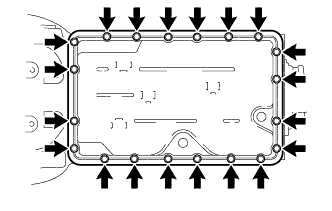 |
Install a new automatic transmission oil pan gasket and the automatic transmission oil pan sub-assembly with the 20 bolts.
Install the drain plug and a new gasket.
Using a socket hexagon wrench 5 mm, install the overflow plug and a new gasket.
| 73. INSTALL OUTPUT SHAFT THRUST BEARING |
Install the output shaft thrust bearing race, output shaft thrust bearing and the rear output shaft thrust bearing race to the output shaft of the rear planetary gear assembly.
| Item | Inside | Outside |
| Output shaft thrust bearing race | 37.0 mm (1.457 in.) | 51.2 mm (2.016 in.) |
| Output shaft thrust bearing | 36.1 mm (1.421 in.) | 52.5 mm (2.067 in.) |
| Rear output shaft thrust bearing race | 36.1 mm (1.421 in.) | 51.0 mm (2.007 in.) |
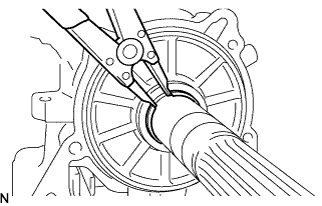 |
Using a snap ring expander, install the snap ring.
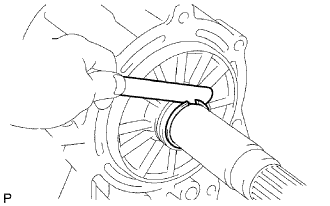 |
Using a feeler gauge, measure the clearance between the snap ring and the rear output shaft thrust bearing race.
| Part No. | Mark | Thickness |
| SU003-03819 |  | 3.80 mm (0.150 in.) |
| SU003-03820 |  | 3.85 mm (0.152 in.) |
| SU003-03821 |  | 3.90 mm (0.154 in.) |
| SU003-03822 |  | 3.95 mm (0.156 in.) |
| SU003-03823 |  | 4.00 mm (0.157 in.) |
| SU003-03824 |  | 4.05 mm (0.159 in.) |
| SU003-03825 |  | 4.10 mm (0.161 in.) |
| SU003-03826 |  | 4.15 mm (0.163 in.) |
| SU003-03827 |  | 4.20 mm (0.165 in.) |
| SU003-03828 |  | 4.25 mm (0.167 in.) |
| SU003-03829 |  | 4.30 mm (0.169 in.) |
| SU003-0383 |  | 4.35 mm (0.171 in.) |
| 74. INSTALL AUTOMATIC TRANSMISSION EXTENSION HOUSING OIL SEAL |
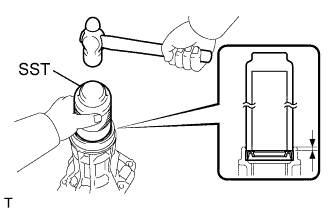 |
Using SST and a hammer, drive in the automatic transmission extension housing oil seal to the extension housing sub-assembly.
Coat the lip of a new automatic transmission extension housing oil seal with MP grease.
| 75. INSTALL EXTENSION HOUSING DUST DEFLECTOR |
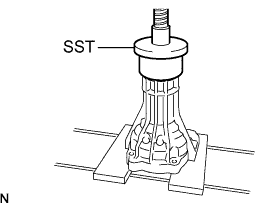 |
Using SST and a press, install a new extension housing dust deflector to the extension housing sub-assembly.
| 76. INSTALL TRANSMISSION CASE ADAPTER RADIAL BALL BEARING |
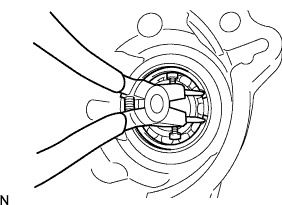 |
Install the transmission case adapter radial ball bearing to the extension housing sub-assembly.
Using snap ring pliers, install the snap ring to the extension housing sub-assembly.
| 77. INSTALL EXTENSION HOUSING SUB-ASSEMBLY |
Clean and degrease the threads of the 6 bolts and the contact surfaces of the case and the housing with non-residue solvent.
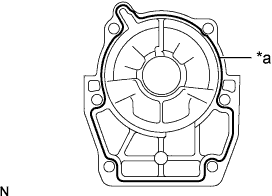 |
Apply seal packing to the extension housing sub-assembly as shown in the illustration.
| *a | Seal Packing (Seal Diameter: 1.2 mm (0.0472 in.)) |
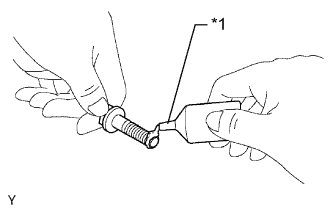 |
Apply adhesive to 2 or 3 threads on the end of the 6 bolts.
| *1 | Adhesive |
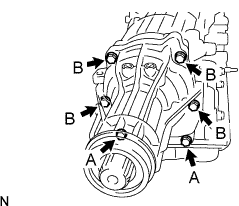 |
Install the extension housing sub-assembly to the automatic transmission case sub-assembly with the 6 bolts.
| 78. INSTALL AUTOMATIC TRANSMISSION HOUSING |
Clean and degrease the bolts and the bolt holes with non-residue solvent.
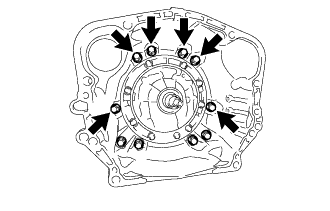 |
Install the automatic transmission housing to the automatic transmission case sub-assembly with the 6 bolts.
|
Apply adhesive to 2 or 3 threads on the end of the 4 bolts.
| *1 | Adhesive |
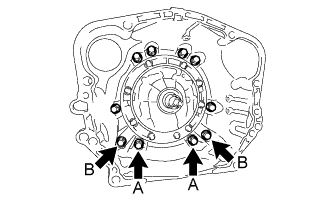 |
Install the automatic transmission housing to the automatic transmission case sub-assembly with the 4 bolts.
| 79. INSTALL AUTOMATIC TRANSMISSION CASE PLUG |
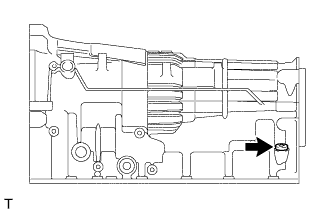 |
Coat a new O-ring with ATF, and install it to the automatic transmission case plug.
Using "TORX" socket wrench T55, install the automatic transmission case plug to the automatic transmission case sub-assembly.
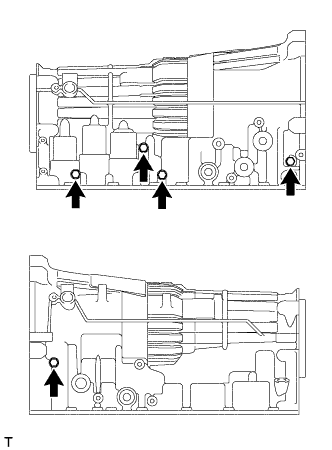 |
Coat 5 new O-ring with ATF, and install it to the 5 automatic transmission case plug.
Install the 5 automatic transmission case plugs to the automatic transmission case sub-assembly.
| 80. INSTALL AUTOMATIC TRANSMISSION BREATHER TUBE |
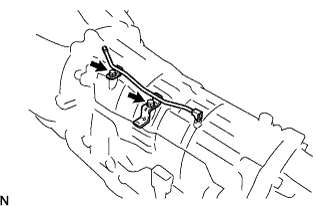 |
Install the automatic transmission breather tube to the automatic transmission case sub-assembly with the 2 bolts.
| 81. INSTALL TRANSMISSION REVOLUTION SENSOR |
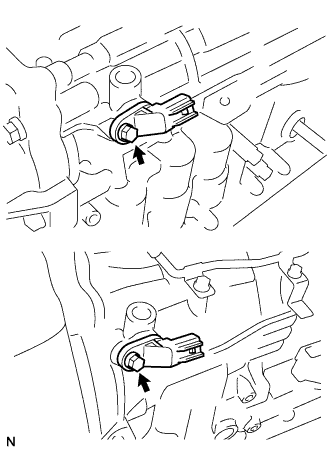 |
Coat 2 new O-rings with ATF, and install them to the 2 transmission revolution sensors.
Install the 2 transmission revolution sensors to the automatic transmission case sub-assembly with the 2 bolts.
| 82. INSTALL OIL COOLER TUBE UNION |
Coat 2 new O-rings with ATF, and install the 2 oil cooler tube unions.
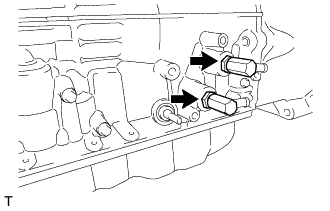 |
Install the 2 oil cooler tube unions to the automatic transmission case sub-assembly.
| 83. INSTALL PARK/NEUTRAL POSITION SWITCH ASSEMBLY |
Clean the bolt and the bolt hole.
|
Apply adhesive to 2 or 3 threads on the end of the bolt.
| *1 | Adhesive |
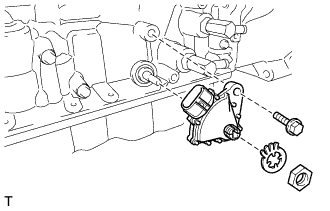 |
Temporarily install the park/neutral position switch assembly to the automatic transmission case sub-assembly with the bolt.
Install a new lock washer and the nut.
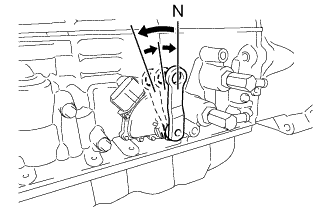 |
Turn the transmission control shaft lever RH counterclockwise until it stops, and turn it clockwise 2 notches to set it to the N position.
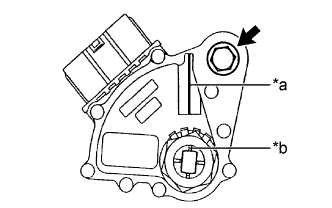 |
Align the neutral basic line with the groove as shown in the illustration, and tighten the bolt.
| *a | Neutral Basic Line |
| *b | Groove |
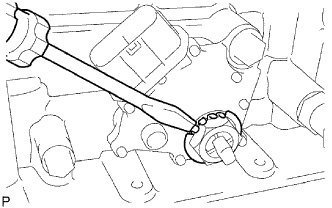 |
Using a screwdriver, bend the tabs of the lock washer.
| 84. INSTALL TRANSMISSION CONTROL SHAFT LEVER RH |
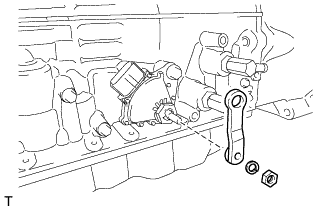 |
Install the transmission control shaft lever RH to the park/ neutral position switch assembly with the spring washer and nut.
| 85. INSTALL REFILL PLUG |
Coat a new O-ring with ATF, and install it to the refill plug.
Install the refill plug.