 |
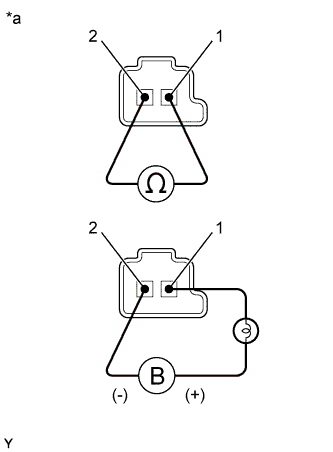
Measure the resistance according to the value(s) in the table below.
| *a | Component without harness connected (Shift Solenoid Valve SL1 and SL2) |
- Standard Resistance:
Tester Connection Condition Specified Condition 1 - 2 20°C (68°F) 5.0 to 5.6 Ω
VALVE BODY ASSEMBLY > INSPECTION |
| 1. INSPECT SHIFT SOLENOID VALVE SL1 AND SL2 |
|
Measure the resistance according to the value(s) in the table below.
| *a | Component without harness connected (Shift Solenoid Valve SL1 and SL2) |
| Tester Connection | Condition | Specified Condition |
| 1 - 2 | 20°C (68°F) | 5.0 to 5.6 Ω |
Connect the positive (+) lead with a 21 W bulb to terminal 1 and the negative (-) lead to terminal 2 of the shift solenoid valve connector, then check the movement of the valve.
| 2. INSPECT SHIFT SOLENOID VALVE S1 |
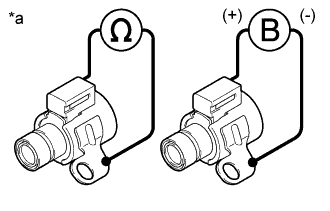 |
Measure the resistance according to the value(s) in the table below.
| *a | Component without harness connected (Shift Solenoid Valve S1) |
| Tester Connection | Condition | Specified Condition |
| Shift solenoid valve S1 connector terminal - Shift solenoid valve S1 body | 20°C (68°F) | 11 to 15 Ω |
Connect the positive (+) lead to the terminal of the shift solenoid valve S1 connector, and the negative (-) lead to the shift solenoid valve S1 body.
| 3. INSPECT SHIFT SOLENOID VALVE S2 |
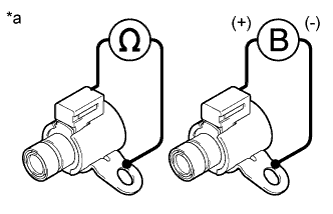 |
Measure the resistance according to the value(s) in the table below.
| *a | Component without harness connected (Shift Solenoid Valve S2) |
| Tester Connection | Condition | Specified Condition |
| Shift solenoid valve S2 connector terminal - Shift solenoid valve S2 body | 20°C (68°F) | 11 to 15 Ω |
Connect the positive (+) lead to the terminal of the shift solenoid valve S2 connector, and the negative (-) lead to the shift solenoid valve S2 body.
| 4. INSPECT SHIFT SOLENOID VALVE S3 |
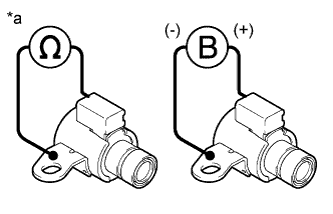 |
Measure the resistance according to the value(s) in the table below.
| *a | Component without harness connected (Shift Solenoid Valve S3) |
| Tester Connection | Condition | Specified Condition |
| Shift solenoid valve S3 connector terminal - Shift solenoid valve S3 body | 20°C (68°F) | 11 to 15 Ω |
Connect the positive (+) lead to the terminal of the shift solenoid valve S3 connector, and the negative (-) lead to the shift solenoid valve S3 body.
| 5. INSPECT SHIFT SOLENOID VALVE S4 |
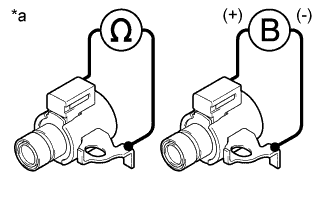 |
Measure the resistance according to the value(s) in the table below.
| *a | Component without harness connected (Shift Solenoid Valve S4) |
| Tester Connection | Condition | Specified Condition |
| Shift solenoid valve S4 connector terminal - Shift solenoid valve S4 body | 20°C (68°F) | 11 to 15 Ω |
Connect the positive (+) lead to the terminal of the shift solenoid valve S4 connector, and the negative (-) lead to the shift solenoid valve S4 body.
| 6. INSPECT SHIFT SOLENOID VALVE SR |
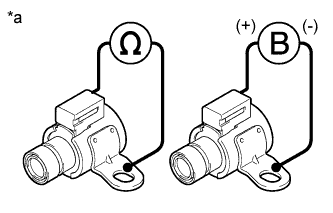 |
Measure the resistance according to the value(s) in the table below.
| *a | Component without harness connected (Shift Solenoid Valve SR) |
| Tester Connection | Condition | Specified Condition |
| Shift solenoid valve SR connector terminal - Shift solenoid valve SR body | 20°C (68°F) | 11 to 15 Ω |
Connect the positive (+) lead to the terminal of the shift solenoid valve SR connector, and the negative (-) lead to the shift solenoid valve SR body.
| 7. INSPECT SHIFT SOLENOID VALVE SLT |
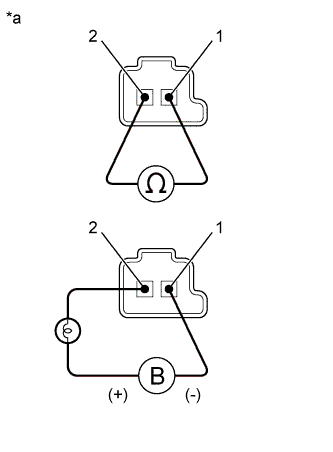 |
Measure the resistance according to the value(s) in the table below.
| *a | Component without harness connected (Shift Solenoid Valve SLT) |
| Tester Connection | Condition | Specified Condition |
| 1 - 2 | 20°C (68°F) | 5.0 to 5.6 Ω |
Connect the positive (+) lead with a 21 W bulb to terminal 2 and the negative (-) lead to terminal 1 of the shift solenoid valve SLT connector, then check the movement of the valve.
| 8. INSPECT SHIFT SOLENOID VALVE SLU |
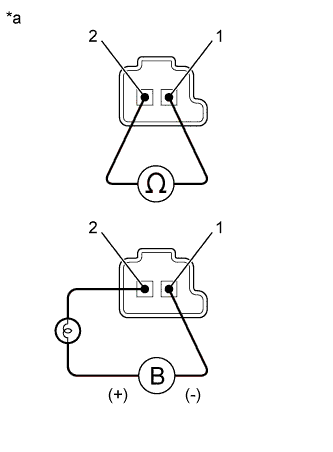 |
Measure the resistance according to the value(s) in the table below.
| *a | Component without harness connected (Shift Solenoid Valve SLU) |
| Tester Connection | Condition | Specified Condition |
| 1 - 2 | 20°C (68°F) | 5.0 to 5.6 Ω |
Connect the positive (+) lead with a 21 W bulb to terminal 2 and the negative (-) lead to terminal 1 of the shift solenoid valve SLU connector, then check the movement of the valve.