Home › Engine / Hybrid System › FA20 INTAKE / EXHAUST › EXHAUST PIPE

EXHAUST PIPE > INSTALLATION

for Preparation Click here


1. INSTALL FRONT EXHAUST PIPE SUB-ASSEMBLY
  1. Rope up the front exhaust pipe sub-assembly to the front suspension crossmember.

    HINT:
    This operation is necessary in order to prevent the front exhaust pipe sub-assembly from falling off.

  1. Remove the SST.

    SST
    09250-53010  


2. INSTALL TAIL PIPE BAFFLE (w/ Rear Spoiler)


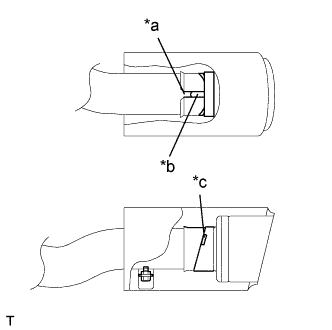
  1. with knee airbag:


      A280286E01
    1. Align the cutout section of the tail pipe baffle with the protrusion of the exhaust pipe assembly tail as shown in the illustration.
      Text in Illustration 
      *a
      Cutout Section
      *b
      Protrusion
      *c
      Stopper

    2. Press in the tail pipe baffle until its stopper contacts that of the tail exhaust pipe assembly.

    3. Install the 2 bolts and the 2 tail pipe baffles.

      Torque:
      7.5 N*m{ 76 kgf*cm , 66 in.*lbf }


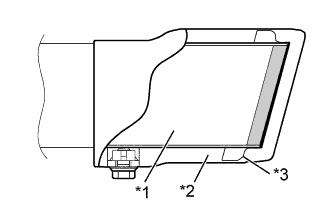
  1. without knee airbag:


      A282937E01
    1. Press in the tail pipe baffle until the tail exhaust pipe assembly plate contact shown in the illustration.
      Text in Illustration 
      *1
      Tail Exhaust Pipe Assembly
      *2
      Tail Pipe Baffle
      *3
      Plate
      V100145
      Contact area

    2. Install the 2 bolts and the 2 tail pipe baffles.

      Torque:
      7.5 N*m{ 76 kgf*cm , 66 in.*lbf }


3. INSTALL TAIL EXHAUST PIPE ASSEMBLY
  1. Install the 4 cushion rubbers and the tail exhaust pipe assembly.


4. INSTALL CENTER EXHAUST PIPE ASSEMBLY
  1. Install the center exhaust pipe assembly with the cushion rubber.

  1. Install the 2 new gaskets and the center exhaust pipe assembly with the 2 new nuts and the 2 bolts.

    Torque:
    48 N*m{ 490 kgf*cm , 35 ft.*lbf }

    NOTICE:
    1. Do not reuse the gaskets.
    2. Do not reuse the nuts.


5. INSTALL FRONT EXHAUST PIPE ASSEMBLY
  1. Temporarily install the front exhaust pipe assembly to the bracket with the bolt.

  1. Install the new gaskets and the front exhaust pipe assembly to the center exhaust pipe assembly with the 2 nuts.

    Torque:
    18 N*m{ 184 kgf*cm , 13 ft.*lbf }

    NOTICE:
    1. Do not reuse the gaskets.
    2. Do not reuse the nuts.

  1. Install the new gaskets and the front exhaust pipe assembly to the front exhaust pipe sub-assembly with the 2 new nuts.

    Torque:
    43 N*m{ 439 kgf*cm , 32 ft.*lbf }

    NOTICE:
    1. Do not reuse the gaskets.
    2. Do not reuse the nuts.

  1. Fully tighten the bolt.

    Torque:
    50 N*m{ 510 kgf*cm , 37 ft.*lbf }


6. INSPECT FOR EXHAUST GAS LEAK
  1. If gas is leaking, tighten the areas necessary to stop the leak. Replace the damaged parts as necessary.


7. INSTALL NO. 2 ENGINE UNDER COVER
  1. Install the 7 bolts and the No. 2 engine under cover.

    Torque:
    7.5 N*m{ 76 kgf*cm , 66 in.*lbf }


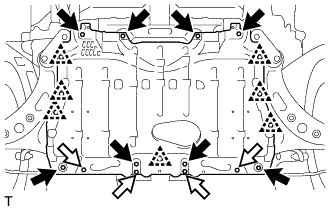
8. INSTALL NO. 1 ENGINE UNDER COVER


    A280546
  1. Install the No. 1 engine under cover with the 12 bolts and engage the 7 clips.
    V100135
    Bolt A
    V100136
    Bolt B

    Torque:
    Bolt A:
    30 N*m{ 306 kgf*cm , 22 ft.*lbf }
    Bolt B:
    7.5 N*m{ 76 kgf*cm , 66 in.*lbf }